
Summer Garden Granny Square. I love making Granny Squares.
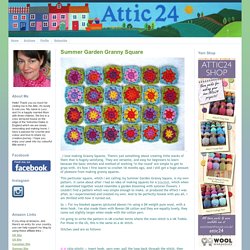
There's just something about creating little stacks of them that is hugely satisfying. They are versatile, and easy for beginners to learn because the basic stitches and method of working "in the round" are simple to get to grips with. It's how I first learnt to crochet 18 months ago, and I still get a huge amount of pleasure from making granny squares. This particular square, which I am calling my Summer Garden Granny Square, is my own pattern. It came about after I had an idea of making squares for a blanket, which when all assembled together would resemble a garden blooming with summer flowers.
So :: For my blanket squares (pictured above) I'm using a DK weight pure wool, with a 4mm hook. I'm going to write the pattern in UK crochet terms where the main stitch is a UK Treble. Stitches used are as follows: sl st (slip stitch) :: insert hook, yarn over, pull the loop back through the stitch, then through the loop on your hook. To Start :: I know. DIY – Le mobile Cloud and Bird (les moineaux ont la tête dans les nuages) - Carnets Parisiens. Il y a des jours où je n’arrive vraiment pas à trouver l’inspiration pour vous écrire quelques lignes avant de vous mettre des photos.
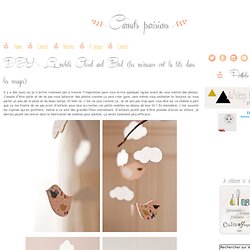
J’essaie d’être polie et de ne pas vous balancer des photos comme ça sans crier gare, sans même vous souhaiter le bonjour ou vous parler un peu de la pluie et du beau temps. Et bien là, c’est un jour comme ça. Je ne sais pas trop quoi vous dire sur ce mobile à part que ça me frustre de ne pas avoir d’enfants pour leur accrocher ces petits mobiles au-dessus de leur lit ! En attendant, c’est souvent les copines qui en profitent, même si ce sont des grandes filles maintenant. D’ailleurs plutôt que d’être pressée d’avoir un enfant, je devrais plutôt me lancer dans la fabrication de mobiles pour adultes, ça serait sûrement plus efficace. Pour un mobile pioupiou, il vous faudra : Deux branches de bois bien sèches Du fil doré et une aiguille à coudre De la colle Un cutter Un clou et un marteau Du carton assez épais De jolis papiers.
DIY - Bird Cage Lanterns. ~on a silhouette kick~ Tutorials. Mitsy from Artmind has a little tutorial she's offered to post here for us today.

A fun Sunday detour. Check below for a link to her blog as she'll be giving away some of them from there. A while ago, I received this awesome leather punch set from EviesToolEmporium as part of the Totally Tutorials Exchange program and I could hardly wait to make something with my new toys! In Belgium, lots of people make an Easter tree as decoration. All bare branches are dressed up with decorative eggs and ribbons. Happy Hippity Hop! Handmade stencils and silhouettes. My new friend, Heika DeHart, shared these images of her daughter Aspen’s adorable bedroom.
Nearly every decoration in the room was created from scratch by Heika herself. My favorite project is the stunning dresser. I loved the result so much, I asked her to share her instructions. She tells how she made her own stencils, how she cut silhouettes of her daughter, and more. Thanks, Heika! How to: Stenciled dresser.
Crafty Nest. Easter Egg BLING! MADE: TUTORIALS. By Dana on July 2, 2008 Click an image below for step-by-step instructions and easy sewing projects.

Don’t worry…we won’t leave you hanging! We’ve got all the nitty gritty details. So click around and have fun. Something quick for the Easter Bunny. No you aren't seeing things this is a repost of my fabric carrots from last year .
I lot of blogs have added my carrots to their listings. A Quick Way to Make Everyday Bottles Display Worthy Canadian House and Home. A Super Easy Kitchen Backsplash Update. Design*Sponge » Blog Archive » diy wednesdays: table lanterns. Design*Sponge » Blog Archive » sewing 101: zippered case. It’s back-to-school time, and it’s hard not to have school supplies on the brain even if school days are nowhere in sight for some of us!
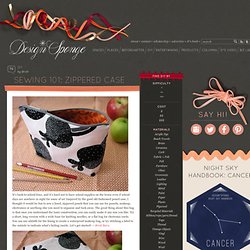
Inspired by the good old-fashioned pencil case, I thought it would be fun to sew a lined, zippered pouch that you can use for pencils, makeup, electronics or anything else you need to organize and tuck away. The great thing about this bag is that once you understand the basic construction, you can easily make it any size you like. Design*Sponge » Blog Archive » paper scrap recycling. Today’s projects are ones that use up old bits of paper scraps I can’t bear to throw away.
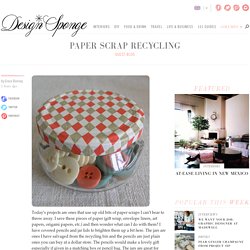
I save these pieces of paper (gift wrap, envelope liners, art papers, origami papers, etc.) and then wonder what can I do with them? I have covered pencils and jar lids to brighten them up a bit here. The jars are ones I have salvaged from the recycling bin and the pencils are just plain ones you can buy at a dollar store. The pencils would make a lovely gift especially if given in a matching box or pencil bag.
The jars are great for organizing or gift packaging. Design*Sponge » Blog Archive » diy project: paper bag lanterns. The bbbcraft sisters love parties!
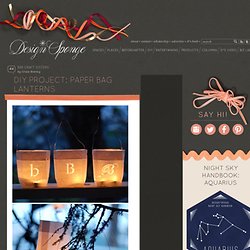
And what’s more important at a party than lighting? With a couple of photographers in our family, we have always had to focus on both indoor and outdoor lighting at parties, making it soft and cozy and above all, inviting. nothing captures this more than a little bit of diffused candle light. we wanted to create an inexpensive way of creating our own indoor and outdoor lighting and came up with these paper bag lanterns. -bbb craft sisters CLICK HERE for the full how-to after the jump! What you need: 1. white paper bags (3.5” x 6.5” we found these , paper bags online on amazon) 2. bone folder 3. pencil 3. stencils and/or stamps and white stamp pad 4. x-acto knife 5. small piece of cardboard 6. 22 gauge wire, cut in to 17” segments 7. grommets and grommet pliers 8. tea lights 9. long matches or long lighter what you do: 2. slide the small piece of cardboard in the flat bag, so you have a surface to cut on without cutting through the other side of the bag.
Design*Sponge » Blog Archive » diy wednesdays (part 1): felted nesting bowls. Design*Sponge » Blog Archive » diy idea: bird mobile. Design*Sponge » Blog Archive » diy project: alexandra hedin’s family portraits. Design*Sponge » Blog Archive » diy wednesdays: drawer divider. We’re always looking for ways to better organize our lives. and after years of starting each day with a visit to one of the most disappointingly disorganized spots in our home we’ve finally decided to do something about it. as shop owners constantly awash in packing materials, the cardboard and giftwrap needed for this project were right under our noses. this diy is a good example that even if no one else in the world (other than a couple bazillion design*sponge readers) is ever going to see it, the simplest of craft projects can make a big impact on your daily routine. have fun!
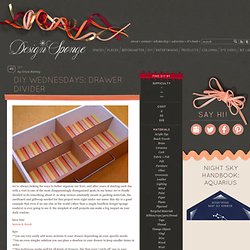
Lauren & derek tips: **you can very easily add more sections to your drawer depending on your specific needs. **for an even simpler solution you can place a shoebox in your drawer to keep smaller items in order. **this technique works well for all kinds of drawers, like that crazy “catch-all” one in your kitchen. Design*Sponge » Blog Archive » diy project: eco-friendly notebooks. This fun, eco-friendly project comes from meghan mcclain and jill thomas of potbelly sandwich works. meghan and jill got a green committee going at their office (fantastic!) And decided to celebrate their inaugural meeting today with a fun project. the girls created these lovely notebooks by reusing office paper found around the company and scraps of vintage wallpaper and chipboard for covers. so rather than letting paper (that’s been printed on one side) go to waste, they found a way to reuse it and create something new and beautiful. meghan and jill kindly shared their full project steps and materials with us so click here to view the full post and instructions, or just click “read more” below. thanks so much for meghan and jill for sharing- best of luck with your green committee!
Meghan and Jill’s DIY Recycled Paper Notebooks: What You’ll Need: 1. Used 8.5 x 11 paper with one clean side. How to: 1. 2.