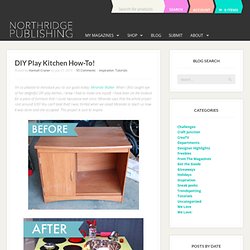
DIY Play Kitchen How-To! - CREATE: Blog. I’m so pleased to introduce you to our guest today: Miranda Walker. When I first caught eye of her delightful DIY play kitchen, I knew I had to make one myself. I have been on the lookout for a piece of furniture that I could repurpose ever since. Miranda says that the whole project cost around $30! You can’t beat that! I was thrilled when we asked Miranda to teach us how it was done and she accepted.
Providing opportunities for pretend play is one of the most important things you can do for your child’s development. Here’s how to make your own play kitchen: 01. 02. 03. 04. Remove any doors and sand all surfaces. Of course these steps will vary with every kitchen, but once you have a plan, putting together your kitchen will go quickly. Doigts de fée :: 
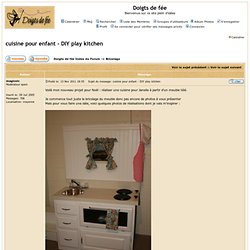
Voir le sujet - cuisine pour enfant - DIY play kitchen. Hop voilà les photos (celles qui passent sur le blog auront déjà vu ^^) Remontage après démontage laborieux du vendeur Découpage du plan de travail Planchette sur la partie supérieure et mise en situation des éléments Début de sous couche Les trouvailles de la déchetterie Sous couche sur meuble entier Sous couche sur les tablettes Et la poignée du futur frigo !
Ce WE j'ai passé une couche de blanc (reste de la peinture du plafond) sur l'extérieur, les montants, et l'intérieur du frigo. Prochaine étape, mesurer le fond pour aller commander la planche qu'il me manque, découper la porte du frigo, sous coucher les portes, etc etc encore beaucoup de boulot en perspective. . ___________ Organizing Ribbons With Empty Tic Tac Containers. Little Helsinki. Più. Moopy & me. Réparons & Re-Parons Noël. DIY récup’ pour Noël. L’idée DIY du week-end : du fluo dans vos accessoires Avec le soleil qui revient, on a envie de touches de pep’s dans son intérieur ! En plus, ça devient plus facile de se... Lire la suite › Les créations poétiques de Manon H Il y a quelques semaines, j’ai découvert lors d’un salon la talentueuse Manon H.
Pleine d’imagination, elle... Petites notions d’ébénisterie : 5 trucs à savoir Ça fait longtemps que je retape et transforme des meubles. Miniio - modern dollhouses. Making Merry: Toilet Paper Roll Flower Ornaments. After seeing this (scroll down for the finished picture) I thought it would be fun to take the same concept and make ornaments. 
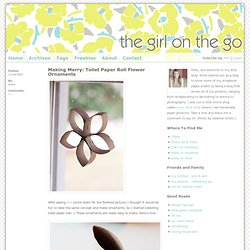
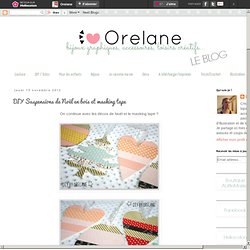
So I started collecting toilet paper rolls :) These ornaments are really easy to make. Here’s how: 1. Fold your paper roll in half to make it flat 2. 3. 4. 5. 6. Have fun and have a great weekend! DIY Suspensions de Noël en bois et masking tape. Les 3 ans d'une poupette ou une déco improvisée La puce vient d'avoir 3 ans.ça y est. Avant de faire la fête avec toute la famille, une petite déco de table improvisée avec...
Lire la suite › Mon sac à main pochette Un projet couture (parmi tant d'autres) qui était dans un coin de ma tête depuis trèèès longtemps ! Je vous présente mon... Les pochons ! Des grands, des petits et des tout minis ! Envie d'Islande...! Bird nest necklace} I have been seeing a lot of bird nest jewelry around lately. They are beautiful and I love the trend so I thought I would try making my own. These turned out to be really easy to make and require just a few simple supplies. This necklace would make a lovely Mother's day gift, which just happens to be coming up this weekend! What you'll need: - Jewelry wire (I prefer using a 24 gage because it is easier to manipulate but the 20 gage can work well too with the help of some round nose pliers) - pearls or glass beads - necklace chain - jump ring and a clasp Select the beads you want, string them onto your wire and arrange them as you'd like. then simply wrap the wire around the beads wrap some wire in the space between each bead (I like the look of three loops but you could just do one or two if you prefer) this is what the back looked like.
Now attach a jump ring and a clasp to the end of a necklace chain and this is what you end up with :) I love how each one is so different. Ruusun aika / Time for roses. Jenny Doh's Blog :: Archives. Do you ever wonder what to call these things? They are some of my favorite writing instruments and are actually composed of these pointy metal things which are called nibs. Nibs come in lots of different sizes. They also vary in the level of flexibility. When you find a nib you love, you might buy a bunch of them like I do. The best way to get to know about nibs is to try them out. They don't cost very much so I say get to know as many as you want. I suppose you could hold a nib with your fingers to write with but that would be inconvenient and so you usually put them in these longer objects called nib holders. So then you push the nib into whiever holder you want to use. After you have the nib in a holder, you dip it in some ink.
Once you dip it, you'll see that a bit of ink gets captured in the nib. Enough to write a letter or a word or even a couple of words. Here are some pens with calligraphy-type nibs that you don't dip into ink. Rose minuscule. Anthropologie | Home | Women's clothes, accessories and homeware. Ma Petite Valisette. Ju*|carnets| AIGUILLES BOULEAU PEACE FLEECE. Inspiration från IKEA. Le Paris fait-main d’Etsy | Etsy.fr. Minimega® designbureau. Eat Drink Chic » Archives. ...we've had our fair share of cold and foggy winter mornings. 
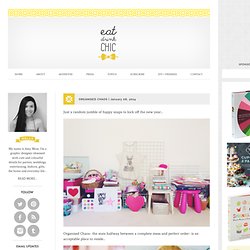
Inside our home, however, I've been attempting to ramp up the colour!
My current decorating project- our living room- is progressing slowly at the moment. Not too long ago we incorporated an Indian sideboard, with which I am completely smitten! I would love to create an artwork for above, but I'm struggling to decide what to do. I'd like to keep it simple, as the room is already flush with colour and detail. I think I might buy a huge blank canvas, stick it on top of the sideboard and just stare at it until an idea comes to me! Another option is maybe a large, simple black and white photo. Among other bits and pieces, I would also love to find a beautiful pendant light to hang above the room. It seems like every surface in my workspace is covered in craft punches, twine, glitter, washi tape, paper goods, stripey straws, jars, bottles, my printables.... you name it. Breakfast and snack remnants also add to the colourful mix...
Happy Home. La Princesse aux bidouilles - Le cabinet. DIY Pot à crayon so fresh. Vous en aviez aperçu un petit bout ici, aujourd’hui on passe aux explications ! 
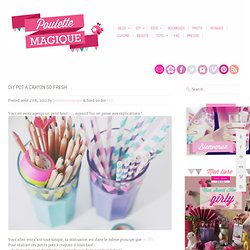
Vous allez voir c’est tout simple, la réalisation est dans le même principe que ce DIY. Pour réaliser ces petits pots à crayons il vous faut : - de la peinture en bombe tous supports (ici de la peinture Julien) - des verres assez hauts (ceux-là viennent d’Ikea) - du masking tape - du scotch à peinture - un ciseau Allez hop, c’est parti ! Premièrement il vous faut bien laver les verres pour que la peinture accroche bien. Délicatement on scotche le haut du verre avec le scotch à peinture pour laisser cette partie intacte. Puis on se munit de notre peinture ! On laisse sécher une petite heure et on enlève délicatement le scotch.
Après on prend notre rouleau de masking tape et on découpe doucement des petits triangles que l’on colle tout le haut du verre comme une petite guirlande de fanion. Voila, c’est fini, il ne vous reste plus qu’à remplir ces jolis pots avec vos plus beaux crayons ! LA SUPER SUPÉRETTE. Recyclage et Cie . . . Tuesday Tutorial: Paper Lantern Ornaments. Want a cute, simple decoration that you can make in minutes? 
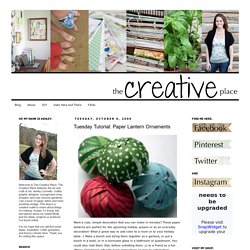
These paper lanterns are perfect for the upcoming holiday season or as an everyday decoration! What a great way to add color to a room or to your holiday table :) Make a bunch and string them together as a garland, or put a bunch in a bowl, or in a hurricane glass in a bathroom or guestroom. You could also mail them (flat, before unfolding them ;)) to a friend as a fun "Merry Christmas" gift with quick instructions on how to unfold them.
I decided to use holiday paper, but was thinking these would also be fun as everyday decorations with leftover scraps of scrapbooking paper or found/vintage paper. What you'll need: - Paper - enough to cut 15 strips - ½"x4" (7.5"x4") - 2 small brads - Ruler, 1/16" hole punch or pushpin to poke holes, exacto blade or rotary cutter and a cutting mat 1. Measure out and cut your paper into 15 strips - each strip ½"x4" 2. 3. (Back) 4. 5. 6. Ready to POP shower. Since we met, my friend Allison and I have been wanting to throw a party together.
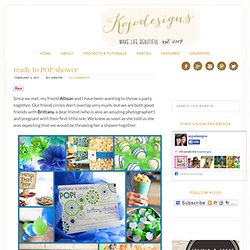
Our friend circles don’t overlap very much, but we are both good friends with Brittany, a dear friend (who is also an amazing photographer!) And pregnant with their first little one. We knew as soon as she told us she was expecting that we would be throwing her a shower together. Our shower theme- “She’s Ready to Pop!” Menu: POP rocks, lolliPOPs, jalepeno POPpers, homemade POP tarts, soda POP candies, rice crispie treats (you know- snap, crackle and POP), ring POPS, tootsie POPS… …cake POPs ….and my personal favorite, a POPcorn bar. decor: strands of balloons (cause they pop), loads of tissue ball pom poms (hung in clusters to resemble fireworks popping in the sky), “pop” labels (they were everywhere!)
Favors: bubbles in our shower colors. What a fun day celebrating this new life- can’t wait to meet him! Oh Snap! a camera and photography party. I already mentioned that Jordan and I are nuts sometimes let our love of throwing parties together get the best of us. 
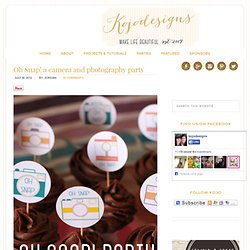
This shared hostessing bent is expressed in different ways- sometimes it means making elaborate Thanksgiving place settings, sometimes it means a windy, not-quite-finished Around the World party disaster (we haven’t put that story on the blog, but we should. Actually, it can be summed up in two words- party fail), and sometimes it means throwing two parties in eighteen days while I’m visiting the middleeast. The insanity enthusiasm has it’s benefits- like the Oh Snap!
Camera/photog party that we had a chance to throw for our friend Britt. Before I get started on the details, can I tell you how amazing Jordan is for throwing crazy-awesome parties without having access to any party supply stores, any regular supply stores, or Amazon? Jord’s whip-things-up-from-nothing skills aside, this party was just so much fun!
THEME- Oh Snap! Red Snapper Say Mac-N-Cheese Snap Peas. Déco écolo - brico récup. Aujourd'hui, recyclage créatif ! Ou comment transformer de vulgaires bouteilles en pastique comme l’artiste tchèque Veronika Richterová. Donner une nouvelle vie à des bouteilles en plastique en leur donnant une forme naturelle et transformer ce recyclage créatif en une forme d’art: le PET-ART. Grâce à différentes méthodes de coupe, de chauffe et d’assemblage, elle crée de magnifiques sculptures colorées translucides: luminaires, plantes, animaux… .google.