
31 Insanely Easy And Clever DIY Projects. Cherry Blossom Art from a Recycled Soda Bottle. Pink blossoms will soon appear on trees, and the National Cherry Blossom Festival starts on March 20.
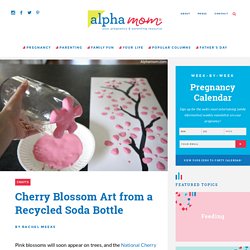
In 1912 the city of Tokyo, Japan, gave Washington, D.C., a beautiful gift of 3,000 cherry blossom trees. This year celebrates the 100th anniversary of that gift. Make cherry blossom artwork with a recycled 2-liter soda bottle as a stamp! Here are the detailed instructions. Start by using dark paint to paint a branch on poster board. I cut this piece of poster board in half lengthwise because I want it to look more like an art panel than a poster.
Once the branch is painted, let it dry before continuing with the stamping. Now let’s do the stamping. The bottom of 2-liter soda bottle has five points like the five petals of a cherry blossom. Press the plastic bottle on the poster board, then lift up. How To Mix Chalkboard Paint in Any Color. We love using chalkboards as backdrops for displays and parties (like this one here!).

So we were super excited to learn that you can create your own custom colors-and it's really easy! We first learned how from Martha Stewart whose tutorial you can read here. She recommends that you use latex paint, but we tried it out with acrylic paints with much success. Here's how you too can create your own chalkboard paint... Supplies: 1/2 cup acrylic paint (choose any color you like, or mix colors together to make the perfect shade!) DIY String Chandeliers. Jessica of Wednesday Inc shows us how to make those gorgeous twine chandeliers from the inspiration shoot she shared with us this morning.

Using balloons, glue and twine, you can also make these lanterns for your wedding – and then bring it home and use it as your very own mid century lampshade. What you will need are: balloons, glue, yarn, tray for glue, corn starch 1/2 cup of Corn starch, 1/4 cup of Warm water, clear fast drying spray paint, hanging lamp cord or fishing line (depending on your desired final product), and a lighting kit if you’re looking for a fully functional lantern. Jessica recommends using a sharpie to mark on the inflated balloon how much room you need to leave for the lighting cord. She also recommends coating the balloon with vaseline prior to wrapping the yarn coated with glue so it doesn’t stick on the balloon once it’s dry.
You can see all the details on Jessica’s blog. Are you getting excited to try to do this at home as much I am? How to Make a Container Candle. It’s not that I’m not willing to spend $22 on a divine scented candle in great packaging, but I’m not a happy camper when it’s burnt out in two days.

So, I decided I’d learn to make my own, and as it turns out, it’s quite easy! Here’s my step-by-step tutorial. 1. Stuff you need: -A double boiler (this one is from Ikea) -Containers. –Wax. -Wicks. -Essential oils for fragrance and dyes for color. 2. Very Cool Pencil Holder.