background preloader

Crafts

Facebook Twitter

Snow-Globe Soap. Dec19 by Brenda Ponnay Stuff their stockings with something they can wash their hands with! By Brenda Ponnay What’s cuter than a button, small enough to fit in a stocking, won’t rot your teeth and leaves you squeaky clean? A mini snow-globe soap, of course! Here’s a super-fun craft you can whip up in an afternoon. It’s quick, it’s easy and it hardly makes any mess!

This is technically just “melt and pour” soap so it might be considered cheating to some hard-core soap enthusiasts but I’m not about to mess with lye or distilling vodka when I’ve got a small child acting as my personal assistant. First you’ll cut up the glycerine into 1-inch chunks. Don’t be fooled by the picture above. After you’ve poured the glycerine, let it cool just enough to form a thin skin on the top. After all your toys are arranged, you can add your snow. I used a small paring knife to shave off some of the irregularities on the bottom but that was purely aesthetic. If you found us through Stumble Upon! 25 Handmade Gifts Under $5. If your gift list is long and your budget is small here are some great Handmade Gifts that you can make.

Keep in mind that handmade items are not just beautiful but special… I love to give them and I love to receive them. In my opinion they are the best! Jersey Knit Bracelet Lovely! This would make a perfect gift for any of your girlfriends. You can choose the colors and recycle t-shirts that you have around the house. Cheap and cute! Tutorial Paper Clip Earrings Tutorial This is a brilliant idea… and the possibilities are endless. Love it! Printed Candles Who doesn’t love a candle? Think about how many different stamps you could use to customize this project. tutorial Hot Chocolate Art! What a great gift for neighbors and teachers… I am personally a hot chocolate lover so this would make a great gift for me tutorial Tile Coaster You can buy these plain tiles at Home Depot for under a dollar. I’ve seen them with family pictures also… Way cute! Tutorial Bow Belt I was amazed how easy this tutorial was. So Pretty! Magnetic Makeup Holder.

Homemade Holidays: Crock Pot Candles. Growing up in my house, we always made our own holiday gifts. We were pretty poor, and I suppose it was our only option. But it was never presented to me like that (I didn’t even know what ‘poor’ was, really, and I had a stupendously fabulous childhood full of ‘thing finding’ and ‘government cheese’. But that’s another story.) It was all about crafting our caring into something unique, something personal. My mom and I made play-doh ornaments, or baskets of baked goods, or clay coffee mugs. The first holiday season that Damian and I spent together, I was a starving college student.
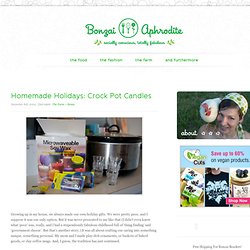
Last year we made all our gifts together – our attempt at canning. Anyway, there I go reminiscing. How To Make Candles In A Crock Pot All you need is some wax, some wicks + wick bases, and some candle-holders. Optional additions include color (candle dye is available at the craft store) and smell. 1) Spoon the pieces of wax into your candle holders and arrange them in the bottom of the crock pot. Homemade Lip Balm | FIMBY. You've stumbled upon one of my most popular posts.

You might also enjoy let's talk lip balm. After making my own lip balm I will never buy it again. It's easy, cheap, 100% natural and good for your lips, especially this time of year. I tried to figure out the actual cost of this recipe but it wasn't worth counting up the pennies. Let's just say Burt's Bees makes a killing on lip balm! Ingredients 1/2 oz. Directions In a small pot over medium low heat melt beeswax, coconut oil, lanolin and vitamin E. This recipe makes enough for 3 - 3/4 oz tins (see photo for size) and one 1 1/2 oz jar. Notes I prefer to measure kitchen cosmetics with a scale but I included the approximate tsp. measurements for those without a scale. All ingredients can be found at a natural food store or ordered from an online store such as Mountain Rose Herbs. Some people are allergic to lanolin. I always use solid honey, that's just the kind of have.

Mug ~ Cup Mixes. DIY Gross out: How to make a horror-tastic intestine wreath. If you want your house to display an original decoration, perfect for Halloween (or anytime of the year if you and/or the kids are horror fans), try making an intestine wreath. My husband was inspired by a posting on BoingBoing which described how to use your standard "crack filler goop" to make realistic intestines rupturing from a dummy.

We decided to skip the dummy and make a wreath complete with eyeballs purchased from any craft aisle. Warning: this project is definitely messy. Note to self – next time, remember to wear rubber gloves when using the crack filler! That stuff stayed on for days. Materials: 1 tin foil pizza pan 1 bottle of crack filler Acrylic paints and paint brushes Utility knife String or rope Optional: plastic eyeballs or something equally disgusting Optional: varnish to make the wreath slimy-looking Directions: Step 1: Cover your work area with newspaper to protect from the unavoidable mess. Step 3: Curve each of the triangular pieces to form a convex wreath shape.

Wipe Off Weekly Menu Board. I am a meal planner. I refuse to go grocery shopping without my week’s worth of meals planned out and list made. (It’s either that or wander aimlessly around the grocery store for two hours and then make ten more trips back during the week to get things I forgot.) Once I get the groceries unloaded, I usually forget what I planned for, so I put together this super easy wipe-off menu board to keep track of what’s for dinner each night!
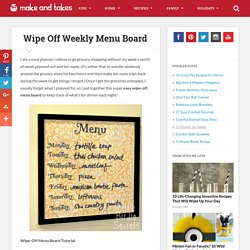
Wipe-Off Menu Board Tutorial Supplies: Picture frame with glass front (I love these 12×12 frames I found at Ben Franklin for only $7!) 1. 2. 3. 4. Now everyone in the family knows what’s for dinner each week! I decided my frame would look better black in my kitchen, so I spray painted it black. Little Birdie Secrets are regular contributors to Make and Takes and was born from the crafting obsession of three friends living in the Pacific Northwest. Organizing Measuring Cups and Spoons. Easy DIY Christmas Decorating Idea: Glittery Epsom Salt Snow.

Love Cartography: Heart Maps | Tickety Boo. New England Through Yummy Mom's Eyes: Tutorial: Photo Wood Blocks. Make Chalk Rocks and Homemade Chalk Board Paint. Mad in crafts: DIY Fire & Ice Lanterns. The old becomes new: A new variation on the outdoor lantern. We have had an unusually warm winter in Michigan this year, and while the temps have been nice, I have had to hold off on this project idea until we got a cold snap. We finally got some snow and cold earlier this week, so I was able to try out this fun winter project. I had pinned a product called Globe Ice Lantern Kits a few months back recognizing that I could DIY them at home.

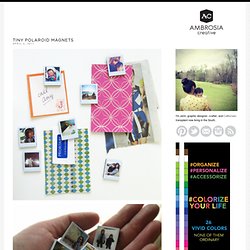
Originally priced at nearly $30 for a kit that makes 6 lanterns, I think they are very reasonable for a small batch. To make DIY Fire & Ice Lanterns, you will need: a package of 3 punch balloons from the dollar store a package of 3 LED tea lights from the dollar store bowls small cylinder (shot glass, pop bottle, etc.) water freezer or below-freezing outdoor temps You are getting a glimpse of my less-than-sparkling kitchen sink in this post. First, stretch the opening of one punch balloon over your faucet. I brought in my first lantern after 12 hours. Wedding Invitations, Envelopes, Stationery | Paper Source Stationery Stores. Bath Fizzies. Tiny Polaroid Magnets | { Ambrosia Girl }

Hi there! It’s felt like forever since I’ve last blogged, and has felt like an eternity since I’ve done anything crafty and nifty. Since my morning sickness has gone into full speed (yes, we’re expecting our third this fall!) I haven’t felt like myself. But nothing like inspiration to wake one out of a reverie — or nightmare, in my constantly sick state. I came across these DIY Pantone chip magnets on How About Orange and wanted to do something similar. The idea of mini Polaroids dotting my fridge sounded cute to me. You will need: Cardboard (mine was the backing of a sketchbook — much thicker than the back of a regular spiral bound notebook) or 2-3 sheets of white cardstock or poster board spray-mounted together to use as a sturdy backing to the magnetsOpaque white marker (necessary only if your cardboard is not white) Craft knife Metal straight edge/ruler Clear packing tape or frisk film.

Step 1: Download a Photoshop file of the Polaroid frames below. 487 Comments. Mason Jars crafts. 9 Kids Craft Websites You’ve Got to Know. I HAVE to share some of my favorite kids craft website with you all today. Each are full of amazing, entertaining, and educational crafts for kids. I’m in awe of the wonderful things they all post, very inspiring. You must check them out! Tinker Lab: Lots of tinkering going on. These are the good and messy kind, really diving in to projects. I Can Teach My Child: All kinds of educational activities. The Chocolate Muffin Tree: It’s all in the name, Chocolate Muffin Tree. Chalk in my Pocket: Play and discovery. Naturally Educational: This former teacher is crafting up all kinds of fun and creative ideas. Childhood 101: From crafting to parenting, lots of playing, learning, and growing. No Time for Flash Cards: There’s no time for flash cards with the fabulous crafts, storybooks, and activities going on here.

Crafts by Amanda: She’s got those simple and easy craft ideas that look great using only a few supplies. Tagged as: crafts Written by Marie LeBaron. How to Decoupage. Decoupage can sometimes be deceptive. By looking at a finished project, you would think this craft technique would be complicated, but it isn't. It is actually quite simple. If you can cut and paste, you already know most of the techniques involved. Basically, you cut out pictures; you glue the pictures onto an object; and then cover the object and pictures with a few coats of glue/decoupage medium to protect it. Go gather together your supplies and start crafting...

Supplies You Need Of course, you can buy supplies and other items that are made specifically for decoupage, but you can also use supplies that you probably have lying around the house right now. Step-By-Step Instructions Follow these step-by-step instructions to make your masterpiece. Free Craft Projects If you want to try your hand at decoupage, but you aren't exactly sure what to make, try one or more of these projects. Decoupage Tips and Hints Make your next project more successful using these tips and hints.