
How to Make Your Own Sea Glass - Albuquerque frugal family. Sea glass is a substance often used in jewelry and other decorative items.

The glass is found along the shores of every ocean and salt water lake in the world, including Antarctica and the North Pole. For people in Eastern New Mexico, however, finding sea glass requires an expensive trip to the beach. Fortunately, it is possible to create sea glass on your own. Very few people, however, know how it is made. The sad truth is that sea glass is created from littering. After a bottle or other piece of glass is tossed into the ocean, it eventually breaks apart into smaller pieces. Fortunately, it is possible to create sea glass without harming ocean wildlife. Remember that the most common colors of sea glass are brown, clear, and green; mimicking the most common colors of glass that are discarded along beaches.
Bulb01.jpg 610×551 pixels. Bright Ideas for Upcycling Lightbulbs. How to cut glass. I posted a picture about 1 week ago on Instagram, Facebook and Twitter of me cutting glass using just string.

I got LOT’S of requests for a tutorial on how I DID THIS! So here it is. FINALLY! You will be able to learn how to cut glass. How-To: Make Your Own Mini Vase in Under 30 Seconds. Quick!

Can you guess what this tiny bud vase is made from? I'll give you one clue: with the right moves, it can be turned into an animal*. Now you're really curious, aren't you? Read on! This modern, ceramic-looking vase can be made in well under 30 seconds and only requires two materials: a 2" glass votive holder and a BALLOON. Camilla Fabbri from Family Chic created these clever little vases by snipping off the mouth of a balloon, leaving about an inch of the neck, and then slipping the balloon over the votive holder. [via Family Chic] *Well, not a living, breathing animal. Tagged : Craft, Inspiration, vases, balloons, flowers, DIY. Candy Cane Marbled Monogram Ornaments. Materials: 1 glass ornament 2 bottles of nail polish 1 vase/cup (large enough to fit half the ornament, but not too big) filled half way with filtered tap water I used Orly French White and OPI All Lacquered Up for these images. These nail polish brands seem to work the best for this technique.
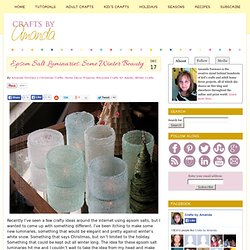
Do experiment with different nail polishes as all of them do not work the same for this. Epsom Salt Luminaries: Some Winter Beauty. Recently I’ve seen a few crafty ideas around the internet using epsom salts, but I wanted to come up with something different.

I’ve been itching to make some new luminaries, something that would be elegant and pretty against winter’s white snow. Something that says Christmas, but isn’t limited to the holiday. Something that could be kept out all winter long. The idea for these epsom salt luminaries hit me and I couldn’t wait to take the idea from my head and make them a reality. UPDATE: Please see my article on crafting with epsom salts for important information (including info on discoloration, see the picture below of them all white), especially if you plan to make these for an important event such as a wedding. How to cut glass. Beading (Manek) Tutorial – Part 2: Border Beading. Continue from Part 1: Preparing The Frame & Canvas After having your frame and canvas prepared, shoes-face traced out, the next step is to sew a stretch of beads along the shoes-face outline like the picture shown below.

You need: 1. Japanese seed beads size 15/0 for the border 2. Very fine needle so that it can go through the hole of the seed bead 3. Bottle Beauty - Martha Stewart Crafts by Material. Creative Recycling Of light Bulb into Valuable Things. When a light bulb burns out, we rarely give it a second thought.

You can lend your imagination toward this fragile household item, intent on giving burnt out bulbs a second life as something very different, and aesthetically pleasing. It’s very easy to make, use of turning a light bulb into an oil burner, terrarium and many another interesting things. Used light bulbs, typically destined for the trash bin, could be the setting for an adorable miniature terrarium, practically any clear glass container can contain a tiny greenhouse, providing humidity and warmth to plants. Here are few amazing examples to use as inspiration. Glowing jar project - varázslat a lakásban (EN/HU) & from{panka}withlove.
For the Love of: Mason Jars. <div class="greet_block wpgb_cornered"><div class="greet_text"><div class="greet_image"><a href=" rel="nofollow"><img src=" alt="WP Greet Box icon"/></a></div>Hello there! Mini Hot Air Balloon Tutorial - StumbleUpon. As I mentioned in my steampunk tree post, these hot air balloon ornaments have been our most time-consuming Christmas project.

Lots of trial and error, figuring things out as we went along, and, in the case of getting the baskets to hang straight, plenty of "colorful metaphors. " The good news is this isn't a holiday-specific craft: wouldn't they make an awesome mobile? Or hang one in the corner of your office for a little whimsy.