
background preloader

Arts&crafts

Facebook Twitter

Bracelet ideas

HowTo posts, photos and bookmarks » Man Made DIY | Crafts for Men. DIY Club Inc. Make your own canvas! In high school, i was the art teachers T.A. (teacher’s assistant) (I spent a lot of time in my art room in high school…) and one of my assignments was prepping the canvas by painting it with gesso. and it sucked. 25 canvases…and they weren’t small. so when i saw that krylon had gesso spray paint..i totally had to give it a try! I took some white material (it was actually dark out curtain material left over from my daughter’s room) and spray painted it.. maybe i should of ironed? Then i took this awesome vinyl cut out from ten 23 designs and laid it onto a black spot i painted… then painted around the edges to seal it in.. (i acutally had it up on my wall…but it wasn’t exactly what i wanted!)

So i used it as stencil instead… i then went totally paint happy my inpirations was this awesome picture from pinterest i used loads of awesome paint by americana…on my very professional artist paint try (i.e. i can’t believe it’s not butter lid) when i was happy with the behind…i peeled up my vinyl… Painted Wall Art for Non-Artists. Some people think that if you're crafty, you're also an artist--and vice versa. That's not totally true, however. In fact, neither Sharon nor myself consider ourselves artists, but we still pretend every now and then. So, here's what happens when I don a fancy beret and a wooden easel, palette and paintbrush in hand... NOT. This is not an original Tristin idea. Pretty, huh? I did. Here's what you'll need: A canvas in the size of your choice (I chose 16x20) Cream colored paint (I used spray paint since I already had it) Brown acrylic paint pen Acrylic paint in colors of your choice Round sponge brushes used for stenciling First, of all, I spray painted the canvas with cream spray paint because the canvas was too stark as it came in the package.

Don't be scared, but it's time to start the "real" artsy stuff. Once you're happy with your branches, it's time to bust out your palette, a.k.a. a paper plate with globs of paint. Boo-yah artists. Inspirational Art–Part One {Day 12} As I was working with my {rescued!} Planks, I realized I wanted to make some signs that were larger than just one plank width.

After experimenting around with a few different methods, we finally came up with this one… My husband cut some of the planks to be equal lengths. I squeezed a line of wood glue onto the edge of one board and stuck another board tightly up against it, and repeated until I had as many boards glued together that I wanted.

I then clamped it with a wood clamp and let it sit overnight. Although this is sort of a lamination process, it wasn’t sturdy enough that way. So, I laid 2 thin wood strips across the back and marked where I wanted to nail them, and predrilled with the drill press. After the holes were drilled, I squeezed a thin layer of carpenter’s glue on each strip, turned it over, and then nailed carpet tacks through the holes I had pre-drilled. You can use any type of nails that you prefer, but I love the look of the big, black nail-heads.

Tutorial: Vintage-looking painted sign from salvaged wood. Today I have a little tutorial for you. I'm going to show you how to (easily!) Make these sweet wooden signs. I promise- they're a cinch, they don't take long at all to make and cost pretty much nothing. You will need: piece of salvaged wood upholstery tacks or short nails (optional) hammer acrylic paint (background color) black acrylic paint (or other color to fill in letters) large paint brush small paint brushink jet printer twine Sharpie Marker or other dull, rounded tool This project started with a pile of cedar fence pieces that we've had sitting in our backyard for ages. My husband had just loaded a good portion of them into our chiminea to be burned when I got the idea for these signs and was able to save them from becoming ash.
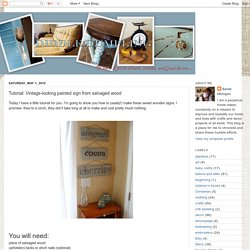
I loved how grey and weathered they had become from sitting outside. Next, distress the wood to your liking. Next, choose your paint. Once you're happy with the paint, put the wood aside to dry and head to your computer. P.S. T-shirt shag rug tutorial. Song Lyric Wall Art / D.I.Y. Project. A couple weeks ago, I found a paint-by-number at an unbeatable price. I can't pass these things up even though I already owned this particular design. I thought that I could maybe use it to make a fun D.I.Y., but my new rule is that all thrifts that I purchase with the intent of restyling need to get done right away. I have way too many half finished projects in my life.

With that little bit of motivation I came up with a fun D.I.Y. to display some of my favorite song lyrcis in our newlywed home. Enjoy.... Here's how I did it... I displayed our piece in our bedroom, on Jeremy's side of the bed. A couple weeks ago, I found a paint-by-number at an unbeatable price. Personalised 'happily ever after' canvas by gorgeous graffiti. Made in Britain can be personalised eco-friendly 'and they lived happily ever after' Personalised hand-made typography canvas by Gorgeous Graffiti, a stunning collection of designs hand-made from our little studio in Scotland, UK. Designed especially as a stunning and unusual gift for most occasions where couples buy for each other. This design would make a fabulous wedding gift! To turn this gift into a keepsake you can also personalise the canvas at no extra cost by having a special message written in gold upwards along the right-hand canvas edge, example 'with love on our wedding day 18th June 2014 x' We always do our best to meet our customer's needs and deadlines wherever possible- please get on touch using the 'ask seller a question' button if you require this design by a particular date. made from: dimensions: H60xW60XD3.5cm product code:

Broken. Painting with condensed milk « ECE made Easy. String of lantern lights tutorial. We spend a lot of time grilling, eating and watching the sun set on our deck and for the summer I typically hang all kinds of lights and lanterns for an extra dose of whimsy. I wanted to purchase more lights to hang for the holiday weekend festivities but just couldn't bring myself to pay for something I knew I could make! I decided to pull out a string of red Christmas lights and transform a bag of tiny paper cups into a string of lanterns for a little red, white and blue decoration. I started by painting the paper cups in a pretty shade of blue. When they were dry I added simple doodles with a sharpie pen and then filled in some of the doodles with white paint (for a little variation) I covered all of the cups with doodles and set aside to dry.

If you don't want to doodle you could use collage, messy paint, a solid color or a even a stamped pattern on the surface Last, I poked a hole in the bottom of the cups and inserted each of the lights. 16. Advent Calendar Craft. Scrap Wood Pendants. I had some thin pieces of scrap wood, that I thought might work well for a necklace. So I cut some up, painted them, drilled a tiny hole, and threaded silk strand through them. Then I used some clasps from the bead store and crimped them on with pliers. It was pretty fun.

My daughter painted one too, but it’s “not done yet”, so I’ll add it to the Facebook page later. Guest Post | Cardboard Crown Tutorial Kids Craft. Hi Joel and readers, I’m excited to be here again! Our house has been a busy one with a 3½ year old boy who is seriously into creative dress-up play (mostly as a firefighter as you will see in the photos below) and a 10 month old boy who is on the move! One of my favorite things is to make something out of nothing. These crowns were made from cereal boxes, the boys had a great time playing with them and they are crazy easy to make! I’ve included a pattern for two of the styles, the Max and Fancy Crown. The whole project is super straight forward, I hope you enjoy watching how our crowns came together, and that you enjoy making your own.

Here we go: Gather materials {cardboard (not too thick), glue gun, rubber band or elastic and decorating materials} Cut out your piece(s), use the pattern (link here) or get creative on your own. Punch holes and decorate if you’d like! Secure back with either rubber band or elastic. That’s it! Earth Day Kids Crafts and Toys with Repurposed Materials. Oobleck: The Dr. Seuss Science Experiment. Oobleck is a classic science experiment that's perfect for entertaining both kids and adults. If you haven't seen it in action it's very fascinating stuff and before too long you'll have your hands covered with it, happily making a mess that can be washed away with water. Oobleck is a non-newtonian fluid. That is, it acts like a liquid when being poured, but like a solid when a force is acting on it.

You can grab it and then it will ooze out of your hands. Oobleck gets its name from the Dr. Acorn Cap Jewels | Kiwi Crate. I love the natural art materials the earth provides this time of year! My four-year-old daughter and I have been having a great time making all sorts of things with acorn caps, such as tiny acorn cap candles, felted wool balls with acorn caps on them, and little fairies acorn caps for hats. This time we created acorn cap "jewels. " How We Did It I have seen this idea around the web lately, so I thought we'd give it a try at home. We had all of the materials on hand, and I'll bet you do, too. First, my daughter had a great time coloring the insides of the acorn caps with each color marker, and placing them securely in the play dough. Then she filled each acorn cap up with the school glue. There were lots of "oohs" right away, as the colors started to seep into the glue. We set our acorn caps aside to dry for 48 hours.

We've had lots of fun playing with them since they were made. Wooden tangram tutorial. July 22nd, 2010 I’m sure you know what a tangram is but didn’t know it was called a tangram (when I looked it up, I think I might have typed, “that clever triangle-y puzzle thing”). If you’ve never even seen one, well then: it’s sort of a puzzle and sort of a game that involves five triangles, one square, and one parallelogram. The objective is to figure out how to make a given shape, which is shown only in silhouette, using the pieces and not overlapping any. My kids and I had a blast just playing around with the shapes and seeing what we could make. Materials: balsa wood (or sturdy cardboard, foam core, or actual wood wood, but you will need different tools for cutting the wood)a sharp pencilrulerexact-o knifefine grit sandpaperpaint brush and paint (optional) Directions: 1. 2. 3. 6. 7.

You can even make a little cute box for your new tangram set to go in. All for the Boys - All for the Boys - DIY PAPER BALL! Today we have a tutorial to make your own paper ball! A craft you can play with - my boys' favorite type (or they only type of craft they'll do lately) Who else used to make these as a kid? You'll need a square sheet of paper, if you don't have one that's already square just cut one! Fold the paper in half, the other half, and in a triangle from each side. So you end up with something looking like this Push in 2 of the sides so it creates a triangle Then you're going to pull the bottom corner of one side up to the point of the triangle Continue this for all 4 points Next you're going to take the side (like where his hand is covering above) and fold it in to meet the center Do THIS for all 4 sides Next you're going to take the bottom loose flaps and tuck them into the little pocket you just made on the fold before Do this for all loose ends/pockets Next open up your creation a bit And inflate through the little opening and you have a ball!

A paper ball! Let me know if you have any questions! All categories and all links. I'm Alice, aka futuregirl. This is my craft blog. Welcome! ... view all.