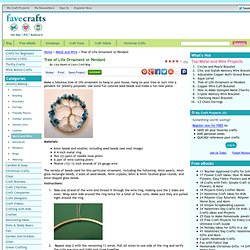
Tree of Life Ornament or Pendant. There are currently no images from other crafters. close Terms & Conditions You must enter into this Agreement if you want to submit digital images or other content to Prime Publishing through Sharing Customer Images (the "Service").
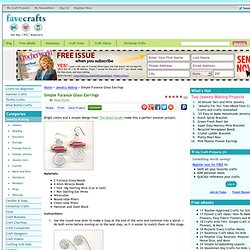
As used in this Agreement, "we" or "Prime Publishing" means Prime Publishing, LLC. and "you" means the individual or entity submitting materials to Prime Publishing. Any individual or entity that wants to use the Service must accept the terms of this Agreement without change. 1) Eligibility. 2) Definitions. 3) License Grant for Materials. 4) Removal of Materials. 5) License for Name, Trademarks and Likenesses. 6) Specifications and Guidelines. 7) Representations, Warranties and Indemnities. 8) Restrictions. Simple Furance Glass Earrings. There are currently no images from other crafters. close Terms & Conditions You must enter into this Agreement if you want to submit digital images or other content to Prime Publishing through Sharing Customer Images (the "Service").
As used in this Agreement, "we" or "Prime Publishing" means Prime Publishing, LLC. and "you" means the individual or entity submitting materials to Prime Publishing. Any individual or entity that wants to use the Service must accept the terms of this Agreement without change. Googely Eye Bracelet. I saw this on Martha and knew it would be perfect for our Monster's Inc themed costumes (assuming we actually wore them this year).
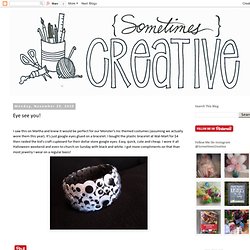
It's just google eyes glued on a bracelet. I bought the plastic bracelet at Wal-Mart for $4 then raided the kid's craft cupboard for their dollar store google eyes. Easy, quick, cute and cheap. I wore it all Halloween weekend and even to church on Sunday with black and white. {macramé: square knot} string & hexnut bracelet. By Kate on September 13, 2011 This bracelet has been inspired by this really wonderful “Braided Hex-nut Bracelet” tutorial which I pinned on Pinterest a while back.

Two things I absolutely love about this project are: 1) It’s cheap as chips: I already had string in the cupboard and the brass hexnuts were 3p each from the hardware shop. 2) It’s my kind of jewellery: I’m not really a girly girl IYKWIM! The bracelet I made is a bit different to the ‘braided hex-nut bracelet’ and uses macrame instead, which is great, because I promised some tutorials a while back and felt a bit bad that I hadn’t written any yet! Full instructions after the jump! Shrinky Bracelet. If you grew up in the 80's, like I did, you're probably already familiar with the awesomeness that is Shrinky Dinks...but did you know that you can still buy Shrinky Dinks?
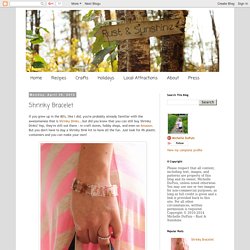
Yep, they're still out there - in craft stores, hobby shops, and even on Amazon. But you don't have to buy a Shrinky Dink kit to have all the fun. Just look for #6 plastic containers and you can make your own! There is a great tutorial on Instructables (courtesy of Dabbled) with all the instructions for making your own shrinky projects from #6 plastic containers, so I won't go into too much detail here. Most of this post is actually about turning these awesome little pieces of plastic into a sweet bracelet (and bonus pendant) to give to mom for Mother's Day. 1. 2. 3. 4. DIY Earrings. Sailors Knot Bracelet. Modern DIY Bracelets. 28 Jun As a girl, I spent a lot of summer days lounging around making friendship bracelets of one form or another.
It started simply with trios of embroidery thread and eventually evolved into more intricate creations involving beads and other such adornments. Lately, all sorts of inspiring DIY bracelet posts have cropped up around the web and it’s made me nostalgic for those uncomplicated summers. DIY Macrame Bracelet. Growing up by the beach in Southern California, the ability to knot a macrame bracelet was practically a right of passage.

Although those days are long behind us, we’ve never forgotten the ever-so-simple square knot technique. This time, however, we’re replacing hemp and wooden beads for more updated elements like colorful nylon cord and glossy metal charms. DIY Ring Base. A lot of you have been asking where to get ring bases for the projects here and here.
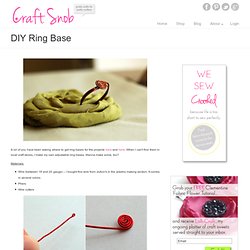
When I can't find them in local craft stores, I make my own adjustable ring bases. Wanna make some, too? Materials: Wire Wrapped Tree Of Life Ornament. DIY Paper Beads. One time I was seriously considering buying a pair of sandals because they were offering a free bonus paper bead necklace.
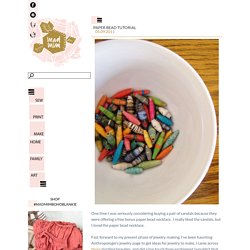
I really liked the sandals, but I loved the paper bead necklace. Fast forward to my present phase of jewelry-making. I’ve been haunting Anthropologie’s jewelry page to get ideas for jewelry to make. I came across these dazzling beauties, and did a toe touch from excitement (wouldn’t that be awesome?!) I set my heart on them (stay tuned for a knock-off post/tutorial on those!) What you’ll need: -magazines, colored paper, tissue paper, toilet paper (ok, maybe not) but really. -Elmer’s glue, Modge podge, and some kind of varnish. -scissors, or a rotary blade, quilting ruler and cutting mat (way faster) -round toothpicks -something to stick your toothpicks in like a styrofoam tray or packing materials, or cardboard box. Colored Pencil Jewelry. Note from Design Mom: I asked Kate of Mini Eco to create a Back to School themed project for us to try.