
Raspberry Pi Webcam Server Tutorial (Live Stream) - Techspect. August 11, 2013 One of the more popular Raspberry Pi projects is turning your board into a webcam server capable of hosting a live stream.
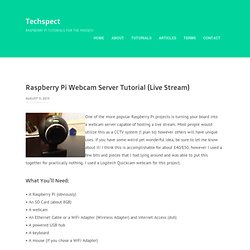
Most people would utilize this as a CCTV system (I plan to) however others will have unique uses. If you have some weird yet wonderful idea, be sure to let me know about it! I think this is accomplishable for about £40/£50, however I used a few bits and pieces that I had lying around and was able to put this together for practically nothing. I used a Logitech Quickcam webcam for this project. What You’ll Need: Security IP camera using Raspberry Pi. UPDATE: I have now deployed the RPi webcam and it is working.
It needs better connectors for the wiring, and the front panel needs some cosmetic work. It currently only streams video, not audio. I may add mpd for audio streaming. I have also not connected the lighting control to the RPi yet, and there is no speaker for an intercom. Motion is being detected and pictures and a short video are being saved, but currently not emailed anywhere. I am currently investigating putting a security camera near my front door so that I can record who comes to the door and possibly talk to them over an intercom.
I already have a cheap Wanscam IP camera connected to my home automation system, but that is only suitable for indoors. Near my front door is a panel with some housing behind it, which used to contain an old intercom system, so I want to use that for the camera. I prefer an IP camera to other sorts of security camera as it should be much easier to integrate with my home automation system. Amazon.co. 2.8" TFT + Touch Shield Board. Hi,I have for sale a shield board based on a HY28A-LCDB, SPI driven with Touch Panel.
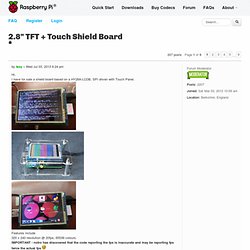
Features include320 x 240 resolution @ 20fps, 65536 colours.IMPORTANT - notro has discovered that the code reporting the fps is inaccurate and may be reporting fps twice the actual fps The board draws approximately 64mA from the 3v3 line, supplied by the Pi.Screen and TP use hardware SPI ( SLCK, MOSI, MISO, CE0 & CE1 ) plus 3 additional GPIO lines ( GPIO0, GPIO1 & GPIO6 ), keeping the other GPIO lines free for other uses - the pcb has a 'breakout' GPIO port to wire too.The case is available for £12 Setup and configuration details : viewtopic.php?
F=64&t=48967I will be supplying this in kit form for £20 plus postage : Raspberry Pi Camera Board ID: 1367 - $29.95. Beefcake Relay Control Kit - KIT-11042. Description: Your 5 volt system can wield great power with this big beefy relay board.
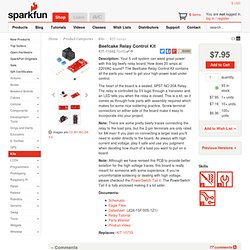
How does 20 amps at 220VAC sound? The Beefcake Relay Control Kit contains all the parts you need to get your high-power load under control. 05 : Protéger notre précieux. Ce post est le cinquième d’une liste de tutoriels sur le raspberry PI, cliquez ici pour accéder au sommaire !
Maintenant que nous disposons d’un raspberry PI en mode serveur fonctionnel, il serait d bon gout de penser à sa pérennité sur le long terme ! En effet un vilain coup de pied, un chat incontinent ou une chérie un peu gaffeuse (spéciale dédicace) est si vite arrivé et notre nouveau gadget (notre précieux) est encore fragile dans son état actuel. C’est pourquoi je dédie cette petite étape de tuto à la présentation des boitiers que vous pouvez acheter ou fabriquer pour l’engin. La communauté raspberry PI étant ce qu’elle est, des boitier spécialement conçu pour le rasp ont vus le jour, et je dois reconnaitre qu’ils font propre : Le plus coloré : Pibow Pibow est un ensemble de couches colorées a assembler sois même, vendu entre 15£ et 20£ selon l’endroit ou vous habitez (frais de ports variables), pour les ptit frenchies, ce sera 17.95£ Domotique et Raspberry PI : graphique et enregistreur de consommation électrique. Domotique : Raspberry PI commande du GPIO avec un iPhone et PLCLink.
Réalisation complète et application pratique en domotique Le RaspberryPI avec PLCLink PLCLink PLCLink est une application pour iPhone ou iPad de supervision et de télécommande d'automatismes utilisant des protocoles standards du net (HTTP, XML, JSON, Modbus).
Raspberry PI Le Raspberry PI est une carte complète micro-ordinateur avec Linux comme système d'exploitation. Vous avez avantage à fixer rapidement l'adresse IP du RaspberryPI en associant l'adresse MAC de celui-ci avec une IP fixe dans l'interface du routeur, il sera plus simple de réaliser ensuite les routages de port pour un accès en réseau extérieur. Le câblage de la LED à été modifié dans la suite. Installation de base Vous trouvez sur les sites consacrés à ce produit les détails pour le montage de base, réaliser une carte mémoire de boot 1Go est largement suffisant pour cette démonstration.
. # usermod -a -G gpio www-data Installation Suites des opérations d'installations de la carte RaspberryPI Vidéo de démonstration #! #! <? #! #!