
Wire Crafts. Beaded Toe Ring Tutorial - Creativity in Pieces. Hello everyone, This beaded toe ring tutorial will teach you how to make a wire ring!
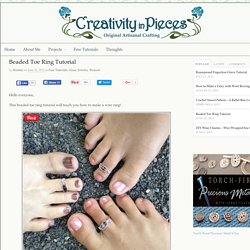
This weekend I had the pleasure of attending my cousin’s wedding in Chicago. I am from a large, close, fun loving family. Therefore, my cousins and I all arrived in Chicago a few days before the wedding and we took the bride out on the town for an evening of fun. In the end, sisters and cousins (both present and future) gathered together to celebrate the upcoming wedding and the deep bond that we all shared. This was certainly a night to remember. This toe ring can fit any project budget by varying the wire type and beads used. See my Beaded Toe Ring Tutorial (or How to Make a Wire Ring Tutorial) on YouTube for video instructions! Materials: 20 gauge wire Various beads – 3 to 5mm diameter. Shrink plastic ring tutorial. Thank you to everyone who requested a shrinkydinks ring tutorial!

This tutorial is an experimental method, not an exact science – you should have fun playing with it… UPDATE: Since posting this very popular tutorial in 2008, I’ve answered every question imaginable in the comments of this post. If you have questions, you’re welcome to trawl back through the hundreds of comments to find my answers, or, to make things easier, I’ve compiled a 3-page shrinky rings FAQ, which is available exclusively when you donate $1 or more towards my tutorial (this also entitles you to further help from me by email, should you need it). DIY Woven Chain Bracelet. Chain link bracelets, with colorful threads woven through them, have been popping up here and there.

We adore Aurèlie Bidermann‘s Do Brazil bracelets and thought it was about time we graduate to the ultimate “grown-up” friendship bracelet. With a curb chain bracelet and some embroidery thread, we’ll teach you how to make your own woven chain bracelet. And one for your bestie too, of course. You’ll need:a curb link braceletembroidery threadtwo bobby pinsa pair of scissors Cut 2 sets of 15 strands of embroidery thread, with each strand measuring four times the length of the bracelet.
Lay the second color (blue) over the first color (coral). Repeat the steps until you reach the end of the bracelet. (top images from here and here, rest of images by Honestly…WTF) 1181-1340220830-6.jpg (JPEG Image, 500 × 1221 pixels) - Scaled (53. Happy Friday! I have found a wonderful tutorial on how to braid leather and if I have time over the weekend, I will use it to make a headband!

Find the tutorial by clicking here Do you see how the colors of these photos from the tutorial echo the colors of the illustration? What the Hex? I'm not a crafty person... but occasionally I pretend to be.

When I saw this post ages ago on the ModCloth blog via Honestly... WTF, I thought I had finally found a DIY project that I could actually do! Home. ~Lady With The Red Rocker~ Would you believe what these are made of??? Well, of course you would, ’cause your smart!!! Salt Dough! Who knew, right??? 2 parts flour 1 part salt Some water (add enough water until dough forms and it feels like pizza dough, or bread dough, or play-doh, or whatever you’re used to… ;)) Mix thoroughly, until dough forms.
To print this recipe click Salt Dough Recipe. ~Lady With The Red Rocker~ Great news! If you don’t have time to make one for yourself, I sell these in my Etsy store !!! I just love these pendants. I’ve seen several on Penterest, like this one from Play At Home Mom , (Although, I could not find the original post on the blog.) and this one at Lisa’s Craft Blog . I think they are so beautiful and are such a great way to show off your family.
To make this family tree pendant , you will need to start with a ring. Lets just say that memory wire is a little tough to work with ’cause, um… it has memory and did not want to bend, but I worked it anyway. DIY Braided Bead Bracelet. It’s been awhile since our last bracelet DIY.

I don’t know about you, but our wrists have been begging for another colorful addition for months now. So after playing with some materials that were already on hand, we’ve created a tutorial for a braided bead bracelet, which is a not so distant cousin of the hex nut and wrap bracelet. Because honestly, you can never have too many . . . You’ll need: Cut the waxed linen cord into a 26″ and 19″ piece. Tie a knot about half an inch down from the loops.
Start braiding the strands. Push the bead against the base of the braid, and cross the left strand over the middle. Keep a finger at the base of the braid, holding the beads in their place and keeping the braid tight. Finish the bracelet with another inch of braided cord, measuring it against the wrist. Thread on a two hole button – two strands through one hole and one strand through another. Trim the end. Picture Frame Earring Holder. For years I had kept my earrings in this little, lined metal box.

They would get tangled and I would get frustrated. I tried the earring holders that stood on the dresser, but I would always tip it over. DIY Chan Luu-Style Wrap Bracelet.