
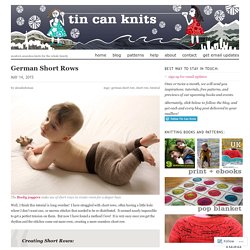
German Short Rows. The Rocky joggers make use of short rows to create room for a diaper bum Well, I think this tutorial is long overdue!
I have struggled with short rows, often having a little hole where I don’t want one, or uneven stitches that needed to be re-distributed. It seemed nearly impossible to get a perfect tension on them. But now I have found a method I love! It is very easy once you get the rhythm and the stitches come out more even, creating a more seamless short row. Creating Short Rows: Step 1 (right side): work to the stitch specified in your pattern (for my swatch I worked to 5 sts from the end) Step 2: turn the work so the wrong side is facing Sept 3: slip the stitch from the left needle to the right needle purlwise with yarn in front Step 4: Pull the yarn to the back of the work OVER TOP of the right needle.
Step 5: Bring the yarn to the front BETWEEN the needles to begin purling. Все черточки над йо: zuikodelie. Untitled. Закрытие петель иглой (резинка 2х2). Обсуждение на LiveInternet - Российский Сервис Онлайн-Дневников. Моя вязаная жизнь - добро пожаловать! Для хорошей посадки вязаного изделия нужна вытачка для груди.
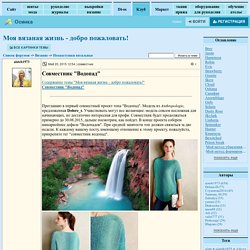
Это особенно важно, если вяжете жакет, кардиган, приталеную вещь. Тут информация совсем не новая, но в массовом издании паттернов по всему миру, в итернете и журналах, и даже у известных дизайнеров, про вытачку просто забыли. Считается, что трикотажные изделия сами по себе обтягивают грудь. Но это не совсем так. Наверное судь в том, что дизайны фотографируются на красивых худых моделях, у которых размер 32-34 и грудь, как правило, маленькая. Вытачка не нужна, если изделие свободного кроя, "oversize", или если ее конструкция подразумевает достаточный обьем в груди. Правая полочка (сторона). Мои проекты Pip, Wellwood и Burr (который находится в процессе вязания, с лицевой и с изнаночной стороны). Zuikodelie: Origins of symmetry. По просьбе grecheskaya.

В порядке возрастания эластичности. 1. Парой для традиционного закрепления косичкой является набор крючком (crochet chain cast-on). Этот набор можно делать сложным способом, то есть связать цепочку из нужного числа воздушных петель и затем подцепить на спицу задние бугорки (особенно вдохновляет при работе с тонкой черной пряжей). 2. 3. 4. 5. 6. 7. 8.
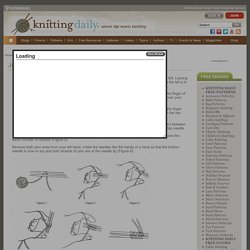
NEW! How to Knit Invisible Stitches, Grafting - KarensVariety.com. Judy's Magic Cast-On (JMCO) - Glossary - Knitting Daily. Hold two needles parallel in your right hand, one on top of the other and needle points facing to the left.
TECHknitting: Two handy knitted increases, one slanting right, one slanting left. These increases are nearly identical, but the right leaning increase is a forwards loop while the left-slanting increase is a backwards loop.
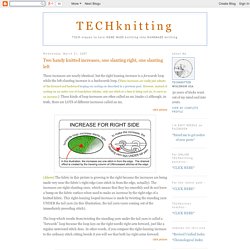
(These increases are really just subsets of the forward and backward looping-on casting-on described in a previous post. However, instead of casting-on an entire row of foundation stitches, only one stitch at a time is being cast on, to serve as an increase.) These kinds of loop increases are often called an m1 (make-1) although, in truth, there are LOTS of different increases called an m1. click picture. Lifted Increases (RLI, RLPI, LLI, LLPI) - Glossary - Knitting Daily. Knitting Daily Shop | Help / Customer Service Glossary » Lifted Increases (RLI, RLPI, LLI, LLPI) advertisement Free EBooks Topics Tags View All Tags Blogs.
TECHknitting: A very nearly invisible increase. Here is an increase which is as invisible as any increase can well be--the sort of increase you would do in the middle of a field of stockinette, should you ever need to do such a thing.
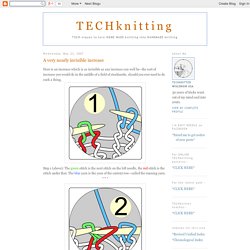
Step 1 (above): The green stitch is the next stitch on the left needle, the red stitch is the stitch under that. The blue yarn is the yarn of the current row--called the running yarn. Step 2 (above): Insert the head of the right needle into the red stitch as shown. Step 3 (above): Place the head of the red stitch on the left needle--arrange it untwisted, with the right arm forward. Step 4 (above): With the running yarn (blue) knit the red stitch AND the green stitch. That's it. --TECHknitter PS: There has been some confusion between the nearly invisible increase which ADDS a stitch to your fabric (this post above) and "knitting into the stitch below" which is a knitting trick to make a thick and puffy fabric but which does NOT ADD a stitch.