
Gourmandises d'Halloween...oui, encore... - La chouette bricole. Après le Zébra cake d'halloween , les bonbons : OBLIGÉ !
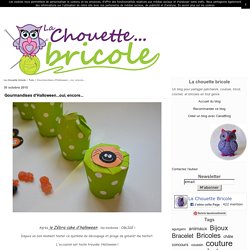
Depuis un bon moment tester ce système de découpage et pliage de gobelet me tentait. L'occasion est toute trouvée: Halloween ! Je voulais faire une petite surprise pour les enfants qui vont sonner à la maison. Comme c'est un bricolage rapide je me suis dit que j'allais partager cette activité avec vous, et puis cela permet de ne pas avoir les petites menottes pas toujours très propres toucher tous les bonbons ! Pas bête n'est ce pas ? Le matériel nécessaire: -des gobelets en carton -des étiquettes Halloween à imprimer gratuite ( étiquettes citrouilles: ici ; étiquettes araignées, fantomes...: ici ) -des bonbons ( ou biscuits ) -de la colle -une paire de ciseaux Découper le bord bourrelet du haut du gobelet,
Gathering Beauty: Diy Origami Gift Boxes. As I mentioned in this post I've been having fun making a whole bunch of these diy origami gift boxes.
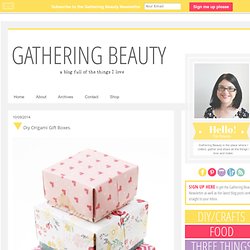
I've been thinking about using them for christmas presents (how great would they look filled with these cinnamon sugar coated cashews?) But you could use them all year round to hold whatever you want. Things you'll need to make your own origami gift boxes: Scrapbook paper, Bone folder, Glue, Craft knife, Ruler, And a Cutting mat. 1. To make your origami box you are going to need 2 pieces of square paper, the second needs to be 1/2 inch smaller than the first. 2. 3. 4. 5. 6. 7. 8. 9. 10. Once finished the larger box should fit easily on top of the smaller to form your origami gift box. To make the medium size box I used 10x10 inch and a 9.5x9.5 inch squares of paper, for the small box I used 8x8 inch and 7.5x.7.5 inch paper. Free Template Maker. Voici quelques schémas à imprimer pour réaliser de jolies boîtes! Art & Créations : Si vous le souhaitez, voici quelques schémas qui vous aideront à fabriquer de jolies boîtes pour y mettre un petit quelque chose qui fera plaisir à l’autre….ou pour la vente.
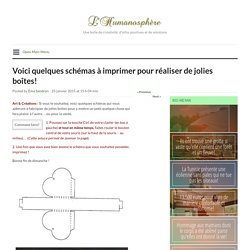
Comment faire? 1. Poussez sur la touche Ctrl de votre clavier (en bas à gauche) et tout en même temps, faites rouler le bouton central de votre souris (sur le haut de la souris – au milieu)… (Cette astuce permet de zoomer la page). 2. Une fois que vous avez bien zoomé le schéma que vous souhaitez posséder, imprimez ! Bonne fin de dimanche ! Ah un ruban, des paillettes, du tissu, une fleur séchée, des plumes, du cuir… voici autant d’idées pour enjoliver votre travail… Via Sur le même thème. Papiers-tissus_pliages.jpg (JPEG Image, 1240 × 1755 pixels) - Scaled (57%) Boite triangulaire et son couvercle. Bolsitas en foami para baby shower :lodijoella. Manualidades para baby shower Para esas fechas especiales donde tengamos que celebrar un baby shower te traemos manualidades que puedas hacer tú misma en casa ,puedes hacer bolsitas en foami para baby shower,aquí lo mas importante es el molde ,imprime ahora mismo el molde de la bolsita que te compartimos y,con el paso a paso que veras a continuación sabrás muy bien como confeccionar las bolsitas de dulces para tu baby shower.
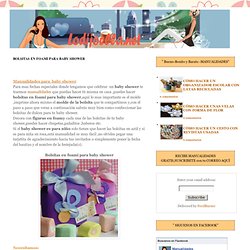
Decora con figuras en foamy cada una de las bolsitas de tu baby shower,puedes hacer chupetas,pañalitos ,baberos etc. Si el baby shower es para niño solo tienes que hacer las bolsitas en azúl y si es para niña en rosa,está manualidad es muy fácil ,no olvides pegar una tarjetita de agradecimiento hacia tus invitados o simplemente poner la fecha del bautizo y el nombre de la festejada(o). Make a gift bow from a magazine page. In gift wrap emergencies when you've got the present but need some wrapping, here's an idea for turning a magazine page into a bow.
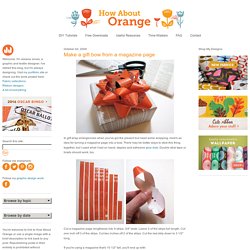
There may be better ways to stick this thing together, but I used what I had on hand: staples and adhesive glue dots. Double stick tape or brads should work, too. Cut a magazine page lengthwise into 9 strips, 3/4" wide. Leave 3 of the strips full length. Cut one inch off 3 of the strips. If you're using a magazine that's 10 1/2" tall, you'll end up with: 3 strips, 10 1/2" x 3/4" 3 strips, 9 1/2" x 3/4" 2 strips, 8 1/2" x 3/4" 1 strip, 3 1/2" x 3/4" Twist each strip to form a loop at both ends and staple it in the center.
Layer the three longest pieces on top of each other, spacing them evenly and securing each with a glue dot. Use other papers, like a map of your city. Recycled paper gift bows. I found this simple tutorial for gift bows on Craftster It's a great way to make some pretty additions to your presents this Christmas and because they use recycled paper, they are ecofriendly and thrifty too!
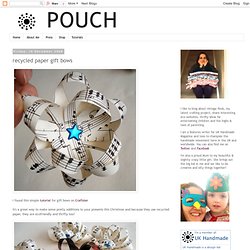
These are my first attempt, I'm pretty pleased with how they turned out. I think they differ from the ones on the tutorial as I used thinner strips and made the loops looser. All you need is some scissors, paper of your choice and shiny brads to hold them together. I used some sheets of music from a vintage book and the coloured ones are made from the glossy outer pages of magazines. I'm going to have another attempt and try and make some exactly like the tutorial ones, I think I need to cut the strips thicker! These are simple to make and a good relaxing-in-front-of-the-television activity, but be warned, they are very addictive once you start making them!
Most inspiring pictures and photos! Most inspiring pictures and photos! Origami Gift Bag. Modèle Origami de Pochette en papier. Most inspiring pictures and photos!