
How to Cut out Hair in Photoshop CC Tutorial. How to Use Select and Mask to extract something from its background in Photoshop CC 2015.5 Note: If you are using Photoshop CS6 or earlier use this tutorial One of the most popular tasks in photoshop is removing something from its background, extracting, masking, floating, whatever you choose to call it.
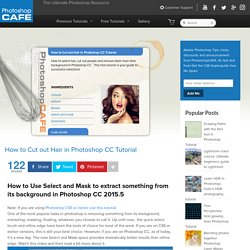
Up until now, the quick select brush and refine edge have been the tools of choice for most of the work. If you are on CS6 or earlier versions, this is still your best choice. However, if you are on Photoshop CC, as of today, it’s a new day. Adobe has been hard at work with the Select and Mask space. You will notice, that it looks similar to refine edge, but it’s much better.
Either start with a selection, or choose a selection tool and choose Select and Mask from the options barChoose the Onionskin mode (all new) and begin to paint on your subject (O key).If you move the opacity slider, you can choose a balance between the original image and the current selection. FreeTutorials Colin. A Handy Guide to Figuring Out Blurs in Photoshop. January 15, 2015 4:36 am Callie Kavourgias Blurs can be beautiful things.
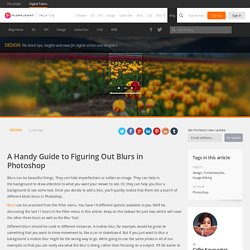
They can hide imperfections or soften an image. They can help in the background to draw attention to what you want your viewer to see. Or, they can help you blur a background to see some text. Blurs can be beautiful things. Blurs can be accessed from the Filter menu. Different blurs should be used in different instances. We’ll be using this image of tulips for all of the blur examples. Image by flickr user James Wheeler CC by SA 2.0 Average Blur Selecting this option will create a color that’s the average of all the colors in your image by averaging the color value of neighboring pixels. If you haven’t made any selections, like with the Lasso tool, then the Average Blur will replace your entire image with the entire image’s average. However, if you’d like you can select one area, before choosing Average Blur, and then it’ll replace that area with the average color that’s in that selection.
Blur and Blur More Box Blur. Clipping Mask Tutorial. Clipping masks are one of the ways you can add images/textures/digital papers to storyboards, photo frames and text.

They might sound complicated, but they are so simple once you figure out how to use them. There are two common ways you can create photo storyboards. Some of my storyboards are simple png files that have cutouts for your images. You drag your image under the frame and resize the image to fit. This is a sample of that type of storyboard. Today I am going to show you how to add images to storyboards using clipping masks in Photoshop and Photoshop Elements. Clipping Mask Tutorial for Photoshop and PSE: I am using the CoffeeShop Web Boards 8 in this tutorial (click here to download it). If you are using the Group-It action, close everything in your program and open the storyboard. Open the layered psd storyboard. PSE11-12 Users-Please Read! PSE11-12 Users: I prefer using floating documents rather than tabs while loading storyboards in PSE. Photographic Enhancement Tutorials on MasterPhotoshop - DeviantArt.
Selecting Hair with Refine Edge in Photoshop CS5. Step 1: Draw A Rough Selection Outline Around Your Subject I'm going to begin by drawing a fairly rough selection outline around the woman in the photo.
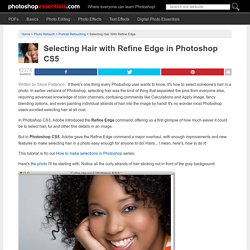
There's no need for any fancy or advanced selection tools here. Photoshop's standard Lasso Tool will work fine, and the Polygonal Lasso Tool will work even better because it's faster and easier to use. I'll grab the Polygonal Lasso Tool from the Tools panel by clicking and holding on the Lasso Tool, then selecting the Polygonal Lasso Tool from the fly-out menu: Selecting the Polygonal Lasso Tool. With the Polygonal Lasso Tool in hand, I'll begin by clicking around the woman's arm and shoulder in the bottom center area of the photo to lay down points for my selection outline. Clicking with the Polygonal Lasso Tool along the inner edge of her arm and shoulder. As I move up into the woman's hair, I'll again stay close to the edge but I'll make sure to avoid any areas where the gray background is showing through her hair.