
Code and fabrication resources for physical computing and networking. Recently, a colleague of mine was working on a project with an Arduino Yún that involved reading a lot of sensor data using the Yún’s Arduino processor and writing it to the microSD card via the board’s Linux processor to be served to other devices via HTTP.

She found that it took anywhere from 20 milliseconds to several seconds to get the data from the sensors written to the SD card. “Why is it not real-time?” She asked me. Welcome to the world of embedded operating systems. They are not realtime. My colleague was measuring her function’s response time in tens to hundreds of milliseconds. All computers run programs. At the electrical level, all computers are made up of transistors, so in computing, the fastest version of “realtime” means “how fast can you read and act on a changing voltage on a transistor?” Operating systems, both on small boards like this and on servers and personal computers, do not guarantee a minimum response time to physical I/O. 1) no operating system. Tutorials / Data Logger.
uLog & OpenLog - Tutorials of DataLogger from Sparkfun uLog openLog Overview This tutorial is intended to provide information and comparison of uLog and openLog. uLog is a tiny analog logging device from Sparkfun.
The uLog have an onboard flash memory mated with a ATtiny24. It don’t need a microcontroller, but can only take data on three analog in. Unstable Voltages of Solar Cells Damage Charging Boards? A Tip 4 U. Solar cell is one of the most popular ways we use to harvest green power.
It’s so convenient, cheap and environmental-friendly that we sometimes have some crazy urges that every project should be tinkered into a solar-powered one. We love this carbon-free idea, and sure you agree (yes, we can tell that from sales of these products.). However, the unstable output voltage of the solar cell might cause damage to your charging board. CAAD Embedded hosted by ETH Zürich - SaveEnergy. Examples - HowTo - Decrease Battery Consumption This tutorial shows an easy possibility on how to save arduino's battery lifetime while using xBee as a transceiver for sleeping mode.
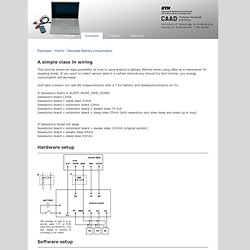
If you want to collect sensor data in a certain interval you should try this tutorial. you energy consumption will decrease. Just take a lookon our real life measurements with a 7.6V battery and Seeeduino/Arduino on 5V: If Seeeduino board in SLEEP_MODE_PWR_DOWN Seeeduino board 13mA Seeeduino board + sleep xbee 33mA Seeeduino board + extension board 23mA Seeeduino board + extension board + awake xbee 74 mA Seeeduino board + extension board + sleep xbee 25mA (both seeeduino and xbee sleep and wake up in loop) Interfaces:introduction · SensorWiki.org. Sensors typically need to be interfaced to the computer in one way or another.
It is possible to buy sensor interfaces, and it also possible to build them yourself. This page gives an overview of both. Communication_protocols:introduction · SensorWiki.org. This section of the wiki is devoted to church calendar software methods of getting data from sensor interfaces to host computers.
RS232 serial Serial data is generally buffered by the operating system in order to provide the highest possible data transfer rates. This usually adds to latency and jitter. However, online bet RS232 often provides the simplest means to connect an inexpensive microcontroller to a host computer. A simple circuit can be used to convert from a microcontroller's TTL voltage levels to the RS232 standard. Connector: DB9 or DB25 Max Transfer Rate: 115,200 bps. Playground - InterfacingWithHardware. These topics cover the hardware and software setup required to connect an Arduino device with a variety of electronic parts, chips and devices.
A related topic not covered under this section is the shield, boards that plug directly into an Arduino's pin layout. Information on the creation and use of specific shields belongs in that section. Tutorials:introduction · SensorWiki.org. Welcome - Fritzing. Bluetooth \ Wiring. By Mitchell Page Mpag5967 [at] mail.usyd.edu.au Key Centre of Design Computing and Cognition, University of Sydney , Australia Normally you would use a serial USB cable connected from your computer to your Wiring board for receiving data sent from a computer running processing to your board.
Tutorials \ Wiring. Basics \ Wiring. Cover \ Exhibition \ Reference \ Learning \ Hardware \ Download \ About »Feed »Forum »Wiki »Code Tutorials: \ Examples: Basics, Library, Topics \ Books.
Library \ Wiring. Calibration. Learning Examples | Foundations | Hacking | Links Examples > Analog I/O Calibration This example demonstrates one techinque for calibrating sensor input.
The Arduino takes sensor readings for five seconds during the startup, and tracks the highest and lowest values it gets. These sensor readings during the first five seconds of the sketch execution define the minimum and maximum of expected values for the readings taken during the loop. Hardware Required. Smoothing. Learning Examples | Foundations | Hacking | Links Examples > Analog I/O. RCtime. Learning Examples | Foundations | Hacking | Links In situations where all of the Duino's A/D pins are used, RCtime is a workaround for reading any kind of resistive sensors on any digital pin. This RCtime function duplicates the Basic Stamp's function of the same name. It can be used to read resistive sensors of any type.
Change the capacitor size to achieve the desired resolution. Tutorials. The World Famous Index of Arduino & Freeduino Knowledge. Body-warner > The process of creating a wearable for air quality awareness. CAAD Embedded hosted by ETH Zürich - Practice.
Bionic Arduino – Introduction to Microcontrollers with Arduino. Bionic Arduino is a set of four 3-hour classes in November 2007 hosted by Machine Project and taught by Tod E. Kurt. It is an introduction to microcontroller programming and interfacing with the real world using the Arduino physical computing platform. It focuses on building new physical senses and making motion with the building blocks of robotics, using Arduino as a platform. In the class, participants are shown and experiment with the Arduino’s capabilities and learn the basics of common microcontroller interfacing, such as: digital output to control lights and LEDs, digital input to read switches and buttons, analog output to control motor position or LED brightness, and analog input to read sensor inputs.
The class assumes no previous electronics knowledge, though it does assume a little programming knowledge. Class description at Machine Project Class Notes. AppliedSensor. AppliedSensor Launches New Website with Enhanced User-Friendly Features Website Helps OEMs, Design Engineers Accelerate New Product Development for Appliance, Automotive, Building Technology, Consumer and Industrial Applications Reutlingen, Germany – April 3, 2014 – AppliedSensor has launched a new website featuring product datasheets, articles and other detailed information about chemical gas sensor and indoor air quality (IAQ) solutions.
The website enables customers, OEMs and design engineers to easily locate products that match energy-efficient gas… Read more Does Your Stove, Refrigerator or Mobile Device Let You Know When Air Quality is Poor? Picture this: a cooker or range hood over your stove that not only eliminates cooking odors in your kitchen, but saves energy, too. Read more Indoor Air Quality Widely Discussed at International Scientific Conference. Tutorials / Tutorials. DIY Environmental Monitoring — Development Blog. Sensors, Measurements and Instrumentation Links. Resources for Sensors, Measurements, Instrumentation and related Sciences The following links are to information and resources such as institutions and organizations, databases or specialized links pages, articles, referenced data or well-written handbooks.
All of the web sites noted here have been reviewed and selected for professional quality, relevance and content. <LS> denotes a suggested link. Last updated: July 16, 2013. Datasheet catalog for integrated circuits, diodes, triacs, and other semiconductors, view. The Electronic Components and Semiconductor Superstore. Sensors - GAS - Ozone (O3) Gas Sensor - MQ-131 - SBC , Sensor , RFID , Wireless ,Display ,Embedded OS - ThaiEasyElec.net. Steve's Electronic Components. Koolmonoxidesensor AS-MLC in de Conrad online shop. Shop - Sensors - MQ131 (O3) - Buy Ozone sensor for Arduino. Wholesale Gas Sensor Module-Buy Gas Sensor Module lots from China Gas Sensor Module wholesalers on Aliexpress.
Contact AppliedSensor to find answers to your most pressing sensor questions. Hi rel semiconductors. Arduino Air Quailty Monitor. Multiply by 100 to get particles per cubic foot. Desired value is under 500 Multiply by 100 to get particles per cubic foot. Desired value is under 50 Sensor is uncalibrated. Arduino Air Quailty. Indoor Air Quality Plots. Arduino Air Quailty. .5 to 2.5 micron particles. Mbed NXP LPC1768 Prototyping Board [ARM90153M] - $59.50. The mbed works with the groundbreaking mbed tool suite, lets you create a functioning prototype faster than ever. The tightly coupled combination of hardware and software makes it easy to explore designs quickly, so you can be more adventurous, more inventive, and more productive. Features. Droidalyzer - Portable Android Development Kit (IOIO) + Alcohol Detector Accessory for Android [KIT06251P] - $65.00.
Grove - ADK Dash Kit [KIT83150P] - $129.00. Seeeduino ADK Main Board [ARD52028P] - $79.90. Grove - Mega Shield [SLD90147P] - $9.90. Seeed Studio Blog. Hi, this is sonic, the boy who is always dreaming. Thanks everyone for joining seeed community since 2008, we couldn’t reach today’s achievement without our maker community. Here comes the first comment on our blog is on the post: An idea about open source PCBs. The Seeed Blog is proudly powered by WordPress, we share the same idea with wordpress to make thing done better and faster. About us. Blog: data visualization. Blog: augmented reality. What we do.