

Metal Text Under 12 O’clock Spot Light « PsAwesome★ Awesome Photoshop Tutorials. In this Awesome★ Photoshop tutorial, you will learn how to create a metal text which is illuminated from above, casting shadow.
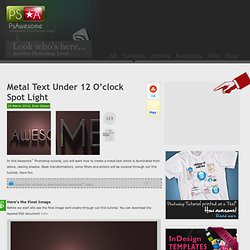
Basic transformations, some filters and actions will be covered through out this tutorial. Have fun. Awesome★ Tutorial Video >> Metal Text Under 12 O’clock Spot Light Download the video of this tutorial for just 1$. Tutorials. How To Draw A Wave. This art tutorial, kindly donated by surfing comic strip illustrator and surf artist Bob Penuelas covers how to draw a wave the Wilbur Kookmeyer way!
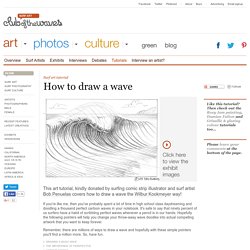
If you're like me, then you've probably spent a lot of time in high school class daydreaming and doodling a thousand perfect cartoon waves in your notebook. It's safe to say that ninety percent of us surfers have a habit of scribbling perfect waves whenever a pencil is in our hands. Hopefully the following pointers will help you change your throw-away wave doodles into actual compelling artwork that you want to keep forever. 15 Best Photoshop Light Effect Tutorials.
Nightclub & concert photography tips for the modestly equipped shooter. Last night, Ivo sent in an inquiry regarding nightclub and/or concert photography. Ivo has a humble photography kit, as most of us who are not born millionaires do! He was asked to shoot a nightclub event happening in 2 days from now, and he‘s reaching out for help in that area. Since Ivo’s situation is a bit urgent, I had to move up the question queue and give priority to his issue, but this in no way means that I’ve forgotten about all your questions that have been submitted earlier. I will get to them soon and make sure I provide an answer to each and every one of you, but in the spirit of helping one another let’s start by trying to solve Ivo’s problem as he’s kind of on a deadline.
Since nightclub and concert photography more or less provide the same challenges for the shooter, I decided to include both in this post for those of you who are looking for concert photography tips rather than nightclub photography or vice versa. Now as I’ve mentioned earlier, Ivo has a basic kit. Tutorials [ photoshop, flash, pov-ray & polar graphing tutorials ] Tutorials. Knotting a nail. Trainée Lumineuse [Tuto Photoshop] - Tuto Photoshop.
Voilà le résultat que vous devriez être capable d'obtenir à la fin de ce tutorial : Bon commençons par créer un nouveau document photoshop : Déverrouillez l'arrière plan en double cliquant sur le cadenas dans la palette des calques.
![Trainée Lumineuse [Tuto Photoshop] - Tuto Photoshop](http://cdn.pearltrees.com/s/pic/th/lumineuse-photoshop-graphiques-18511223)
Renommez-le "arrière-plan". Appuyez sur la touche "D" afin de réinitialiser les couleurs de premier et arrière plan (noir en premier plan et blanc en arrière plan). Remplissez l'arrière-plan de noir (Ctrl+G ou bien pot de peinture). Créez un nouveau calque (Ctrl+Shift+N) que vous nommerez "Traits".
45+ Photoshop Web Design Layout Tutorials. Professional Photo Retouching for Perfect Skin. Professional Photo Retouching for Perfect Skin Skin tones are rarely even, as a retoucher it’s important to remember that after your healing and dodge and burn (click to read the previous articles) you need to even them out for good results.

If we take a look at the following shot provided by Fantasy Fotos: Notice that the model’s skin tones vary, if we focus generally on the legs you’ll see what I mean, there’s a little too much red in the knees and the feet are less saturated than the thighs. That needs fixing, and we’re going to do it with a Gradient Map. How to Create Eroded Metal Text with Photoshop. In this tutorial I'll show you how to create an eroded metal text effect.
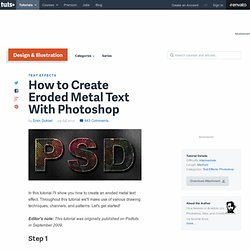
Throughout this tutorial we'll make use of various drawing techniques, channels, and patterns. Let's get started! Editor's note: This tutorial was originally published on Psdtuts in September 2009. Step 1 First we need to define a pattern of dots. Fill the selection with white. Now drag two more guides to the center of the selection as in the image below.
Top 25 Excellent Adobe Photoshop Tutorials of July Month. Adobe Photoshop is one of the most popular Graphic Editing Software.

You can create Visual Effects, Text Effects, Icons, Fire & Explosion Effects, and Photo Effects using Adobe Photoshop. Learning Photoshop was never easy, until tutorial blogs came into design world. Make an Inspiring Artistic Poster with Drawn Elements. Making a Superhero Movie Teaser Poster With PhotoShop. GraphicTutorials.net - Photoshop and Design Tutorials. Learn how to retouch skin, how to bring out the eyes and how to whiten the teeth. GraphicTutorials.net - Photoshop and Design Tutorials. GraphicTutorials.net - Photoshop and Design Tutorials. Design an impresive blog layout. 25 Fresh Web Layout Tutorials for Beginners and Advanced. Designing websites in Photoshop is becoming a necessity for every designer.
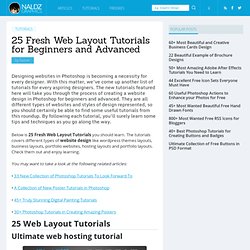
With this matter, we’ve come up another list of tutorials for every aspiring designers. The new tutorials featured here will take you through the process of creating a website design in Photoshop for beginners and advanced. They are all different types of websites and styles of design represented, so you should certainly be able to find some useful tutorials from this roundup. By following each tutorial, you’ll surely learn some tips and techniques as you go along the way.
3D.DTuts - Free Tutorials by 3D Modeling, Texturing, Animation. Details Skill Level:BeginnerTechniques:Modeling, Rendering, TexturingUsed Software:3DS MAXCompletion Time:2 hoursAds: Hi everybody.
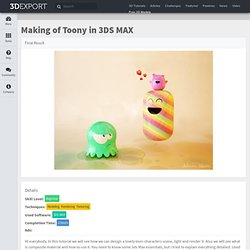
In this tutorial we will see how we can design a lovely toon characters scene, light and render it. Also we will see what is composite material and how to use it. You need to know some 3ds Max essentials, but i tried to explain everything detailed. Final Result. 3D.DTuts - Free Tutorials by 3D Modeling, Texturing, Animation. Details Skill Level:IntermediateTechniques:3d modelingUsed Software:3ds Max , Mudbox, Vray, PhotoshopCompletion Time:4 hoursAds: My style is cartoony I would like my character be a childlike kind totally Before start designing any character you must know the characteristics of the character like what is the age, from which background character is coming, what was the objective etc…?
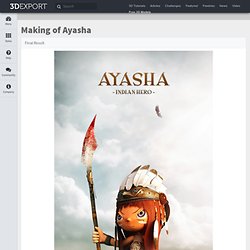
So before I start to design my character I spotted some characteristic for that, and because my style is cartoony I would like my character be a childlike kind totally. So I wrote for myself on the paper “childlike, lovely, brave & oppressed”, I think it’s very important point in creating a character, because it will affect the whole characterization. 3D Monster. 14 Aug 2010 This is the first tutorial of my four part series dealing with character animation.
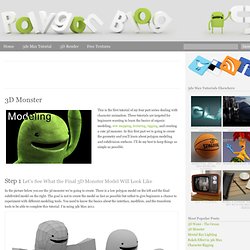
These tutorials are targeted for beginners wanting to learn the basics of organic modeling, uvw mapping, texturing, rigging, and creating a cute 3d monster. In this first part we’re going to create the geometry and you’ll learn about polygon modeling and subdivision surfaces. I’ll do my best to keep things as simple as possible. 30 3DS Max Modeling Tutorials. 3DS MAX has opened new doors for showing us our creativity. With it the reel world looks much better and wonderful than the real world. There are different steps in 3DS MAX but the most important one is modeling. You can’t get the output right without perfection in modeling. Superperson Opening title in After Effects. 50 Excellent Adobe After Effects Tutorials. Jan 07 2010 This post presents a round-up of Adobe After Effects Tutorials for your visual effects and motion graphics-related work. After Effects is getting popular as the industry of Computer Graphics and Digital Motion is growing.
With After Effects, you have choice to generate dynamic and expressive motion graphics with truly stunning visual effects — very easily and quickly. So here is the list of Adobe After Effects Tutorials. After Effects Resources » Data & Info Graphics. 50 Effective Landing Page Templates for your Products. A landing page templates or landing page is a single web page used that appears after clicking on an advertisement or an article at a certain site for conversion.
It usually display directed sales copy that is a logical extension of the advertisement or link. Landing pages are commonly used in online marketing to enhance the effectiveness of advertisements and at the same time increase the sales of the product that it is being promoted. Nowadays, business of all sorts turn to Landing Page in promoting their products and in ensuring that it sells to its target consumers. Create an Animated Homage to Bruce Lee – Day 1. In this tutorial Markus walks us through the creation of a video accompaniment to Bruce Lee's 'Be Water' philosophy. It features vibrant motion typographic sub-titles, animated illustrations and clever camera techniques. The training will be split over 3 days for a total of 71 minutes of tutorial video. In day 1 of the training Markus designs and animates the typography for the video. RGTV - Episodes. Comments. 77 Ultimate Round-Up of Adobe After Effects Tutorials.
The Computer Graphics & Digital Motion Industry is once again on its historical growth trend. When it comes to visual effects and motion graphics, After Effects is usually one of the primary choices to consider. Create your tilt-shift picture. Move the vertical slider on the right of the original photo to select the area in focus. Use the "Preview" button to see the results, then click on the required image size and press "Download" when done to process the image and get a download link. Site members get unlimited downloads up to 21MP (5700 pixel length/width) and can access over 50 bokeh styles, click here for details.
Processing and downloading hi-res images may take a few minutes, depending on original photo size and other factors. A download link to the most recent hi-res file processed this session will appear in the "Recent hi-res:" area. Untitled. Premium graphic design resources and Advanced Photoshop Tutorials. Learn how to create a sleek portfolio layout with Photoshop CS5. Hello my friends. Another day means another resource, or tutorial released on Graphstock.com.