
Create dynamic distortion effects. ART158_tut_pshop.pdf (application/pdf Object) How to Mold Paint Splatter to a Face in Photoshop. In this tutorial, we'll learn how to take splattered paint Photoshop brushes and apply them to the contours of a model's face.

This is a relatively simple technique, which yields excellent artistic results. Let's get to it! Final Image Preview Take a look at the image we'll be creating. Want access to the full PSD files and downloadable copies of every tutorial, including this one? Video Tutorial Our video editor Gavin Steele has created this video tutorial to compliment this text + image tutorial. Preparation First thing you will need to do to create this effect is find some nice paint splatter/spray brushes. Step 1 Copy the background and paste it onto a new layer. Create a new layer labeled "Extra Skin. " For this I usually just play around with the Cloning Tool until I get close to something that looks right.
Step 2 Once we have covered all the facial features, select the "Extra Skin" layer and the "Subject" layer, then press Command + Alt + E on to merge the layers into a new layer. Adding Texture to the Skin. Welcome to PhotoshopStar.com!

If you find this site useful, you might want to subscribe to our free newsletter for updates on our new Photoshop Tutorials and Articles. Basically, in this tutorial I’m going to be showing you how to add texture to the skin like the one in the below image. Firstly, start by finding a stock photo that you can add the texture to. For example, you can use this one or you can of course, go to Google Images and look up some picture you are interesting in. Also you need to find some appropriate stone texture. Flip this texture vertical with Edit > Transform > Flip Vertical and set opacity up to 50% for this layer: Ok, then mess with the layer mode & opacity/fill. This texture will cover the face and we need one more for the neck covering. Now it’s time to compose two different texture layers in one and cut away the textures out the skin area.
Go back to the hidden layer and make it visible again. Now I would like to clear eyes area from the texture. Selecting Hair with Refine Edge in Photoshop CS5. Step 1: Draw A Rough Selection Outline Around Your Subject I'm going to begin by drawing a fairly rough selection outline around the woman in the photo.
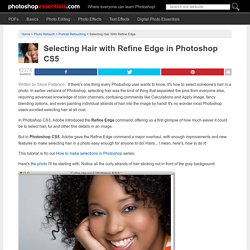
There's no need for any fancy or advanced selection tools here. Photoshop's standard Lasso Tool will work fine, and the Polygonal Lasso Tool will work even better because it's faster and easier to use. I'll grab the Polygonal Lasso Tool from the Tools panel by clicking and holding on the Lasso Tool, then selecting the Polygonal Lasso Tool from the fly-out menu: Selecting the Polygonal Lasso Tool.
With the Polygonal Lasso Tool in hand, I'll begin by clicking around the woman's arm and shoulder in the bottom center area of the photo to lay down points for my selection outline. Clicking with the Polygonal Lasso Tool along the inner edge of her arm and shoulder. As I move up into the woman's hair, I'll again stay close to the edge but I'll make sure to avoid any areas where the gray background is showing through her hair. 28 Impressive Pop Art Inspired Photoshop Tutorials. Pop Art is a style of modern art that focuses its attention on well known images of popular culture such as from advertising, film, billboards, comic strips and even supermarket packaging.

With the proper use of color and images, a sprinkle of humor and a bucket load of talent, the pop-art effect can be really impressive. Below you will find a selection of tutorials that will help you create your pop-art vision. Pop Art Inspired Fashion Illustration PS Tutorial Wicked-Worn Vintage Pop Art Design PS Tutorial Andy-Warhol-Up Your Photographs PS Tutorial Pop Art Inspired by Lichtenstein PS Tutorial Pop Art – Photo Effects PS Tutorial Pop Art Comic PS Tutorial Turning a Photo into Lichtenstein Style Pop Art PS Tutorial.