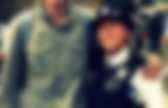
How to Create a Deus-Ex Inspired Photo Manipulation with Photoshop. How to Create a Deus-Ex Inspired Photo Manipulation with PhotoshopReviewed by Paul Victor on Dec 1Rating: Preview of Final Results Deus-Ex Inspired Photo Manipulation Photoshop Tutorial Resources Step 1 We would first need to crop the photograph a little bit so the composition is evened out better.

Step 2 Before we start on the high-tech part of the eyeball, we first need to retouch the small veins on the eyeball itself as it’s a futuristic prosthetic eye. You can fix any spots on the eyeball or skin that may annoy you but for this tutorial, I’d like to focus on the eyeball. Step 3 Create a copy of the photograph layer and rename it ‘Texture’. Step 4 To achieve that futuristic blue and green tint, we will need to add a Curves Adjustment Layer with the settings shown below. Step 5 To create a more cinematic look, we will need to sharpen the photograph. With the Background layer selected, go to Filter > Sharpen > Unsharp Mask. Repeat this exact step for the ‘Texture’ layer. 6.2.3.2 Photoshop English. Images in category Nature.
Inspiration, Technique, Great Design. Free Miscellaneous Textures @ TextureZ.com. Magic and special light effects. Magic and special light effects July 3rd, 2009 by ART-D Posted in Adobe Photoshop, Designing This tutorial will teach you to create amazing “magic” green color effects using some simple methods.

It will greatly beautify every fantasy-style work. Final Image Preview Create a new file (File>New) of 1920x1200px/72dpi. Select now the Rectangle Tool (U) to continue representing the background: Set the next demonstrated styles for the last made layer by clicking on it on the layers’ panel: Fill 0%, Blending Options>Gradient Overlay Gradient’s parameters: Create a new layer which must be processed with a standard brush of white color to include on the picture several spots and lines as you may see on the next picture: Select the next indicated option Filter>Blur>Radial blur (2 times) Using Free Transform option, press Maintain aspect ratio to resize uniformly the rounded lines: Select the next styles for the layer containing the rounded lines: Blending Options>Color Overlay.
Photoshop Tutorials. Free Photoshop Tutorials & Adobe Photoshop Tips. Topaz Plugins Super Crazy Sale - 35% Off All Products I hope you are enjoying the holiday season.
As we near the end of 2015, Topaz wants to spread a little cheer with a sale on the entire line of their products. From December 17th through December 31st, Topaz is offering 35% off of the entire Topaz store. If you love plugins and have been waiting for a great sale, here it is! Use coupon code TOPAZ2015 for the discount sale price to be reflected in your shopping cart.
PhotoshopSupport and Adobe Exclusive Deal On Creative Cloud Photography Plan - Save Up To 20% On Your First Year PhotoshopSupport.com and Adobe invite you to become a Creative Cloud Photography plan member today and save up to 20% on your first year! Offer valid from October 28, 2015 to November 28, 2016, for customers of PhotoshopSupport.com only. Capture the moment. Your photos don’t always capture the scene the way you remember it. Free Adobe Photoshop Tutorials For Creative Suite 1 Creating Black And White From Color. Photoshop Drawing Tutorials and Articles. Photoshop Basics. 40 Photoshop Tutorials for Lighting and Abstract Effects. Piešiame plaukus su Photoshop. Piešiame plaukus su Photoshop Šioje pamokėlėje jūs galite pamatyti tiesių, šiek tiek besigarbanojančių plaukų piešimo principus 1.

Šioje pamokoje piešime plaukus panaudodami Brush Tool (B)(piešti arba tapyti parinkta priekinio plano spalva), Dodge Tool (O)(pašviesinti vaizdo taškus juos paryškinant), Burn Tool (O)(patamsinti vaizdo taškus) ir Smudge Tool (tepti paveiksliuko spalvas) įrankius 2. Brush Tool (B)(piešti arba tapyti parinkta priekinio plano spalva) įrankį ir nupieškite pagrindinę plaukų formą. 3. Smudge Tool (tepti paveiksliuko spalvas) įrankį(1), nustatykite 10-20 vaizdo taškų(pixel) skersmenį su minkštais kraštais(2). “Tempkite” plaukus pagal jų natūralaus augimo kryptį Gavosi taip: 4. Dodge Tool (O)(pašviesinti vaizdo taškus juos paryškinant) įrankį. Laikant nuspaustą ALT klavišą Dodge įrankis pavirsta Burn įrankiu. Štai kas gavosi po 5 minučių darbo: 5. Paveiksliuke parodytos sritys kurias reikia patamsinti(darker)/pašviesinti(lighter) panaudojus Dodge ir 6.