
Fun with pockets ~ a tutorial. Thank you so much for the sweater love. i'm happy that the pockets were liked. if you'd like to try adding pockets to your knits too, here is a photo tutorial of how i've done it. ready?
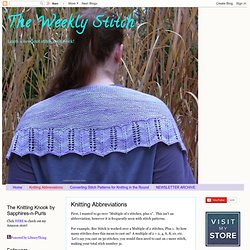
Here we go... here is what you'll need to make your pocket(s). i've used contrasting color wool for the inside, but if you'd rather keep to all one color, then disregard the second color. for demonstration purposes i've made a swatch. before cutting into your sweater, i would suggest always making a swatch to practice on first, you'll want to determine where the pocket should be, then find the center on the sweater (swatch). it's easy to just look, but if you like you can add pins to mark the placement if you pull your swatch apart, you'll be able to see the stitches a bit clearer. do you see the double vertical bars?
Lift the stitch so you isolate just one. Knitting Abbreviations. First, I wanted to go over "Multiple of x stitches, plus x".
This isn't an abbreviation, however it is frequently seen with stitch patterns. For example, Bee Stitch is worked over a Multiple of 2 stitches, Plus 1. So how many stitches does this mean to cast on? A multiple of 2 = 2, 4, 6, 8, 10, etc. Let's say you cast on 30 stitches; you would then need to cast on 1 more stitch, making your total stich number 31. Knitca™ Drawing knitwear schematics in Illustrator: Part 2 - Jen Arnall-Culliford Knitwear. Last week's post covered setting up your preferences and layers in Illustrator.
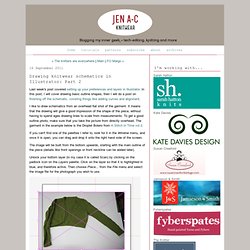
In this post, I will cover drawing basic outline shapes, then I will do a post on finishing off the schematic, covering things like adding curves and alignment. I like to draw schematics from an overhead flat shot of the garment. It means that the drawing will give a good impression of the shape of the piece, without having to spend ages drawing lines to scale from measurements. To get a good outline photo, make sure that you take the picture from directly overhead. The garment in the example below is the Droplet Bolero from A Stitch in Time vol 2. Drawing knitwear schematics in Illustrator: Part 1 - Jen Arnall-Culliford Knitwear. One of the many jobs that I've done while working on A Stitch in Time 2 is drawing schematics for each of the garments.
I thought it might be helpful to do a quick run-down on drawing these, as it seems to be a question that pops up from time to time on designer blogs and in the designer's group on Ravelry. I am using Adobe ® Creative Suite 5 ® (CS5) and my copy of Illustrator ® is version 15.0.0. I work on a MacBook Pro using OS X version 10.6.8. Some aspects may look a little different if you are using a PC or an older version of Illustrator, however the differences shouldn't be too significant.
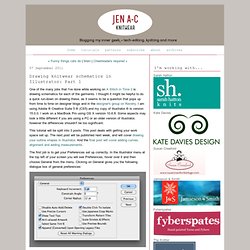
This tutorial will be split into 3 posts. The first job is to get your Preferences set up correctly. Jen Arnall-Culliford Knitwear: Technical Editing. Today's post covers refining your outline shape - adding curves and details - as well as adding measurements and aligning.

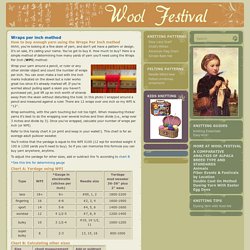
This completes the series on using Illustrator to draw knitwear schematics. The first two posts in this series covered setting up preferences and layers in Illustrator, and drawing basic outline shapes. This is the basic angular outline shape for our schematic. Member Desktop. Wraps per inch method. How to buy enough yarn using the Wraps Per Inch method Ahhh, you're looking at a fine skein of yarn, and don't yet have a pattern or design.
Weaving in Ends. I have some good news.

And, I have some bad news. Good news first: there is no one right way to weave in your ends. So, chances are, you haven’t been doing it wrong! Now, the bad news: there are so many different ways to weave in your ends, you might not be doing it the best way either. Videos Tutoriales DROPS. Brooklyn Tweed. JF: Welcome, Dianna!

Glad to have you on the blog today! DW: Thanks for having me! JF: Your design work seems heavily inspired by Scandinavian traditions and culture. Can you tell us a little bit about that? Do you have a family history in that region of the world? Short Rows: Shadow Wraps. Over the last couple weeks I’ve reviewed the plain wrap, the yarn over wrap, the Japanese wrap, and the double stitch wrap.
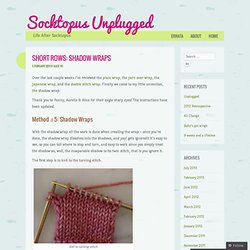
Finally we come to my little unvention, the shadow wrap. Thank you to Penny, Aurelia & Alice for their eagle sharp eyes! The instructions have been updated. Method #5: Shadow Wraps With the shadow wrap all the work is done when creating the wrap – once you’re done, the shadow wrap dissolves into the shadows, and yay! The first step is to knit to the turning stitch. Knit to turning stitch Before going any further, let’s just take a moment to identify the relevant stitches.
Daughter & Mama Stitches Pick up the mama stitch with your right needle. TECHknitting. Includes 13 illustrations, click any illustration to enlarge *For those following along with the 8-trick Pocket Hat KAL, there are no pattern instructions in today's post.
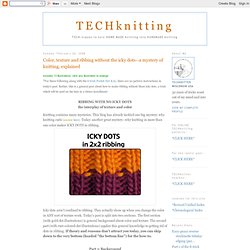
Rather, this is a general post about how to make ribbing without those icky dots, a trick which will be used on the hats in a future installment. RIBBING WITH NO ICKY DOTSthe interplay of texture and color Knitting contains many mysteries. This blog has already tackled one big mystery: why knitting curls (answer here). Today: another great mystery--why knitting in more than one color makes ICKY DOTS in ribbing. Knitty.com.