
The Lazy Lady’s Guide to DIY: Hanging Herb Garden. At some point near the middle of March, I always decide that I’m “done” with winter.

The sweaters and jackets get pushed to the back of the closet, the flip flops come out, and I inevitably freeze my butt off for several weeks until the weather catches up with my warm-weather state of mind. Likewise, my cravings for fresh herbs and veggies are always a little ahead of the season. Growing your own herbs is a great way to save money and avoid buying too much at a time and letting most of it go to waste.
If it’s still too cold to plant outside where you are (or if you’re short on space!) This hanging herb garden is the perfect project to get you in gear for spring. What you’ll need: Tin containers with snap-on plastic lids (tea, cocoa, and coffee cans are a good bet), coat hangers, pliers, scissors, herbs (I bought basil, rosemary, dill, and cilantro for about $2.50 each), masking tape, coffee filters, a nail, a hammer, X-acto knife, scrap fabric or paper, and glue or spray adhesive. Monogram Mirror. Tutorial on how to make a Monogram Mirror on down in this post.....
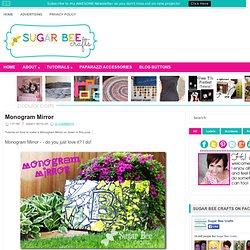
Monogram Mirror - - do you just love it? I do! Side note - - let me tell, it's hard to take a picture of a mirror and show how fabulous it is. Just know, it's fabulous in person!! I have to admit, the monogram was my husband's idea - isn't he a genius?!? I originally thought I was going to put this on the mantel in my family room, but I just wasn't loving it there. Let me show you how I made this. Supply list: --mirror --hammer/crowbar --board --liquid nail (or hot glue?
First grab a mirror (or two) and remove the frame. Put the mirror in a trash sack. Safety note - - I normally let my kids help with my project, but this is not one for kids! Next draw your monogram in the middle of your board. After you've done the monogram area, place all your large pieces. DIY Planter Box Centerpiece. Hey friends!

After finishing my mirrors in the dining room, my table started to look naked! So… I dressed her up today. This is a super easy project and I LOVE the results! This is the wood I used for the project… 2 – 1x6x4 whitewood boards 1- 2×4 stud Total for wood was under $10… Yippee! Plastic Cup Lamp. Now that my university is closed for winter holidays, I finally have more free time to do all the crafty things I’ve been wanting to.

One of these is a lamp made from plastic cups I’ve seen at taf, the art foundation, in the Monastiraki region in the center of Athens. Wipe Off Weekly Menu Board. I am a meal planner.
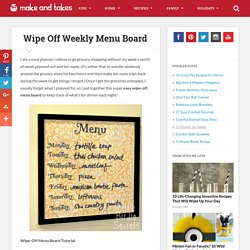
I refuse to go grocery shopping without my week’s worth of meals planned out and list made. (It’s either that or wander aimlessly around the grocery store for two hours and then make ten more trips back during the week to get things I forgot.) Once I get the groceries unloaded, I usually forget what I planned for, so I put together this super easy wipe-off menu board to keep track of what’s for dinner each night! Wipe-Off Menu Board Tutorial Supplies: Plastic Spoon Laurel Wreath. Easy No Sew Window Valance. Recently when I was browsing through my local Pottery Barn I came across a window treatment that I loved but was a bit too costly for my budget.
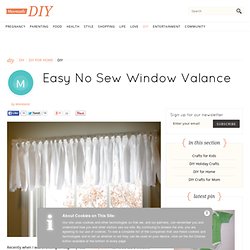
When I looked closer, I thought it would be so easy to make myself at a fraction of the cost and without sewing a stitch. I already had white drapery panels on my window at home and just needed to add some interest to the top. I chose to use cotton duck to make my version, but you could use any fabric, felt, ribbons, or even an old pair of jeans to create this one of a kind treatment for a window. For less fraying of the fabric, choose a fabric with a tight weave. The inset photo was my inspiration: Pottery Barn’s Textured Fat Tie Drape. After I made the white valance above, I started playing with adding some color to the valance and cut strips from a printed yard of green fabric I had. 1. 2.
Step 1: Fold a strip in half and place loop end on bottom of rod, lift rod so strip is under the rod and ends are at top as shown.