background preloader

Crafting

Facebook Twitter

Chic Masquerade – DIY Mask & Template | Sprinkles in Springs.

Macrame

Wedding / Love this! Something Charming: {how to fake calligraphy} I’m sure you all know by now that I like to play around with calligraphy. I do it for friends, and even offer it as a service with my wedding planning. For the real type of calligraphy, I use a real calligraphy pen, a Lamy Safari black 1.5 fountain pen, to be exact. But I didn’t always do that. Pretty handwriting runs in my family, and I’ve always been blessed with nice handwriting. I always used to practice my cursive writing, and last year I just decided to go for it. First things first, you need to find a good pen to use. You really don’t need the nicest handwriting in the world in order to do this. Make sure you use lots of loops and swirls, to make it look all pretty-like. Real calligraphy pens give different strokes with varying thicknesses.

It can take some time to do a lot of letters in this way, but the outcome sure does look nice! Have you ever tried fake calligraphy? UPDATE 3/6/2013: My own "fake calligraphy" font is now for sale! <A HREF=" Flapper flower clip. Last week I posted a picture of the new flower I made for my daughter’s hat…well of course I took pictures during the process for a little tutorial!

A little while back my pastor did a series on gifts/personalities. He was describing what different ones look like on a practical level. On one he used an example of someone that likes to give step by step instructions to tell people what to do…Chris nudged me on that one. My mom always called me bossy as a little girl… Supplies: Felt, flowers, feathers, alligator hair clip (or whatever type of clip you like), hot glue gun Step 1: Remove the stems from the flowers Step 2: Hot glue the petals back together (this makes the flower flatter than it is with the stem) Step 3: Get all the layers together Step 4: I added a bead for the center by pushing a needle through the glue and then back out Step 5: Enjoy some chocolate….makes every craft project better….especially when kids are sleeping and you don’t have to share Step 6: Cut your feathers.

Sewing projects

Crochet and knit. Sewing clothing & clothing patterns. Try This: Print Your Family Photos On Wood Readymade. Coloring Pages for Adults. Detailed Design Adult Coloring Pages Coloring pages drawn in designs especially for adults and teens are the best way to relax and be creative while making a personal work of art. 
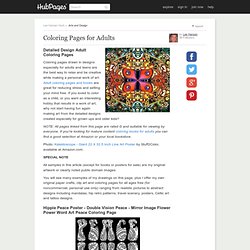
Adult coloring pages and books are great for reducing stress and setting your mind free. If you loved to color as a child, or you want an interesting hobby that results in a work of art, why not start having fun again making art from the detailed designs created especially for grown ups and older kids? NOTE: All pages linked from this page are rated G and suitable for viewing by everyone. If you're looking for mature content coloring books for adults you can find a good selection at Amazon or your local bookstore. Photo: Kaleidoscope - Giant 22 X 32.5 Inch Line Art Poster by Stuff2Color, available at Amazon.com. All samples in this article (except for books or posters for sale) are my original artwork or clearly noted public domain images.

Illustration above is my own work. Simple Hair Accessory - Printable Exercises. Printable Paper. Headband Refashion. Our headband had a flower that was starting to look a little tired and worn so we made it new again! This braided ribbon could embellish many things— a hair clip would be cute too! These headbands would make great handmade gifts for little girls to make each other! Woven Ribbon Headband Gather a headband and about 4 1/2 yards of ribbon. You can use any with — I chose 1/4 inch. The braiding will be two toned if the ribbon is different on the front and back, another nice look! Begin by finding the middle of the ribbon. Now bring the bottom ribbon up and make a loop and send it through the beginning loop that you just made by crossing the ribbon.

Pull the right side snug. Now repeat for the other side, picking up the right side, making a loop and sending it up through the loop just made on the other side. Pull the left side snug. Pull right side snug. Continue braiding until you have a piece long enough to cover the headband. Bring the other side over and then trim. Hot glue ribbon to headband. How to do Custom Lettering without a Fancy Machine. I keep seeing so many amazing projects that people are making using their Cricut, Sillouette or other "fancy" machines. While I love the results (and would definitely love to get one of those machines myself at some point), I often use an "old school" technique to achieve similar results.

I can do my own lettering in just about any font, any size and any color using nothing fancier than a regular computer, printer, lead pencil and acrylic paints. It also works for simple graphics and pictures as well. Check out these cute nameplates I made for some new Bedside Bookshelves for my kids. The lettering is a lot nicer than I could do just freehand, but I was able to do it without a special machine. NOTE: I've been told that the Curlz MT font ranks up there with Comic Sans, Papyrus and others in the "fonts to hate" category ;) However, my girls love the "letters with the curlicues" out of the limited fonts I have to choose from, so it still works fine for us! :) Here's what you do: 1. 2. 3. 4. Make it & fake it. SO, after announcing the arrival of spring in Oslo for the last two months, we have now reached summer ('ish)! Woho, we have had sunny weather and 25C for the last three days so I have finally packed away my cashmere and turned to T-shirts.

For me Havaianas and T-shirts go hand in hand, and I can't wait to use mine (indeed after I get my pedi done..). I love the classic Havaianas, for me they are a cult fav, but an old original can always go benefit from an update right??? For this DIY you will need: Silk ribbon (preferably a bit thick (see people, my new instructions are very detailed)), 2 rhinestones/beads ect, fishing line, awl (yes this is actually a tool that people fathers have, beats me) ohh, and a nedle and scissors.

I didn't take pictures making these (I was way to excited to finish them off and hit the beach) but in the spirit of my new resolution (to provide verrrry detailed explanations of my DIY's) here we go : 1. 2. 3. 4. Diy / 1/2 your fingerprint, 1/2 his-- Salt Dough - 2 cups flour, 1 cup salt, cold water. Mix until has consistency of play dough. bake at 250 for 2 hours, then cool and paint….good recipe for thumbprint pendants; and super cute.(:

DIY: Makeup Brush Holder. My oldest daughter is away at college and it’s her birthday this week so I wanted to send her something special for the occasion (and something easy to ship too!) She mentioned she didn’t have any decent makeup brushes so I made a trip to Sephora to splurge on a new set for her. While I was there I thought about something to hold them all and wanted to give her a little handmade gift to go with the new brushes. I thought a cute fabric pouch would be perfect so I stitched up a makeup brush holder with some leftover fabric remnants from my stash. This was one of those projects that I made up as I went along but I tell you this, if you can sew a straight line, you can make your own too! Here’s how I made this fabric makeup brush holder for my college girl in about an hour. First grab yourself some fabric, for this I used two remnants, one a blue medallion cotton fabric, the other a cotton duck lining.

Here are the measurements of fabric used: First start by sewing your inside pouch. Stuff to make / salt dough - 2 cups flour, 1 cup salt, cold water. Mix until has consistency of play dough. bake at 250 for 2 hours, then cool and paint....good recipe for thumbprint pendants. Save on Crafts, Wedding Supplies, Flowers, Tulle, Lights, Decorations & Discount Craft Supplies Save-on-crafts. Home Remedies, Essential Oils, Coconut Oil for Hair Growth and Scalp Problems.

Home Articles Hair-Loss  Hair loss and other scalp problems are a big issue that millions of people face across the globe. Owing to unhealthy eating habits and ever increasing pollution, people are losing hair volume and the texture and strength of their hair is also deteriorating. There are several methods of protecting hair, one of which is regular application of oil on the scalp and hair. Controlling hair fall is very easy and also inexpensive. There are several home remedies that that will enable you to do this. Listed below are some simple home remedies for the same. Use coconut oil mixed with avocado to apply on the hair every week. References:  Warning: The reader of this article should exercise all precautionary measures while following instructions on the home remedies from this article.

More articles from the Hair-Loss Category. KEEP FOREVER Needle Felt Kit by 4hornsheep. Braided Leather-Lace Belt Craft. Upcycled Tea Time for the Birds. July 26, 2010 by Robin Plaskoff Horton On my the hunt for objects repurposed into cool things for two garden rooms and a garden we are doing for the September Stamford, CT Designer Show House, I came across these teacups and creamers upcycled into bird feeders. Working with the theme “Conversing with Nature: A Creative Garden Retreat,” interior designer, Victoria Lyon, and I are designing two rooms that will serve as a potting shed as well as a place to develop creative ideas for the garden, paint, sketch, read garden books, and otherwise lose one’s self in imaginative thought. We’ve got some fantastic eco-friendly and innovative things up our green sleeves: stay tuned for details.

Headband Refashion. Pacific Botanicals - Growers & Suppliers of High Quality Certified Organically Grown Herbs & Spices. Aromatherapy and Essential Oils Blog - AromaTalk. Pinecone Firestarters with Colored Fire. Anybody can throw some dried pinecones in a wicker basket and call it the Christmas season, but some people like to give this staid decorating tactic a kick in the pants. The winter was over before I got around to trying these pinecones, but I’m hoping I’ll get the pinecone urge next winter and will have some pictures then.

How to Open, Kill Bugs, and Sanitize Pinecones Gathering your own pinecones from the backyard is an easy and fun way to do it, until a bug crawls out of one and you get the heeby jeebies everytime you look at your pinecone crafts after that. These are the steps I usually follow to sterilize my pinecones, though I think most people don’t bother with this and just use them fresh from the yard. Place the pinecones in a bucket of cool water and let them sit out overnight (don’t let them freeze). The next day, let the cones sit out in the sun to dry (preferably inside where they won’t just find more bugs). Waxed Colorful Decorative Scented Pinecones Shopping List. How to Draw Tinkerbell Easy, Step by Step, Disney Characters, Cartoons, Draw Cartoon Characters, FREE Online Drawing Tutorial, Added by Dawn, March 27, 2012, 5:58:48 pm. Hey everyone, sorry I returned so late today but I had a lot of work to do with some of the lessons that I was trying to make.

Since everyone likes the sketched drawings I have been making, I thought a nice version on Tinkerbell would be liked as well. The sketch of Tinkerbell came out so good. I really like her face and how I managed to keep those cheeks of hers looking chubby like they normally do. Disney's Tinkerbell has been one of my favorite Disney characters of all time since I was a young girl. I guess you could say I liked her because she had spunk, and personality for a female figure. My eight year old sister really loves all the Tinkerbell movies and so far she has three of them. I asked her if she wanted the sing-a-long series, but she said no because there is nothing funny about a bunch of fairies singing and dancing.

Survival Bracelet (Updated!)

Bookmarks

The Peg Board: Tutorial for Origami Corner Bookmarks. This is the easiest bookmark you'll ever make but it's cute, it's functional and it's fast. The basic bookmark requires only a 6x6 doube-sided piece of paper Fold in half Fold 1 coner back to half-way point Fold right corners up to half-way point and make sure to crease well. Hold the bookmark in your hand and open the area between the corner that was folded down and the back, While holding the bookmark, fold the 2 right corners up into the fold. When finished your bookmark should look like this. DIY Mod Podge Tile Coaster Tutorial. Tutorials. Art Platter. Herbal crafting. Herbal crafting suppliers.