
Floral Embroidered Top DIY. Embroidery basics. Not too long ago, someone asked me for advice on keeping the back side of her embroidery neat and pretty.
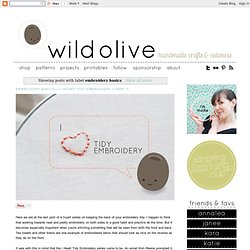
She was going to be stitching some tea towels and wanted the back to look nice. This made me very excited that she was thinking about this. When the back of your work will show, you really get self-conscious about this sort of thing. But I think that tidy embroidery is a good idea all of the time, so I've created a three-part series to focus on this very thing! It's been a while since I asked my friend Olive to help out, but since she loves tidy embroidery, I thought it would be a good idea to invite her along. Calm down, Olive! Now, that's KNOT to say that working without knots is a bad idea. But I've been using a few options for secure stitching that's tidy (and doesn't have much waste). This first one starts with a knot. As you work, use the backs of the stitches to hold down the tail coming off the knot. And now you've got the security of a knot, but the tail is all tidied up! Mirror work 7. Today, I would like to share with you another mirror/shisha work tutorial – needlewoven picot mirror work.
I’m using A 1.25cm diameter mirror.Mark the points for the tip and base of each petal.Fix the mirror onto the fabric with 4 straight and 4 diagonal stitches.Position the pins as shown for the petals.Bring up the needle to the right of the base of the first petal. Mirror work 1. Make a template of a petal and use this to draw petals around the mirror.

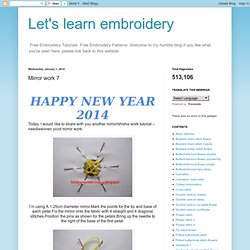
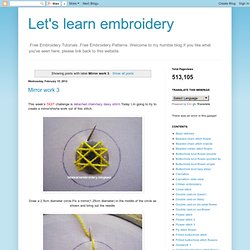
Mirror work 3. Draw a 2.5cm diameter circle.Fix a mirror(1.25cm diameter) in the middle of the circle as shown and bring out the needle.
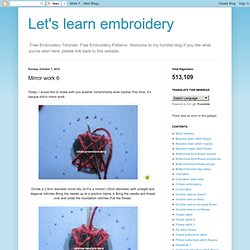
Bring the thread over and under the foundation stitches and take a stitch from the starting point.Wrap the thread under the needle.This is the detached chain/lazy daisy part. Pull the thread (when pulling, use the same tension all around to get beautiful, rounded center) and insert it back into the fabric to hold the loop. One detached chain stitch made. Mirror work 6. Today, I would like to share with you another mirror/shisha work tutorial.This time, it’s basque stitch mirror work.
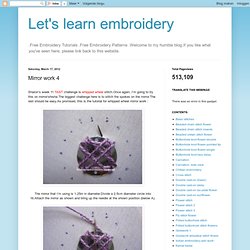
Mirror work 4. Sharon’s week 11 TAST challenge is whipped wheel stitch.Once again, I’m going to try this on mirror/shisha.The biggest challenge here is to stitch the spokes on the mirror.The rest should be easy.As promised, this is the tutorial for whipped wheel mirror work : The mirror that I’m using is 1.25m in diameter.Divide a 2.5cm diameter circle into 16.Attach the mirror as shown and bring up the needle at the shown position (below A).
Bring the needle and thread over and under the foundation stitches.Wrap the thread under the needle and pull (when pulling, use equal tension all around to produce beautiful, rounded center). Mirror work 2. I’ve created this mirror/shisha work out of flower stitch 2.

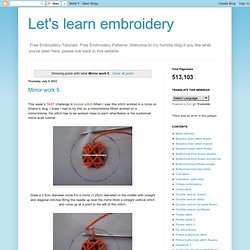
Mirror work 5. This week’s TAST challenge is bonnet stitch.When I saw this stitch worked in a circle on Sharon’s blog, I knew I had to try this on a mirror/shisha.When worked on a mirror/shisha, the stitch has to be worked close to each other.Below is the sunbonnet mirror work tutorial: Draw a 2.5cm diameter circle.Fix a mirror (1.25cm diameter) in the middle with straight and diagonal stitches.Bring the needle up near the mirror.Work a straight vertical stitch and come up at a point to the left of this stitch.
Bring the needle under the straight stitch. Bring the needle and thread over and under the foundation stitches, as shown. Take a stitch from right to left at the position shown. (Please refer Sharon’s tutorial to understand this better)