
Stencil with freezer paper (harry potter tee) Yes, I am a nerd.

I came up with a brilliant idea for a Harry Potter t-shirt and I couldn't resist. "Expecto Patronum! " However, you can make whatever kind of design you want with a freezer paper stencil. It doesn't have to be Harry Potter related. (Although it would be awesome if it was.) I learned about the joys of freezer paper back in my early college days. Basically, freezer paper is backed with a plastic coating that will stick to soft surfaces when ironed, but it peels off cleanly and easily. To make a sweet t-shirt you will need: paper & pencil a t-shirt an iron a piece of cardboard or poster board fabric paint & brush Start by drawing your design on some regular old paper.
My design kept getting bigger, so I taped two sheets together. Next, place your design underneath a sheet of freezer paper and trace it neatly with a sharpie. The marker gives your lines greater width making it easier to cut them out and paint them in later. Important: Set these shapes aside. Decorating frames. Newspaper gift bag. When I bought something at a store recently, the clerk handed me my purchase in a bag made from a newspaper.
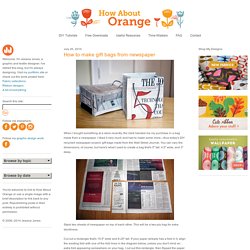
I liked it very much and had to make some more—thus today's DIY recycled newspaper project: gift bags made from the Wall Street Journal. You can vary the dimensions, of course, but here's what I used to create a bag that's 5" tall, 4.5" wide, and 3" deep. Stack two sheets of newspaper on top of each other. This will be a two-ply bag for extra sturdiness. Cut out a rectangle that's 15.5" wide and 8.25" tall. Fold a flap 1.25" down from the top. Cut two pieces of cardstock or chipboard to 4.25" x 1", then glue them on the widest two panels just under the top fold. Put glue on the outside of the 0.5" tab and bring the left-most panel over to form the body of the bag, aligning the cut edge of the panel with the folded edge of the flap.
Upend the bag so the 2" flap is now up. Put glue on both flaps and fold them inward to form the bottom of the bag. Craft website. Crochet rug. We've had some really beautiful days here lately.

Recently, I made a small kitchen rug for Jon's mom. I like crochet because it's very forgiving. And it's quick. And fun. And relaxing. I didn't really use a pattern or anything. Anyway, it worked up in a few hours. This kind of thing is really fun and easy to do. As you can see, I get a lot of help around here...
UPDATE: Due to popular request, I've created a vlog tutorial series on this project. Photo Frame. Here is a simple yet stylish photo frame that can accomodate quite many photos at once. The idea is very simple. Fasten twines on the empty frame and hang photos using clothes pins on them. You can use a frame you bought or a frame you made by yourself. To make it you just need to find some wood strips, sand them, paint or stain them and fasten together with the staples and nails. Yes, everything is as simple as it sounds. Paper flowers.
Japanese Kusudama, this tutorial is featured on Craftuts Anyone can do that, I assure you.

The proof: I can, just take a quick look at my result below. And, believe me, I am neither meticulous nor particularly patient. You could even say I’m the opposite. Below you can see my very first attempt to create paper flowers. What you will need to make your own Kusudama paper ball? 1. 3. 4. (optionally) I prefer torn paper instead of cut.
You have to start with a single petal.