
Crafting the Continuum Bracelet: A DIY How-To. In which Chrononaut Mercantile describes how bring one of their handmade Age of Steam pieces to life.
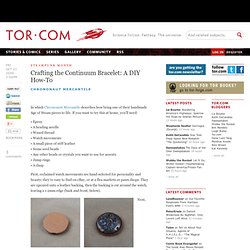
If you want to try this at home, you’ll need: • Epoxy • A beading needle • Waxed thread • Watch movements • A small piece of stiff leather • Some seed beads • Any other beads or crystals you want to use for accents • Jump rings • A clasp First, reclaimed watch movements are hand-selected for personality and beauty; they’re easy to find on eBay, or at a flea markets or pawn shops. They are epoxied onto a leather backing, then the backing is cut around the watch, leaving a 1-2mm edge (back and front, below).
Next, Japanese hex-cut Delica beads are sewn onto the backing. Then a peyote stitch is used to circle the watch body with beads. The back, after a few rows and then completed: The front, in the same stages: Then the outside of the woven edge is embellished with Swarovski crystal and additional seed beads. Steampunk-bug.pdf. How to make you own Charms. How to Make Jewelry On a Crazy Day: Steampunk, Gilder's Paste and Adirondack Paint Dabber Tips. The Pink Hare: Simple steampunk jewelry tutorial. I've been promising it for ages so here it is .
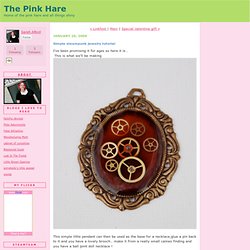
This is what we'll be making This simple little pendant can then be used as the base for a necklace,glue a pin back to it and you have a lovely brooch.. make it from a really small cameo finding and you have a ball joint doll necklace ! Here's what you need Resin - I use cast n craft but if you don't want to buy alot of resin and just want to make a few pieces you can run to the hard ware store and pick up adhesive resin in that syringe thingie. Get the 30 minute ! Gearspaintbrushpliers Step one . gears usually have these sharp little pokey bits . these are rather painfull so we need to remove them .
Simply take you'r pliers and pull em off. Take your glue and squirt a small amount into a plastic cup. Use your paintbrush and paint the inside of the cameo piece. add gears and let fully dry. Once the piece is completely dry you'll mix your resin following the instructions on the box . Clockwork Heart Pendant Necklace. Steampunk bijoux mecanisme de montre Steamjewels. Steampunk Finger Stylus. I use a touchpad GPS regularly at work and lost the pen stylus a long time ago; it was inconvenient anyway trying to hold the stylus, GPS unit, and drive an ATV at the same time.
So I made some finger stylussss? Stylii? From old water jug handles for work. For this Instructable I added some extra parts for fun Steampunk styling. Step 1: Cut Handle Out of Water Jug This is simple, just cut out a small section from the handle of the jug. Step 2: Plain Stylus Finish Briefly hold the tip of the stylus in a flame to round it and keep it from being scratchy. Step 3: Paint and Hot Glue Extra Stuff. Wire. And by wire I mean jewelry... Of all kinds. / Steampunk ring tutorial by *bodaszilvia on deviantART. Steampunk jewellery tutorial by ~Gothic-Enchantress on deviantART. Wire Embellishments Tutorial by *sodacrush on deviantART. Steampunk DIY. Steampunk wire wrapped ear cuff II by *Hiddendemon-666 on deviantART. Steampunk brooches by ~cattislearningtofly on deviantART.
Steampunk butterfly by ~Krinna on deviantART. Secession steampunk pendant by *ukapala on deviantART. DIY Steampunk Resin & Leather Cuff. Here's another resin experiment I've been meaning to show you guys, since it's the one I actually wear the most so far of all my experiments.
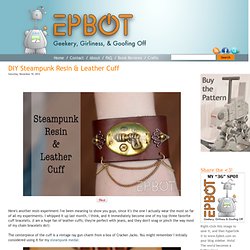
I whipped it up last month, I think, and it immediately become one of my top three favorite cuff bracelets. (I am a huge fan of leather cuffs; they're perfect with jeans, and they don't snag or pinch the way most of my chain bracelets do!) The centerpiece of the cuff is a vintage ray gun charm from a box of Cracker Jacks. You might remember I initially considered using it for my steampunk medal: After this was taken I removed the loop, painted the gun silver (it was initially gold) and aged it with a little brown paint.
Next I dropped it into my resin mold along with several tiny watch gears: Once the resin was cured, I tried two or three different metallic papers for backers: I loved the silver foil, but was afraid it'd look a little too Buck Rogers.