
Hair tutorial. We haven't done a hair tutorial in ages!

So, my friend (and hair genius) Caroline, photographer Jamie Beck and I decided to come together to whip up this gorgeous mermaid tail. It's perfect for those lazy summer day (or date nights) when you want to surprise and awe people with your hair. I absolutely love it--in fact, it might be my favorite hair tutorial yet.
How gorgeous is that braid, above?! Here are Caroline's steps, if you'd like to try it out... 1. 2-4. 5-6. 7. 8. (Optional step: You can remove the two separate rubber bands at the end, and just use one to combine the two tails together. "That's it! " (Photos by Jamie Beck for Cup of Jo. ...love Maegan: Embellished Collar DIY Fashion. DIY. Lifestyle. Collars and embellished collars have been making their rounds on the internet and blogs for the past couple of years now.
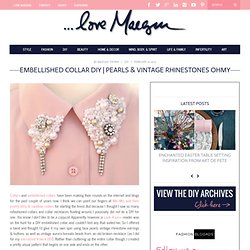
I think we can point our fingers at Miu Miu and their pretty kitty & swallow collars for starting the trend. But because I thought I saw so many refashioned collars and collar necklaces floating around, I purposely did not do a DIY for one. You know I don’t like to be a copycat. Apparently however, a Look 4 Less reader was on the hunt for a DIY embellished collar and couldn’t find any that suited her.
So I offered a hand and thought I’d give it my own spin using faux pearls, vintage rhinestone earrings & buttons, as well as vintage aurora borealis beads from an old broken necklace {as I did for my encrusted V-neck DIY}. *NOTE* Once embellished, your shirt will have to be dry-cleaned or carefully hand-washed and hung dry. Here’s What You’ll Need… * A blouse with a nice collar. . * Faux pearls in 2-3 sizes.
. * Needle/Thread/Scissors Steps… Voila! Have Fun! ...love Maegan: Partial French Braid with Cascading Hair ~ Tutorialalso known as the "Waterfall Braid" Fashion. DIY. Lifestyle. I’m not the originator of this hair style but I’ve gotten so many requests for it, I thought I’d give it a go for you.
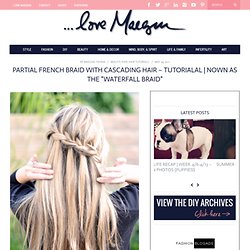
I don’t know what it’s called either so I haven’t researched it and/or found any other tutorials for it …thus, this is my version of it, and I’ve dubbed it the Partial French Braid w/ Cascading Hair. The photos I’ve seen online show the braid a little more straight across the back of the head and mine sort of braids at an angle, similar to my side/low french braid up-do. I’m sure this is 100% easier to do on someone else’s hair than your own but it goes pretty quickly once you get the hang of it …I mean, it’s my shortest hair video tutorial to date. That’s gotta mean something, right Enjoy. Note: Apologies in advance for the yelling of “NOOOO” towards the end, where I momentarily fear I’m going to lose my entire braid and have to start over.
Have Fun! 5 Hair Tutorials That Make Me Wish I Had Long Hair - henry happenedHenry Happened. Wire Bow DIY. I'm always looking for fun hair accessories to add to my collection. Here's a quick little wire bow DIY project to add a little flair to pony tails, buns, and braids! Supplies needed: pretty fabric (thanks, Alexa!) , wire, wire cutters, and scissors Step 1: cut out a length of fabric (mine was 13 inches).
You can make it as long or short as you'd like. Step 2: sew around the edges of the fabric (make sure the fabric is turned inside out, or printed side down) leaving a small hole unsewn. Step 3: take a length of wire that is double the size of your fabric (mine was 26 inches). Step 4: flip the fabric right-side-out and slide the wire inside. I love quick DIY projects and this one doesn't disappoint. Happy crafting!