
DIY Sequin Collar - Inspiration & Links to 10 Awesome DIY Tutorials. Posted by ScrapHacker.com on torsdag, mars 8, 2012 · 5 Comments Today is International Womens Day…today is also the day of the H&M and Marni designer collaboration global launch.

I say celebrate girl power and Marni by letting the collection inspire some D.I.Y action. There are lots of goodies among the Marni pieces, a personal favorite is the Sequin Peter Pan collar… It so happens that collars have been a popular D.I.Y project among crafty online DIY fashionistas for quite a while now so embrace diversity and tap into the inspiration from the line-up of no less than 10 D.I.Y collar tutorials from around the web, all ready to help you launch your very own D.I.Y collar project – Enjoy! Gold Leather Collar from aPair&aSpare – TUTORIAL HERE. D.I.Y Inspiration from ScrapHacker.com. Disco Diva D.I.Y Posted by ScrapHacker.com on juni 13, 2012 · Leave a Comment Today’s my birthday!

And not any birthday, my 30th, yay/yikes! I’ve been tapping into disco diva fiesta mode browsing the best Disco D.I.Y the blogosphere has to offer – and there are some pretty neat Disco hacks out there I tell you! Hopefully all of you D.I.Y disco divas can find some nuggets of interest [...] Ice Cream D.I.Y ideas Posted by ScrapHacker.com on juni 7, 2012 · 3 Comments ”I scream, you scream, we all scream for ice cream!”
Pimp an old tee Posted by ScrapHacker.com on juni 5, 2012 · 5 Comments With temperatures rising so is the annual epidemic of fashion fever, making many of us feverishly hit the high street (although our wardrobes are already stuffed full…). New life for ladders Posted by ScrapHacker.com on juni 4, 2012 · 19 Comments Pillowcase Pimpin’ D.I.Y Funky Chunky D.I.Y Tiimb-eerr! Monogram Monday It’s Monogram Monday! Mothers Day D.I.Y Posted by ScrapHacker.com on maj 11, 2012 · 1 Comment. Watercolor 'Will You Be My Bridesmaid?' Cards.
If you have been loving the watercolor and ombre trend recently, you are going to LOVE this amazing DIY Sarah is bringing us today!
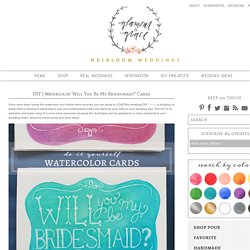
She is sharing a sweet way to ask your bridesmaids if they will stand by your side on your wedding day. This DIY is so adorable and super easy! It is even more awesome because this technique can be applied to so many elements in your wedding (hello, fabulous escort cards and favor tags!) It’s DIY time again, lovely readers! This time I have a super “artsy” project for you! Materials Watercolor paper cut into 9″x6.25″ rectangles, folded into cards(size A6: 4.5″x6.25″), 1 per bridesmaidWatercolor paints (the cheap Crayola one will work just fine!) Coin ring. This craft will literally cost you just a view cents. In the Netherlands we don’t use one and two Euro cent coins. Except for one store. So when you went to that store you’ve got those coins you can’t use any where else. I thought I could make a nice craft with them.
CRAFTS. DIY Spoon Ring « Be A Strainer. Goodies. DIY Project: Tape Sponge Lamp. This tape sponge lamp project was the grand prize second place* winner from our DIY contest, and it’s easy to see why it was such a hit among voters.
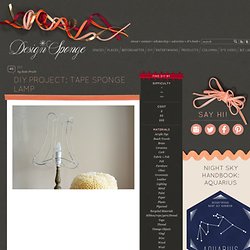
By creating a simple repeating shape, Giselle managed to transform the material into something organic, elegant and almost unrecognizable as tape. There are very few materials or steps to this project; the process is almost simple enough to figure out on your own, but luckily Giselle has shared a full tutorial with details on how to start, how large to make the piece and how to add the lighting element. DIY Missoni Chevron Shoes. Your home for all things Design. Home Tours, DIY Project, City Guides, Shopping Guides, Before & Afters and much more.