
Sewing 101: making a pouf. Add a burst of color to your room with this crafty pouf!

At 17” wide and 10” deep, it’s large enough to serve as floor seating or a foot stool. (And if you have pets, I have a feeling they may want to make this their new favorite spot!) This project is a little challenging to sew, but it’s not too difficult, so if you’re comfortable with the basics of sewing, give it a try. You can make a colorwheel effect with a range of solid colors, or choose a variety of patterned fabrics for a louder patchwork effect. Medium-weight cottons work well for this design (check out quilting shops for great selections of solids and prints). I love the idea of making a set of these poufs in a range of sizes, for a sculptural stack of cushions that will become a room element in their own right. CLICK HERE for the full how-to after the jump! Finished Dimensions: 17” diameter by 10” tall What You’ll Need ¼ yard each 12 coordinating fabrics (I used quilting cottons) 1 yard muslin 3 pounds fiberfill stuffing iron 1. Sewing 101: machine appliqué. Here’s a great way to snazz up simple textiles with an easy embellishment technique – machine appliqué!
This technique allows you to apply cut-out shapes of fabric to the surface of another fabric, achieving colorful and interesting effects that would otherwise be complicated to sew. In this post I’m appliquéing a tablecloth, but you can use the basic instructions here to appliqué shapes on just about anything around the house — curtain panels, throw pillows, cocktail napkins, duvets, even totes. (Bonus: appliqué is great for covering stains or flaws, so it’s a sneaky way to rescue stained pieces!) For beginners, it’s best to start with simple shapes with straight lines, but once you get the hang of this easy technique, you can appliqué just about any shape. Think monograms, floral or animal silhouettes, or even images cut from patterned fabric. CLICK HERE for the full how-to after the jump! What You’ll Need A variety of coordinating fabrics for the appliqué Background fabric Sharp scissors. Sewing 101: curtains. [today i’m thrilled to welcome brett bara of manhattan craft room to d*s with a special guest column. you’ve been asking for more sewing how-tos, so brett will be joining us for a sewing 101 primer, covering all the basics for getting started with home sewing. welcome, brett!]
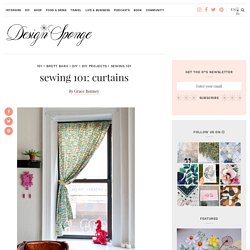
Hello there! I’m very happy to be here at design*sponge to spread a little sewing love. I hear a lot these days from folks who want to learn to sew, but don’t know where to start. I’m here to tell you how EASY sewing can be—especially home décor sewing. There’s so much you can sew for your home that requires only the most basic sewing skills, from curtains and duvets to pillows and slip covers—so that’s what we’re going to explore in this column.
I thought the perfect place to start would be with the one home accent that is by far the easiest to sew and the most impactful on a room: curtains! If you love textiles and want to incorporate a little DIY action into your life, there’s no better place to begin. Sculptural braided extension cords. I’m constantly getting into silly arguments with my partner about my DIY projects.

Whenever I turn to him for advice, ever the left-brainer, he gives me the practical answer, which I hate. Shouldn’t you be able to carry it this way? Wouldn’t this shape make it sturdier? What’s this extra piece for? Excellent questions, all. I’m realizing that on the art/design spectrum, I fall much closer to the former than I thought. I’ve prefaced this particular project with the above disclaimer because I want everyone to know that this project is not practical. Is this project practical? Read the full how-to after the jump! Materials 3 extension cords (all the same length, 6′ or longer is better)scissorsmasking tape3 skeins of thick/bulky weight yarn3 plastic cord tubes (these can be found at IKEA or most hardware stores in the electrical section) Instructions 1. 2. 3. 4. 5. 6. 7. 8.