
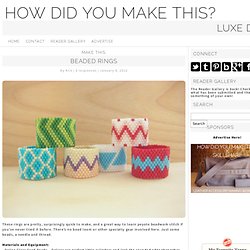
How to make your own air dried porcelain with common household ingredients. Anything that is quick, affordable and makes beautiful things is a craft winner for me . But…I often find myself uninspired for something new and different. I’ve found it in air dried porcelain (aka Porcelana Fria). What will someone make with 3 cups of white glue (PVA) 3 cups of cornstarch (Corn flour) one tablespoon of white vinegar one tablespoon of glycerin (health food or hobby shop), and 2 tablespoons of canola oil? The beautiful mouse and necklace pictured (compliments of Espirit ) is the answer! Amazingly simple and a GREAT school holiday project, get the kids into the kitchen to cook up some home made, air dried, porcelain. Make This - Beaded Rings - Luxe DIY - How Did You Make This? These rings are pretty, surprisingly quick to make, and a great way to learn peyote beadwork stitch if you’ve never tried it before.
There’s no bead loom or other specialty gear involved here. Just some beads, a needle and thread. Materials and Equipment: - Delica Glass Seed Beads – Delicas are perfect little cylinders and lack the rounded edge that other kinds of seed beads have. You can use any size 11 or smaller seed bead for this, but I like the Delicas for the crisp finish they give. - Beading Needles – My all time favorites are John James size 12 needles.
If you’re working at a table you’re good to just pour out beads like this, but if you’re working on a lap tray it’s wise to keep your beads in some small, shallow bowls or a similar container. I use my thread doubled, so I cut a moderately long strand, thread the needle, then even up the ends. Temporarily use one of your beads as a “knot.” String the first row of beads by color. Now you need to turn for the next row. Bonus tip! Home Office Storage Solutions. Creative Reuse 2008: Simple Pen Holders. Etched Portion Control Wine Glass. OK, confession: I’m on Weight-Watchers.
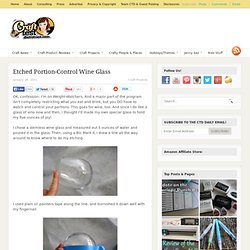
And a major part of the program isn’t completely restricting what you eat and drink, but you DO have to watch and control your portions. This goes for wine, too. And since I do like a glass of vino now and then, I thought I’d made my own special glass to hold my five ounces of joy! I chose a stemless wine glass and measured out 5 ounces of water and poured it in the glass. Then, using a Bic Mark it, I drew a line all the way around to know where to do my etching. I used plain ol’ painters tape along the line, and burnished it down well with my fingernail.
I then applied the Armour Etch Cream (see my review of that here) to the bottom of the glass. Now, you could leave it here and you’d have done the job- now you know just where to fill your glass! I chose the flower head icon of the Songbird Cartridge (using my “j” monogram) for the Cricut and cut it out at 3″, using some craft vinyl. So there it is…my special, portion-control wine glass. Etched Portion Control Wine Glass. Community - Craft Forums with Patterns, Project Ideas, Craft Advice and More. Not martha - to make: marble magnets - StumbleUpon. I finally gave in and made marble magnets.
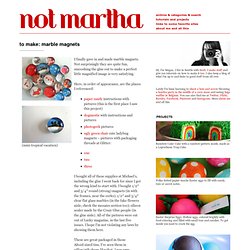
Not surprisingly they are quite fun, smooshing the glue out to make a perfect little magnified image is very satisfying. Here, in order of appearance, are the places I referenced: paper candy instructions with pictures (this is the first place I saw this project) dogmestic with instructions and pictures photogeek pictures ugly green chair cute ladybug magnets – pictures with packaging threads at Glitter:onetwothree I bought all of these supplies at Michael’s, including the glue I went back for since I got the wrong kind to start with. I bought 1/2″ and 3/4″ round (strong) magnets (in with the frames, near the corks); 1/2″ and 3/4″ clear flat glass marbles (in the fake flowers aisle, check the mosaics section too); silicon sealer made by the Crazy Glue people (in the glue aisle).
60 Small Ways to Improve Your Life in the Next 100 Days. Contrary to popular belief, you don’t have to make drastic changes in order to notice an improvement in the quality of your life.

At the same time, you don’t need to wait a long time in order to see the measurable results that come from taking positive action. All you have to do is take small steps, and take them consistently, for a period of 100 days. Below you’ll find 60 small ways to improve all areas of your life in the next 100 days. Home 1. Make Your Own Glitter Flats. In case you haven’t noticed in the past almost 3 years (!!) WANM has been in existence, I am not a crafty person. Nope, I leave the crafts to Chels and I stick to the kitchen (where disasters can easily be shoved down the garbage disposal!). Top 10 Sites for Do It Yourself Projects : Planet Green - StumbleUpon.