

DIY Summer shorts (free pattern) Hello DIY’er!

I hope you are enjoying the summer and the heat… As I saw that you liked both posts with patterns included, I created a simple pattern of a summer shorts you can make with the fabric you like. It’s a basic pattern which you can you can use as you like depending on what fabric you choose and the finishing touches you prefer. Are you ready to sew DIY summer shorts from scratch? Let´s do it! Materials: Fabric with a minimum elastic of 2-3% (I chose this festive and multicolored print to cheer up my white legs :P)Interlining (if the fabric is light then white or black if it’s dark)Fabric scissors and measuring tapePins and a 22cm invisible zipperSewing machine (and serger if you have one)SUMMER SHORTS PATTERN (free download HERE) * IMPORTANT: To print this pattern you must print it on a large scale format printer (the doc. measures are 100cm x 50cm) Download the PDF document and visualize it on your screen at 100% before printing. Process: 1. 2. 3. 4. 5. 6. 7. 8. 9. 10.
Make DIY Bleach Shirts with Star Shapes. BRAIDED TOP DIY. Muchas veces cuando no encontramos nada que ponernos, nos vamos de tiendas, y no pensamos en darle otra vida a nuestra ropa.
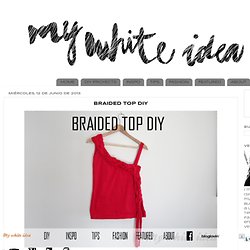
Este DIY es el resultado de aprovechar 2 camisetas de publicidad. Many times when you don´t find something to wear in your closet, you go to go shopping, and you don´t try to give another life to our clothes. Glittery Paper Butterfly on ring. When Amy from One Artsy Mama announced the 3rd material, I know it’s going to be a fun (and messy) week!
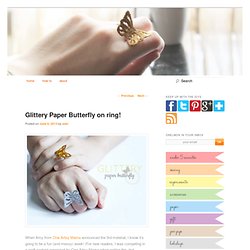
(For new readers, I was competing in a craft contest organized by One Artsy Mama when writing this, but unfortunately I was voted out this round and had to retreat from the contest :( but you can check out the fun competition here). Tutorial: DIY bow bracelet. Hello, world!
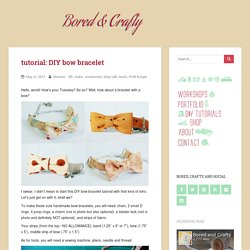
How’s your Tuesday? So-so? Macrame-Braided Slippers with Rhinestones. I recently did a tutorial for a slipper refashion over at Buzzfeed.
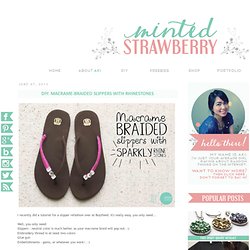
It's really easy, you only need... Well, you only need: Slippers - neutral color is much better, so your macrame braid will pop out. :) Embroidery thread in at least two colors Glue gun Embellishments - gems, or whatever you want/. :) 2nd Funniest Thing : DIY and unique pieces. Querido equipo: El post de hoy trata sobre un collar DIY reciclando botellas de plástico y me hace especial ilusión porque viene en forma de videotutorial!
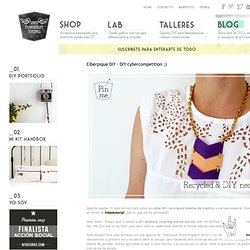
Que sí, que me he estrenado!! Dear team: Today's post is about a DIY necklace recycling plastic bottles and I'm thrilled because it's my first videotutorial! Yes, the first one in my life!! (you don't need to understand Spanish to follow step by step tutorial) Encourage fashion: DIY: Wrap Headband. I have been loving these headbands recently and wanted to make a DIY!
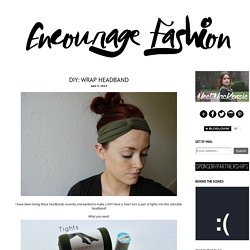
Here is how I turn a pair of tights into this adorable headband! What you need: 1. Unroll or flatten your tights. I like to use fresh out of the package tights because they are easy to cut, but old ones are perfect too! 2. Tie-Dye Shorts. Last year tie-dye shorts were popular and we thought they would definitely fizzle out by this summer.
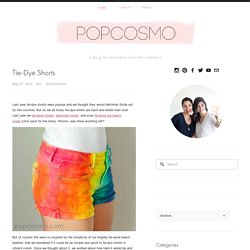
But as we all know, tie-dye shorts are back and better than ever. Last year we dip-dyed shorts, bleached shorts, and even tie-dyed our beach sheet (click each for the links). Hmmm, was there anything left? But of course! UK fashion & nail art blog: DIY jewellery: how to make easy retro rings! Making rings is so incredibly easy and quick!
It's also pretty darn fun so I decided to dust off my craft box and show you a favourite DIY of mine. usually when I make rings I use old buttons or coins but I saw these novelty phone & cereal miniatures in my local craft shop I decided to give them a whirl (I love anything a bit kitsch!) You really only need three things to make these; rings blanks, glue and a centerpiece! To start with I removed the string cord from the phone and glued the receiver to the body (I used my glue gun but you can use craft glue like E6000 which is perfect for this project) simply dab glue on the flat ring blank disc and hold the phone into place until secure! With lovely,with lovely,
Remember Shrinky Dinks ?

I recently rediscovered them, and it turns out they’re just as amazing now as they were when I was five. I love how versatile this magical material is. It starts out thin and semi-transparent, so you can draw your own creation or easily trace an existing image to make an impressive-looking replica. I used the tracing method to create customized dog necklaces and they turned out super cute! Upcycled Tights Necklace. I own a lot of tights as you may already know from my Tidy Tights post :) It's because I almost always wear skirts or dresses. This means that I am constantly looking for new ones because they tend to rip pretty fast, as tights often do:) It just felt so wasteful to throw the ripped ones out, so I decided to turn them into a necklace! Messy Side-Spiked Headband. I'm too obsessed with hair accessories right now - this tutorial is another proof of it. I realized I haven't posted any jewelry DIY in a while.. but don't worry, I'm planning the next one to be an easy-ish necklace DIY (saw inspiration online, can't wait to make it!)
But for now, I shall share this tutorial with you guys to tide yourselves over until then. Read on to see how I made this, and maybe it'll be easy enough for you guys to have the drive to make your own. :) Blouse Refashion – Bias Binding Armholes. You can refashion a frumpy, long sleeve blouse into a cute fitted top in only a few steps. Just cut off the sleeves, take in the sides, and finish the armholes with a ‘french’ bias binding. It took my look from ‘suicidal accountant’ to ‘sassy librarian’ in a flash! Hemp Jewelry: Beaded Summer Ankle Bracelet. Rocker Dresss - McCall's Pattern 6754 - ProfessorPincushion. Many times I come across beginner sewers who believe that it’ll take some time before they’ll be able to tackle a project that’s cool, fun, and something they’ll actually want to wear.

Not to knock pajama bottoms and tote bags, but it’s understandable if a lot of sewers have bigger and better visions on what they want to accomplish with their new sewing skills. To those people, let me introduce you to McCall’s 6754. This dress rocks (hence the name) and it’s an easy dress that can be completed by a beginner. Yes, you can do this! And if you’re still unsure, don’t worry, we have a full length tutorial here to show you exactly how it’s done. The dress is simple but still has a lovely style. Are you loving it? If you want to enter our pattern giveaway, leave a comment below and let us know: Would you rock this dress or take it in a different style direction and which style would that be?
Easy DIY Knotted Cord Bracelet. While in the States for my conference, I squeezed in a (too short) visit with the lovely Erica, from Wicked Bride. I got to see her gorgeous home in person, meet Ella (plus her kitties and Hubby), and we got a little crafty. We whipped up some super cute, and super simple, knotted cord bracelets. I had pinned a lot of knotted bracelets to my "DIY to try" board, but Hubby joined in to help us try out a few different knots before finding an awesome one that lies flat, works perfectly and looks so sweet. Supplies: Cord (two strands approximately 22" long each)Two 1" gold ribbon crimp ends (they also come in silver)Lobster clasp with tag connector and two jump rings Needle nose pliersGel Epoxy (E-6000 glue works too)Toothpick & scrap cardboard (to mix the epoxy)ScissorsTape Before you get started, open up the crimp ends a little, using pliers.
Take one length of cord, fold it in half. Crop top DIY. ¿Tienes unos cuantos retales y te gustaría hacer tu propio crop top? Pues sigue estos pasos para conseguir la réplica del modelo de Balmain clonado por Zara! Es la ocasión perfecta para aprovechar todos esos restos de tela que tienes guardados. Farm Fresh Therapy. Please enable JavaScript to view the <a href=" powered by Disqus. </a> Puzzle Piece Necklace. These super adorable puzzle piece necklaces are a perfect gift for that special person (or persons) in your life. They are light weight and simple to make and can be customized easily! These would make excellent end of the year gifts between friends at school. I’d love to show you how easy they are to whip up!! Ampersands and amperSAM FELD. My junior year of college is officially over and in about an hour, I'll make my way over to the airport so I can see my sister graduate. Time goes by pretty fast. There's lots to be learned from this sister of mine.
Lots concerning mindfulness, creativity, stress relief strategies, and taming curly hair. DIY Scalloped Skirt. Draped cardigan / cárdigan plisado. Customized plastic bracelet / pulsera de plástico personalizada. Pasta necklace...again! I know....this is the third post (for those who follow) with pasta necklaces ... Alana Lacy Scarf, Free Crochet Pattern. Braided Four Strand Bracelet. DIY Kate Spade Inspired Bow Necklace. DIY: Flower Hair Clip. Grand opening of Tiki's DIYary!!! ^-^...today : ~~ Hand-painting a color lined Shirt ~~ Morse Code Blue Jean Bangles. How to transform a pair of jeans. DIY Bows Headband. How To Make Your Very Own Name Necklace. DIY No Sew Jersey Scarves. Essas Frescurites aí : DIY: Ear Cuff de Lacinho. DIY top & DIY shorts. DIY Crochet Beaded Bracelet. KNOW AND TELL CRAFTS: YARN BRACELET DIY! - Dream a Little Bigger Craft Blog - Sleeping with Sirens DIY Custom Sneakers. Upcycle: Tin-Can Daisies. Kcw: day 1 // DIY tribal leggings. The Kipi Blog: DIY Project.
Cooking ala mel: TARDIS Sneakers *Tutorial* Butterfly Jewelry Specimen Pendants. Popsicles & Pinatas. It's always autumn - itsalwaysautumn - easy square top with stamped polka dots. The Three Dollar Secret Tutorial. DIY // Swirl Ring — Bettina's Blog - Something handmade. DIY Embroidered Sunglasses. Pink Zipper Flip Flops. Pretty Me Up-Probably one of the most chic belts you'll ever make for cheap!
Easy To Sew Skirt - Great For Newbies! DIY, Children's Crafts, Home Decor: DIY: "I Love My Husband" T-Shirt. A Canadian DIY and Fashion Blog. Sarita creative: DIY Beaded Friendship Bracelets. Rock Mosaic: diy gathered high waist skirt. Easy Woven Wrap Bracelet. DIY 30 DAYS 30 TEE-SHIRTS : #14 with a customised message. DIY Braided Rhinestone Necklace. 10 No Sew Tshirt Recycling Ideas. 嘀咕网 - 收集高清唯美图片视频,分享你所爱,结识心朋友. Gold Leaf Flecked Acrylic Bangle Tutorial. PLA DIY: Neon-Trimmed Purses. Spring Bling Week – Mixed Media Bracelet.
Done! Sequin Top (Part 2) DIY Plastic Canvas Clutch. Upcycled light bulb necklace. DIY J.Crew Necklace. DIY Studded Turban. Woven Wrap Bracelet. DIY TEE-SHIRT WITH A RUFFLE ACROSS THE SHOULDERSDIY BLOG. Cat Face Stenciled Shirt. DIY Rice Beads. DIY trio zipped bag. DIY // Bleached St. Patty's Day Slouchy Tank Top. Upcycled Sweater Boots. Recycled bracelets. DIY jewelry from paperclips and tape. DIY Faceted Clay Rings. MYWHITEIDEA: MARC JACOBS BULLDOG LOAFERS DIY. Pandora's Craft Box: DIY Star Wars X-Wing Jewelry. Canadian DIY Style Blogger and Fashion Boutique. Diy screenprinted tee // daily buzz style 9×9. Guest post: DIY Cat Toe Shoes. Girl Loves Glam: WIWW and How to make a simple infinity scarf. Owl dress. Pearls & Scissors: Refashionista: Sweater into Skirt (tutorial) DIY: Neon/Neutral Triple Cluster Pearl Bracelet. E v e r s - DIY Fashion blog. How to Make a T-Shirt Infinity Scarf.
Panda-in-Love Sleeping Mask. My Favorite Way to Tie A Scarf Tutorial (It's Easy!) Pearls & Scissors: Refashionista: Sleeves into blouse (tutorial) DIY Leather Knot Bracelet. Squirrelly Minds » DIY Sequined Message Shirt. Downton Abbey style hat in 20 minutes! DIY deathly hallows shirt. Printing on Book Paper (For Pendant) DIY Nautical Knot Headband.