
How to Make Clothing Buttons from Shrink Plastic&8230;. This tutorial is an old one of mine that’s too good not to share again.

Since posting the first time, I’ve had lots of questions about these buttons which will hopefully be answered in this revised post. Equipment Some handy notes: 1. The buttons. Single hole, hole punch (like this one here). 2. 3. Okay.. lets get started! Tracing tips: You can use either coloured pencils or permanent pens. Words must be writted backwards in order to be readable. Shrinking the buttons: To shrink the buttons, you can use an oven or a heat gun (the kind used for embellishing). After the buttons have twisted and twirled, and are LYING FLAT, it’s time to take them out. Note: If the skrinking is taking too long, you may need to turn your oven up. Here’s a short little stop-motion to make sure you’ve got the gist of how easy this is! Shrink Paper {here} Circle Punch {here} Hole punch {here} Pens {here}
How To Make a String Tree Wall Mural Home Hacks. Wipe Off Weekly Menu Board. I am a meal planner.

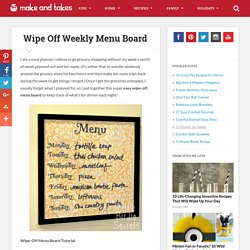
I refuse to go grocery shopping without my week’s worth of meals planned out and list made. (It’s either that or wander aimlessly around the grocery store for two hours and then make ten more trips back during the week to get things I forgot.) Once I get the groceries unloaded, I usually forget what I planned for, so I put together this super easy wipe-off menu board to keep track of what’s for dinner each night! Wipe-Off Menu Board Tutorial Supplies: Picture frame with glass front (I love these 12×12 frames I found at Ben Franklin for only $7!) MADE: TUTORIAL: Heartbreaker Valentines.
Who said valentines were only red and pink?

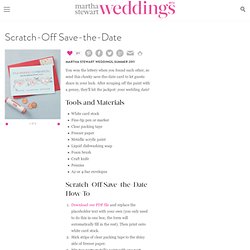
In bright colors, these Heart Breaker Valentines work great for boys and girls. So get out your scissors and stapler, because today, you’re tearing up my heart….. (cue N Sync) Each valentine is stapled together to create a pouch full of secret candies. New England Through Yummy Moms Eyes: Tutorial: Photo Wood Blocks. Scratch-Off Save-the-Date How-To. You won the lottery when you found each other, so send this cheeky save-the-date card to let guests share in your luck.

After scraping off the paint with a penny, they'll hit the jackpot: your wedding date! Tools and Materials. Corner Bookmarks. DIY Lace/Marble Necklace. Happy Monday everyone!

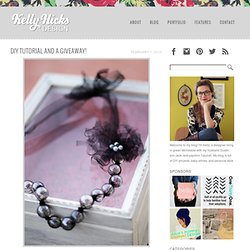
Today I am going to show you how to make this necklace and introduce my first giveaway! Below are the steps to make this tulle necklace. And to win this necklace, just leave me a comment below! A winner will be announced on Friday. Good luck! Step 1: Pick out your fabric and beads. Step 2: Measure the fabric around a bead and then add an inch, this is where you will cut. Step 3: Cut the fabric the long way. Step 4: You should now have a long strip of fabric. Step 5: Sew the folded fabric at the open end. Step 6: You should now have a tube. Step 7: In order to turn the tube right side out, attach a safety pin to one end.
Step 8: Feed the safety pin through the tube. Step 9: Once the tube is right side out, put a bead in the tube and center it. Multi-Store Box. Due to popular demand, I am doing a tutorial on the Magic Boxes I showed off in some previous posts. To begin, choose your paper. You need six sheets of matching paper (preferably a heavier weight). Choose one for your outside, budgeting for a contrasting one for your lid, and 4 to create the inside boxes. Cut as follows (all measurement are in inches): Outside: 6 x 11 3/4ths Lid: 8.5 x 8.5 4 inner boxes: 8 x 8 The only challenging part of this project is creating the lid and inside compartments. 1. 2. fold the tips of your paper in so that they meet at the center. Fold in all four sides, and then unfold.