
ToChk. Raspberry Pi. Raspberry Pi Information and Products for Custom Applications and Engineering Richard J Kinch, PhD kinch@truetex.com Last updated: March, 2016 This page describes the lens adapters I design and manufacture for the Raspberry Pi camera module.
I also give examples below of various projects to enhance the optical performance, including suggestions for novel applications of the camera. Presentatie%20Netwerken%20en%20portforwarding%20NL TELENET%20MODEM%20ONLY. Panalyzer - a RaspberryPi based Logic Analyzer. Trying to get this code running....
I'm admittedly not too savvy at some of the software steps involved. On my desktop, I git cloned the raspberry pi linux tree, created the .config from my pi's (debian squeeze) /proc/config.gz, ran the make ARCH=...oldconfig command, and then built the kernel. Then I was able to make the Panalyzer binary and module after changing the Makefile to point to my pi/linux folder. Code: Select all file PanalyzerPanalyzer: ELF 64-bit LSB executable, x86-64, version 1 (SYSV), dynamically linked (uses shared libs), for GNU/Linux 2.6.24, BuildID[sha1]=0x0ac8c9951674961e9524164ec990bec740a762bc, not stripped. C - How to read value from GPIO port of an ARM microcontroller? GPIO_BASE on B2. Wiring Pi. Pin numbering of the BCM2835 GPIO port(s) on the Raspberry Pi has been a source of great confusion since the designs for the Pi were first published.

In the early days (even before hardware was available) the default usable GPIO pins were simply referred to by number as GPIO0 through GPIO7. Additionally there were pins for other purposes, SPI, I2C and serial. This was highlighted on the original image on the Raspberry Pi Wiki site too. So when initially writing wiringPi, I chose to have the same default pin numbering scheme and numbered them from 0 upwards.
This is no different to how the Arduino operates – “Pin 13” on the Arduino is Port B, bit 5 for example. So wiringPi supports its own pin numbering scheme as well as the BCM_GPIO pin numbering scheme, and as of Version 2, it also supports the physical hardware pin numbers (for the P1 connector only), but I would like to suggest you stick to the simplified wiringPi pin numbers. For a printable version of these tables, click here. Viktor's DIY: Giving New Life to LCD Screens from Old Laptops, TVs, Monitors, etc. Introduction Over the years I have collected quite a few laptops (among many other things...).
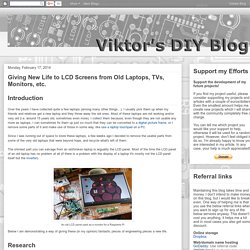
I usually pick them up when my friends and relatives get a new laptop and they throw away the old ones. Most of these laptops are not working and/or very old (i.e. around 15 years old, sometimes even more). I collect them because, even though they are not usable any more as laptops, I can sometimes fix them up just so much that they can be converted to a digital picture frame, or I remove some parts of it and make use of those in some way, like use a laptop touchpad on a PC. Since I was running out of space to store these laptops, a few weeks ago I decided to remove the usable parts from some of the very old laptops that were beyond hope, and recycle what's left of them.
Creating A New Project – Raspberry Pi Projects. Enabling Running Remote Projects in NetBeans As Root User By default the root account is disabled in Raspbian, but for an application to access the IO pins it needs root user privileges.
There are ways to configure the IO to get round this but its not all that easy and for development its often just easier to have full root access so the permissions don't get in your way (you can disable it later before releasing your RPi into the wild if the security issue is a concern). When running from the command line you can do this simply using the sudo command, but when remotely running from NetBeans you need a way for it to be able to run the application as root user if you are using the IO pins.
There doesn't seem to be a configuration option in NetBeans for this currently so enabling the root user account and letting NetBeans use it is a simple work around. Use this command: sudo passwd root If it doesn't work check the ssh config. Mehulj94/ISS-Tracker-Raspberry-Pi. Using WiringPi library with Raspberry PI cross-compiler. This tutorial shows how to develop a blinking LED project for Raspberry Pi in Visual Studio using the WiringPi library and our cross-toolchain.
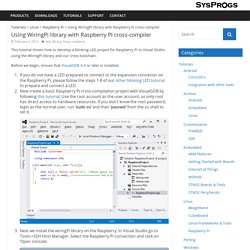
Before we begin, ensure that VisualGDB 4.0 or later is installed. If you do not have a LED prepared to connect to the expansion connector on the Raspberry Pi, please follow the steps 1-8 of our other blinking LED tutorial to prepare and connect a LED.Now create a basic Raspberry Pi cross-compilation project with VisualGDB by following this tutorial. Use the root account as the user account, as only root has direct access to hardware resources. If you don’t know the root password, login as the normal user, run ‘sudo su’ and then ‘passwd’ from the su shell to set it. Next we install the wiringPi library on the Raspberry. Developing a Raspberry PI app with Visual Studio. This tutorial demonstrates how to build and debug a simple Raspberry PI application using Visual Studio.
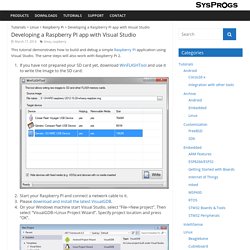
The same steps will also work with Raspberry Pi 2. If you have not prepared your SD card yet, download WinFLASHTool and use it to write the image to the SD card: Start your Raspberry PI and connect a network cable to it.Please download and install the latest VisualGDB.On your Windows machine start Visual Studio, select “File->New project”.
Then select “VisualGDB->Linux Project Wizard”. Specify project location and press “OK”. The VisualGDB Linux Project Wizard will start. Programming the ATtiny85 from Raspberry Pi. ARM Information Center.
Motors. Java. eMail. GUI. GPIO. Platforms and Frameworks. VNC. How to run Ubuntu Snappy Core on Raspberry Pi 2. The Internet of Things (IoT) is upon us.
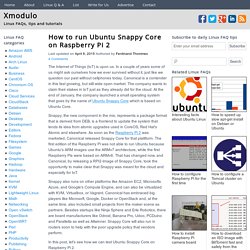
In a couple of years some of us might ask ourselves how we ever survived without it, just like we question our past without cellphones today. Canonical is a contender in this fast growing, but still wide open market. The company wants to claim their stakes in IoT just as they already did for the cloud. At the end of January, the company launched a small operating system that goes by the name of Ubuntu Snappy Core which is based on Ubuntu Core. Snappy, the new component in the mix, represents a package format that is derived from DEB, is a frontend to update the system that lends its idea from atomic upgrades used in CoreOS, Red Hat's Atomic and elsewhere. Snappy also runs on other platforms like Amazon EC2, Microsofts Azure, and Google's Compute Engine, and can also be virtualized with KVM, Virtualbox, or Vagrant. Docker on Snappy Ubuntu Core on a Raspberry Pi 2. In a previous post I gave a quick introduction to Snappy Ubuntu Core on the Raspberry Pi 2.
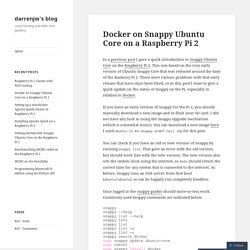
This was based on the very early version of Ubuntu Snappy Core that was released around the time of the Rasberry Pi 2. There were various problems with that early release that have since been fixed, so in this post I want to give a quick update on the status of Snappy on the Pi, especially in relation to Docker. If you have an early version of Snappy for the Pi 2, you should manually download a new image and re-flash your SD card.
I did not have any luck in using the Snappy upgrade mechanism (which is somewhat ironic). You can download a new image here. Markondej/fm_transmitter. Computer Laboratory – Raspberry Pi: Baking Pi – Operating Systems Development. This course has not yet been updated to work with the Raspberry Pi models B+ and A+.
Some elements may not work, in particular the first few lessons about the LED. It has also not been updated for Raspberry Pi v2. Welcome to Baking Pi: Operating Systems Development! Course by Alex Chadwick. NOOBS partitioning explained · raspberrypi/noobs Wiki. NOOBS partitioning (and booting) explained The multiple partitions that NOOBS divides your SD card into (at least 5) can be quite overwhelming and confusing. This page will try and explain how it all works, and illustrate how NOOBS differs from the 'traditional' standalone images. Non-NOOBS partitioning.
Standalone partitioning explained · raspberrypi/noobs Wiki. Internet Laundry. How to Clone Your Raspberry Pi SD Card for Super Easy Reinstallations. » Live Streaming RaspberryPi Camera DoEpicCoding. This post will show step by step how to Stream the content captured by your RaspberryPI Camera, these are the things we will be doing in this tutorial to get everything set and running. - Connect Camera to RaspberryPi. - Enable Camera in RaspberryPi Configuration file. - Install VLC program in RaspberryPi - Excute Streaming command specifying communication protocol and port.
So, the first step to take is connecting your RaspberryPi Camera Module properly, take on count that the camera is easily affected by static so make sure to avoid that, also it should be connected to the socket right behind the Ethernet Port and pay special attention that the connector’s strip is fully inserted and making clean contact as shown in the picture below: Now that we have our camera properly connected its time to enable it “if not already enabled” in the RaspberryPi configuration file, so you need to open a new Command Terminal and execute the following command:
Nimbits. Url?sa=t&rct=j&q=&esrc=s&source=web&cd=1&cad=rja&uact=8&sqi=2&ved=0CB0QFjAAahUKEwjHpt2m8dzHAhWCVhoKHX-sCbc&url= A chunky, multifunction printer with a USB connection is no feast for the eyes, especially when it is sitting next to your up-market laptop or tablet. On the other hand, a network printer can disappear unobtrusively into a corner of the room and serve multiple users on the LAN. The convenience, flexibility, and invisibility of network printers is one reason why they have replaced their USB counterparts in many offices. However, that's still no reason to drag your old USB printer down to the nearest recycling center. The Raspberry Pi can connect the USB world with the Internet, providing a print server service for your old USB clunker thanks to CUPS. With a wireless adapter plugged into your Rasp Pi, the location of your printer depends only on wireless reception and a suitable power supply. Shopping List Because USB-only printers are no longer in vogue, you can find used equipment at very reasonable prices.
Configuring the Network #/etc/resolv.conf nameserver 192.168.0.1. Sci Fi Your Pi : Previously: Sci Fi Your Pi - Prince Dakkar's patent log taking chart compass Sci Fi Your Pi - Prince Dakkar's patent log taking chart compass - Functional Design Sci Fi Your Pi - Prince Dakkar's patent log taking chart compass - Route selection and indication. RPi Low-level peripherals - eLinux.org. Back to the Hub. Hardware & Peripherals: Hardware and Hardware History. Low-level Peripherals and Expansion Boards. Screens, Cases and Other Peripherals. Fritzing. DHT Humidity Sensing on Raspberry Pi or Beaglebone Black with GDocs Logging. Google sometimes will update their API and cause issues with the gspread library. Difference between _, __ and __xx__ in Python. 25.1. pydoc — Documentation generator and online help system. Source code: Lib/pydoc.py The pydoc module automatically generates documentation from Python modules.
The documentation can be presented as pages of text on the console, served to a Web browser, or saved to HTML files. For modules, classes, functions and methods, the displayed documentation is derived from the docstring (i.e. the __doc__ attribute) of the object, and recursively of its documentable members. Raspberry Pi Notes. Root user privileges – Raspberry Pi Projects. x11 - How do keyboard input and text output work? Tutorial - How to give your Raspberry Pi a Static IP Address. Griffon's IT Library » Linux Ubuntu XRDP » XRDP – How To Make your keyboard “special keys” (Alt+Gr, Up,Down,..) working when using XRDP. Blinking an LED with Raspberry Pi 2 and C# Mono « RJ Dudley. Raspberry Pi and Mono – Hello World! OK, it has to be done. The first article you write about anything new has to contain the immortal words “Hello World”.
Raspberry Pi Wonderland. Arduino and Raspberry Pi - Experiments and Tutorials: Raspberry Pi and Bitcoin Mining - Tutorial / Experiment [Minera] Read Raspberry Pi: Measure, Record, Explore. Introduction Welcome! Hi there. Congratulations on being interested enough in the process of measuring and learning about the world around you to have gotten your hands on this book. If you haven’t guessed already, this will be a journey of discovery for both of us. I have grand plans to ‘play’ with computers and use them to know a bit more about what is happening in the physical environment.
Ambitious? You will find that I have typically eschewed a simple “Do this approach” for more of a story telling exercise. GoPiGo/Software/CSharp at master · DexterInd/GoPiGo. CamJam EduKit in partnership with The Pi Hut. Viktor's DIY: Internet of Things (IoT) with ESP8266 - Proof of Concept. Tutorial – How to give your Raspberry Pi a Static IP Address. Mikronauts.com » Blog Archive » Raspberry Pi IoT Experiment #1: LDR & ThingSpeak.
Raspberry Pi – Driving a Relay using GPIO. Raspberry Pi – Driving a Relay using GPIO. UNIX / Linux Tutorial for Beginners. Raspberry Pi Pinout - 5v Power. Introduction to Raspberry Pi with Raspbian OS - CodeProject. Cloud Storage - Box.com. Controlling Raspberry Pi via text message - FrontMotion Firefox.