
Raspberry Pi 3 UART baud rate workaround. GitHub - itemir/rpi_boat_utils: Utilities for Raspberry Pi, mostly for usage on a boat. Includes uart_control, AIS daemon, AISplay and sensor daemon. Linking the ESP8266 to a Raspberry Pi through MQTT. In my previous blog post I have tried to explain why MQTT is the right protocol for IoT scenario’s.

So it would be nice if the ESP8266 would be able to leverage this protocol as well. And it does! Over on the ESP forum, Tuan PM has been working on code to allow us to use the ESP boards as an MQTT client. The forum post is here and the wiki here. Linking the ESP8266 to a Raspberry Pi through MQTT. /etc/inittab no longer present in Raspbian Jessie? Thanks for the suggestion, I checked the config.txt file and enable_uart=1 was already in the file, but there is still no /dev/ttyAMA0 file when I boot.
I'm, trying to write from a python script to the serial port. On my Pi Zero, the cmdline.txt doesn't refer to ttyAMA0, but serial0 which is linked to ttyAMA0. I remove that bit from cmdline.txt, but then when I reboot //dev/ttyAMA0 don't exist. If I tried the linking as described above, then I get a single message on the serial port saying "Uncompressing Linux... done, booting the kernel" but no logon prompt.
Then /dev/ttyAMA0 exists. Connect ESP8266 to Raspberry Pi. December 3th 2014, 16:19 by Razvan Dubau This small tutorial is meant to help you connect the ESP8266 wifi module to Raspberry Pi through serial port.
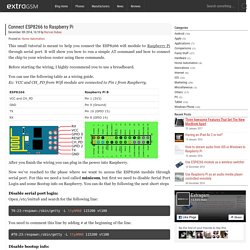
It will show you how to run a simple AT command and how to connect the chip to your wireless router using these commands. Before starting the wiring, I highly recommend you to use a breadboard. You can use the following table as a wiring guide.Ex: VCC and CH_PD from Wifi module are connected to Pin 1 from Raspberry. After you finish the wiring you can plug in the power into Raspberry. Connecting ESP8266 with Raspberry PI. Connecting the ESP8266 Wi-Fi module to Raspberry Pi.The ESP8266 is a low-cost Wi-Fi chip with full TCP/IP stack and microcontroller capability produced by Shanghai-based Chinese manufacturer, Espressif Systems.The chip first came to the attention of western makers in August 2014 with the ESP-01 module, made by a third-party manufacturer, AI-Thinker.
This small module allows microcontrollers to connect to a Wi-Fi network and make simple TCP/IP connections using Hayes-style commands. However, at the time there was almost no English-language documentation on the chip and the commands it accepted.The very low price and the fact that there were very few external components on the module which suggests that it could eventually be very inexpensive in volume, attracted many hackers to explore the module, chip, and the software on it, as well as to translate the Chinese documentation.
A Simple IoT Project with the ESP8266 WiFi module. December 19, 2014 | Arduino , Circuits | A Simple IoT Project with the ESP8266 WiFi module This is one of my older ESP8266 articles.
Please check out my more recent ESP8266 projects below: The ESP8266 WiFi Module The ESP8266 is a WiFi module that costs less than 5 USD. Sending it AT commands from a computer via an USB to serial adapter. I’ve explored options #1 and #2 above, and that’s what I’ll be talking about here. ESP8266 Temperature / Humidity Webserver. This tutorial was written before we put in the HUZZAH ESP8266 breakout in the shop - we recommend going with that as it has a regulator, level shifter and is breadboard friendly!
This project is presented on a breadboard as it best demonstrates the connections and how the digital pins might connect to other types of sensors. A final project may only have power, a regulator, the ESP-01, and a sensor, which could fit in a very small container. The ESP8266 is a 3.3 volt device only. It can draw over 300 milliamps at some peak operations. To give it a safe margin, the LD1117-3.3 regulator is safe, able to supply 800 milliamps when it needs to, cool at 500 milliamps. Many web tutorials show the ESP8266 being connected via generic FTDI USB to Serial device. 5 volt signal levels can harm the ESP8266.
The Adafruit Console Cable #954 runs at 3.3 volt signal levels so it's safe (safe for the sensitive Raspberry Pi also). Connect an ESP8266 to your RaspberryPi - 3. Connect to the serial portYou should now be able to interact with the ESP8266 via a terminal emulator program.

I suggest GNU Screen for this (“sudo apt-get install screen”). Screen passes through your keystrokes unless you start with “CTRL-A” in which case you can then make screen do things. For example “CTRL-A” then “k” will close (kill) the session. screen /dev/ttyAMA0 115200 (the speed may vary depending on your ESP8266 board) (you may need to sudo this too, depending permissions) You can now send your ESP8266 “AT” commands.
You’ll still need “return” and “CTRL-J” after each one, though. ESP8266 - NURDspace. "File:" cannot be used as a page name in this wiki.
Building the gcc toolchain have a look at the github wiki Code examples. WiFi Module - ESP8266 - WRL-13678. I’ll hold off on saying what you’ve probably already read with the words “cheap”, “IoT” and “the future” and tell you what I have learned so far.
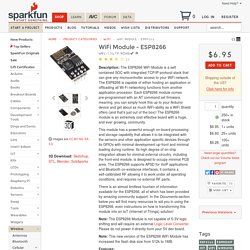
I ordered one of these in early October (2015) and was able to get it responding, however, I was thrown off by its version response. I can’t speak for other suppliers, whose product images often show a more “plain” blue board, but Sparkfun sells this nifty “black AI-Cloud” (AI-Thinker) version (with possibly a larger flash than “blue” versions, which can be important later on for Firmware Over The Air (FOTA) and other firmware flashing). I believe AI-Thinker is partnered/licensed by some means with Espressif (the ESP8266 SoC maker) to make a board. I compare it to Arduino using Atmel’s AVR. I mention this because support for this chip is largely community driven and it can become very confusing. Using the ESP8266 module. I obtained my module from an Ebay vendor in the United States.
