
Calibrating Humidty. @BulldogLowell The results with the DH22 were surprisingly disappointing, I thought they would have better performance.
I tried two of them without any correction factor in the sketch and in my 75% humidity test they never got close. They were however consistent so applying a (rather large) correction factor in the code would bring them into "zero" at 75%. In my 75% "chamber"DH22 # 1 reported 55.8DH22 # 2 reported 55.4 so they are pretty close to each other.
MySensors - Internet of Your Things! Hackable Magazine. J’ai cru que je ne voyais pas bien en recevant une newsletter de Mouser sur les nouveautés en vente : des Prototyping Kits Cypress PSoC CY8CKIT-049 à 3,20 € (HT) à base de microcontrôleur CY8C41xx et CY8C42xx… Moins de 4€ TTC pour une carte ARM ?!

Dans ces cas là, on se dit que c’est une erreur, une carte incomplète, avec un IDE à 1200€, ou quelque chose de ce genre mais, curieux, on prend tout de même le temps de regarder de plus près et là… c’est le choc ! On parle d’ARM Cortex-M0, une puce 32-bit avec, attention ça fait peur, 32 Ko de flash, 4Ko de SRAM, ADC, une quarantaine de GPIOs… Le tout avec une connexion USB/série (CY7C65211) et un bootloader embarqué de base. (AT)tiny Fish Feeder. Ultimate Raspberry Pi Configuration Guide. The Raspberry Pi is a great thing: it is real computer, it is cheap ($40), it can interface with electronics, talk to the web and has full HDMI support.
However it runs on Linux, which I have a love-hate relationship with. I love the idea of Linux, but when I start messing around the command line and downloading packages and installing things, I often get lost. I've assembled bits and pieces from various online posts and guides into this Instructable, which is what I call the "Ultimate Raspberry Pi Configuration Guide". Electronics : Microprocessors : How to make an Arduino-compatible minimal board. Make your own board Once you have been playing with Arduinos for a while you probably are thinking that you want to deploy one, but without the expense, and physical size, of using a whole new Uno board.
This post describes how to do that. AtMega328P chip We will start off with a "raw" Atmega328P-PU chip, the sort of thing you might buy off the shelf from Digi-Key, Element14, or other suppliers: Note that pin 1 is at the end where there is a notch in the plastic and an extra hole on the top. The chip itself can be purchased for around $US 3. Debugger avec Arduino. Cet article (un peu long) a pour but de donner un point de vue global sur l'environnement Arduino et les différents outils disponibles, fruit de longues heures de recherches.
Capteur de niveau d'eau "NF" How to Turn Your Webcam Into a Streaming, Motion-Detecting Surveillance System. Setup Logmein Hamachi for SSH access behind firewalls, etc. *Disclaimer* I only just figured out how to do this, but it seems handy so I"m sharing the method.
If you don"t understand anything, post and I"ll attempt to clarify. If you don"t pay for a static IP address, or find yourself behind firewalls that you can"t control, this method will allow you to access SSH on your Raspberry Pi by installing client-side software to connect to a logmein hamachi network. First, create a logmein.com account if you haven"t already, and from there, create a network (on the left). Next, download the logmein hamachi client software for your remote machine (laptop, work machine, what have you) and connect that to your hamachi network.
Then, download the beta logmein hamachi .deb file. . $ sudo wget you may need to add a flag at the end of that line to disregard authentication, just check the terminal for anything it"s telling you to do and do it, such that you can download the file.
Dépannage. Réinitialisation du mot de passe root de pi directement sur la carte SD. Raspberry pi News, Videos, Reviews and Gossip - Lifehacker. GARAGE. Simple and intuitive web interface for your Raspberry Pi. ROBOTS. Un serveur web oui mais .... comment faire pour que ce ne soit pas une passoire - partie 2. Sauvegarde et restauration compléte du système Raspberry Pi sur une carte SD. MA STATION METEO ET MA DOMOTIQUE DIY. Adafruit's Raspberry Pi Lesson 4. GPIO Setup.
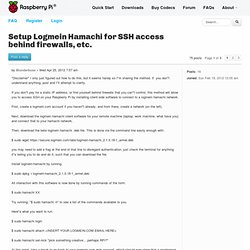
The I2C bus allows multiple devices to be connected to your Raspberry Pi, each with a unique address, that can often be set by changing jumper settings on the module.
It is very useful to be able to see which devices are connected to your Pi as a way of making sure everything is working. To do this, it is worth running the following commands in the Terminal to install the i2c-tools utility. sudo apt-get install python-smbus sudo apt-get install i2c-tools sudo apt-get install python-smbussudo apt-get install i2c-tools Run sudo raspi-config and follow the prompts to install i2c support for the ARM core and linux kernel Then reboot!
We also recommend going through the steps below to manually check everything was added by raspi-config! If you are using Occidentalis, then your Pi is ready to go with I2C as far as enabling the hardware goes. Sudo nano /etc/modules sudo nano /etc/modules and add these two lines to the end of the file: [TUTORIEL] Récupérer des codes 433.92 Mhz (maj)
Comment récupérer des codes émis par une télécommande en 433.92 MhzPas la peine d'essayer de récupérer des codes de clés de voiture ou de portails, il y a de fortes chances qu'il soit protégés contre le Replay (qui consiste à rejouer un code) EDIT: Sinon en VACHEMENT plus simple vous pouvez utiliser cette bibliothè les exemples il y a deux codes receive_demo_advance et receive_demo_simple qui affichera le code des télécommandes sur le Moniteur série Ce tutoriel est basé sur l'article sur la "Home Automation" du magpi 8.
![[TUTORIEL] Récupérer des codes 433.92 Mhz (maj)](http://cdn.pearltrees.com/s/pic/th/snootlab-afficher-recuperer-59821004)
Fritzing. Projet DRP - Daryl Robot Project - Topics perso et Community Management. Pour le maxbotix, il s'agit d'un capteur ultrasonique.
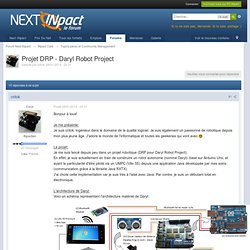
Désolé si ma formulation à laissé penser le contraire. Je t'en parlais, car ton schéma précise "capteur ultrasons de 3 à 30cm", donc je pensais que c'était un capteur courte portée. Du coup s'il va a 3m, je comprends.
IHM. Parts. Raspberry.