
Lovely Wire Knot Ring Tutorial. You can make this lovely ring (or a version of this design) yourself, using just some basic tools, wire and a lip balm! Yes, in this tutorial I am going to demonstrate that just basic beginner tools and a wire from Michael’s can go a long way! Wouldn’t this ring make a great present?? For the purpose of this tutorial I am going to be using the very basic, cheap tools that are available almost everywhere. Instead of a ring mandrel you can just use a tube of a lip balm, like I did.
I chose to make my ring from a simple gold-plated wire (20 gauge) but you could also use 18-gauge wire, twisted wire (wouldn’t that be nice?) PLEASE excuse the state of my nails in these pictures.. First thing to do is to cut a piece of wire. Next, wrap your wire around the tube of your lip balm. Cut of the extra bits, if any. Now bend the wire coming from your left to aim away from the ring and then bend again to aim it slightly upwards, as shown on pictures below.
Almost done! T-Shirt Refashion: Jersey Necklace. Sometimes I feel like I ride on the coattails of creative people.

Back in January as I was surfing my favorite blogs, I came across this post on Ultra Vroom about cardigans and fabric necklaces. I instantly fell in love and had to have a fabric necklace for my very own. I week or so later I remembered the large stash of white jersey hanging around the basement and hap-hazardly made my own version of Annie‘s fabric necklace.
If I remember correctly, I wore that necklace for 4 days in a row. I didn’t really take it off until Penelope bumped her mouth on the table and bled all over me (Penelope is ok, BTW). I love my necklace so much, I’ve been wanting to share it with you for sometime, but haven’t worked on the tutorial until just now. Materials: 1 XXL or XXXL men’s t-shirtScissors and/or rotary cutterSewing machine and or needle & thread Cut off the bottom hem of the shirt. Cut open one end of each strip. Sew coiled ends together. ∆DIY∆ Woven Bracelet. This post is experiencing technical difficulties.

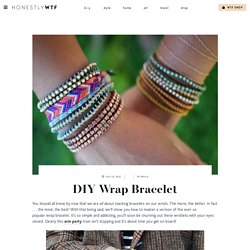
See a similar post here. Things you need for this DIY: *a curb chain bracelet or some curb chain, jump rings and a clasp *embroidery thread *scissors *a bobby pin or a two inch piece of wire bent in half *pliers (if you don't buy the pre-made bracelet) Total time: 1 hour Total cost: $4-$17 diy chain warp woven bracelet Awhile ago I bought some aluminum curb chain and have been looking for something great to do with it. They posted this great DIY and now I am sharing it with you. My chain was smaller than their bracelet so I decided to use two pieces and weave them together. Make sure you keep the direction consistent. DIY Wrap Bracelet - Honestly WTF - StumbleUpon. You should all know by now that we are all about stacking bracelets on our wrists.

The more, the better. In fact . . . the most, the best! With that being said, we’ll show you how to master a version of the ever so popular wrap bracelet. It’s so simple and addicting, you’ll soon be churning out these wristlets with your eyes closed. Clearly this arm party train isn’t stopping and it’s about time you get on board! You’ll need (for a double wrapped bracelet) :* Lengths will vary depending on the size of your wrist (see comments for suggestions). Fold the length of leather cording in half to form a loop.
Place the ball chain along the leather cording with the end of the chain meeting the end of the wrap. Watermark Tee by Sweet Verbana - StumbleUpon. Hello U-Create readers!

I am so excited to be guest posting here today. It just so happens to be my first guest post and I'm still a little shocked that it's here at Ucreate, one of my favorite blogs! Perfect Summer Bangle - StumbleUpon. Here's a fun tutorial on how to make a message bangle that's one-of-a-kind, done in the sun, waterproof and weatherproof.

Even after several trips to the beach, it won't fade or wash off! Essentially, it's the Perfect Summer Bangle. Used in this tutorial: Inkodye Red Prepare. All you'll need for this project is a raw wooden bangle (we got ours from DIYBangles.com), a black paint marker, plastic wrap, and some Inkodye! Transcribe. Perfect. Pour. Brush. Wipe. Tutorials for Recycling T-Shirts - StumbleUpon. So way way back, in June, I wrote this Studio Organization post, about starting the process of organizing my studio by cleaning out the closet full of junk.

Well, it's September and...let's just say the closet is a work in progress. Some of the things that are taking up space in the closet are shirts that I never wear anymore.