
31 Insanely Easy And Clever DIY Projects. Turn pictures into custom posters. Crafts for Men « Keywords: plant, sculpture, art, thumbtacks. Blueprint Coasters. I made some botanical old book page coasters as a present for my sister-in-law a few months ago.

I really liked how they came out , so I decided to make another set. I originally intended to give them as a gift to a good friend, but I ended giving him something else. So I guess for now the coasters are mine. I wanted to make them masculine so I decided to use blueprints. I basically did a google search and found several plans and elevations of a church, lighthouse and sailboat. This is the floor plan for the lighthouse. {source} All the images were black and white, which was a little boring. A word on Picnik; sadly it will be no more on April 19th.
This is the same image after applying the PickMonkey Warhol tool under the effects section. Slatted wood map art. I’ve been seeing a lot of slatted wood lately, mostly in large-scale designs like Morgan Satterfield’s lovely front porch screen or this incredible house that popped up on Desire to Inspire yesterday.

I’ve never come across slatted wood as wall art, but after seeing this wall map project from Natalie Gluic, I’m thoroughly convinced that this is a great way to showcase the beauty of the slatted-wood construction. After giving the strips of wood a rich, deep red oak stain, Natalie traced and painted in a graphic map to add an extra layer of interest. I actually love the abstraction of the map design spanned over the slats, and the subdued paint palette gives the piece sophistication. Constructing the slatted wood is relatively straightforward, and from there you have tons of great options for how to customize it for your own walls.
Crafts for Men « Keywords: download, diy, woodworking, plywood. Dutch designer Marjan Verboeket created free plans for this simple, rustic table and stackable bench.

Constructed from an inexpensive single 8x4' sheet of plywood, you can have all the pieces cut to size at the hardware store, and assemble it at home with a few nails and glue. The seats slide under the table for storage, making this a great solutionfor small spaces or for entertaining more folks than normal. She's also translated these basic structures into: a storage shelf, a desk, a picnic table, stacking cube storage, a bench, and a puppet theater.
All for free. If the yellow is a bit too bold for you, consider a deep charcoal or dark blue which will equally match the warmth of the pine plywood. Get the plans at 101 Woonideën. : A green door, a green upcycling, and green in our wallet This (sorta) Old Life. Painted Wood Wall Art. Photo: Claire Ferrante of Little Dog Vintage Materials: -2 pieces of MDF 30 inches x 24 inches and 1 centimeter thick which equals one piece that is 60 x 24.
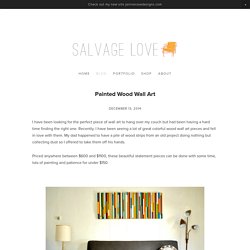
I bought two pieces because I assumed when I attached the wood strips, they would end up being heavy and it would be easier (and safer) to hang them next to each other as two separate pieces -approximately 100 pieces of wood various sizes and depths -7 paint colors. DIY Hanging Lightbulbs. Some of you asked for a tutorial on how to make that gorgeous industrial lightbulb chandy that Gianna of Chic Celebrations made yesterday for Film and Lace wedding ideas shoot, and today you’re in luck!

You will need: chicken wire1×2 wood strips (at home improvement stores such as Home Depot, they can cut to desired size for you)chainsmall nails4 small hooks (to attach the chain onto each end of the wooden frame)lamp kitsL bracketsliquid nails (or other wood glue for the frame) Mount wood frame to desired size and secure the inner joints with L brackets. Stain or paint your frame if you’d like. Layer chicken wire over the top of your frame, and secure it with nails. Be sure to check out the Film and Lace shoot captured bby Krista Mason in full right here! DIY Wire Chandelier. Classic Wood Frame - 18x24. 1246 rue Sainte-Catherine O.

Montréal H3G 1P1 (514) 874-0063 HEURES D'OUVERTURE: 10h00 - 21h00 Lundi au vendredi 10h00 - 19h00 Samedi 11h00 - 18h00 Dimanche 509 rue Saint-Joseph E. Before & After: TV Tray Table Gets Decked Out. The Epic Room Makeover Nightstands and Lamps and How To Make A Space YOURS! Fabulous Pieced Map Art Tutorial. Fabulous Pieced Map Art Tutorial By Creative Juices Decor What fun to be able to do a guest post on Cassity’s blog! My name is Selina and I come to you from Creative Juices Décor.
What you will find on my blog is lots of inspiration for all your Creative Juices! I am an interior designer by degree and LOVE home design/decorating, thrift store shopping, healthy recipes and crafting. Archive » Painted Canvas DIY – My Reward. Crates+via+baileymeandgarden.jpg 358×357 pixels. Reinventing the (Embroidery) Wheel. Common Items as Unusual Bedside Tables. Previous image Next image If you're short on space, cash, or move a lot, try swapping traditional nightstands with something else from your home.

Go "shopping" in other rooms and get those creative juices flowing. And you'll have a few less things to haul come moving day. Need some inspiration? • Extra storage or seating. . • Get crafty and DIY small space solutions. . • No matter how weird, you can make it work. Diy rope bowls. So it's been a while since i've posted anything remotely crafty lately...i suppose i must be getting lazy (technically lazy-er). anyway, i saw this cute bowl on craftgawker over the weekend so i decided to make my own-with my own tutorial 'cause i need the practice anyway right?
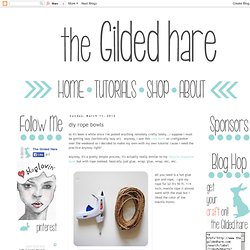
Anyway, it's a pretty simple process, it's actually really similar to my recycle magazine bowl but with rope instead. basically just glue, wrap, glue, wrap, etc, etc. all you need is a hot glue gun and rope. i got my rope for $2-it's 50 ft, 1/4 inch, manila rope (i almost went with the sisal but i liked the color of the manila more). start wrapping in a circular motion to form the base. if you plan on making several i might consider making all the bases first just to make sure they're the same size. when i made my second i tried to make it the same size...which of course, it isn't. but that could just be the fact that i can almost never make the same thing twice... making one bowl took me about an hour...ish? Turning a Postcard Book into Wall Art Desire to Inspire.
Occasionally, I will be fawning over galleries of photos of an entire home and fixate on one small detail.

This very thing happened to me while looking at a tour of Nusara's home. The entire house is done beautifully, but I really honed in on this vignette in her living room. Chevron Wall Pattern.