
Rero robot kit - The review. Second part: ultrasonic obstacle avoidance 4 wheel car. After my first review and robot done by the start guide, I tried something a bit more complex: an autonomous robot, which can find its way out from a room.
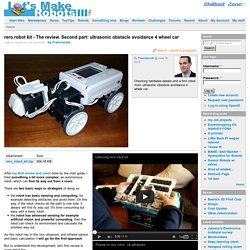
There are two basic ways or strategies of doing so: the robot has basic sensing and computing, for example detecting obstacles and avoid them. On this way, if the robot checks all the path to one side, it always will find its way out. It's time consuming but easy with a basic robot.the robot has advanced sensing for example artificial vision and powerful computing, then the robot can check its environment and calculate the shortest way out. As this robot has in this box ultrasonic and infrared sensor and basic calculation, I will go for the first approach.
Four easy tips to make your batteries last longer. This article was written by Valentin Muenzel from the University of Melbourne, and was originally published by The Conversation.
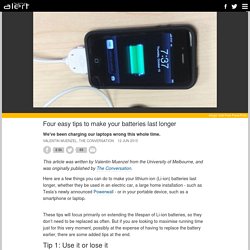
Here are a few things you can do to make your lithium-ion (Li-ion) batteries last longer, whether they be used in an electric car, a large home installation - such as Tesla’s newly announced Powerwall - or in your portable device, such as a smartphone or laptop. These tips will focus primarily on extending the lifespan of Li-ion batteries, so they don’t need to be replaced as often. But if you are looking to maximise running time just for this very moment, possibly at the expense of having to replace the battery earlier, there are some added tips at the end.
Hacking a Resistor to 100.00% accuracy. Which 10KΩ Resistor would you choose :- Well to tell the truth its the same one ..... just the one below has been Tweaked !
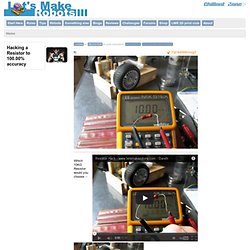
The Trick is to file the body of the resistor (beneath the outer shell _ into the carbon/metal) using a needle file (or cosmetic/nail file). Most common resistors are made from Carbon/Metal film or metal oxide, by file_ing the Carbon/Metal away the resistance can be tuned to whatever value you want. Minimal damage.... Basic rule :- The resistance increases with file_ing.
Resistance = Length of resistor / cross section Area x (substance conductivity) Smooth Head Rotation. Did you ever tried to rotate the robot head and found the movement nervous?

Beware of Delays. Whenever you use delays in your robot code your microcontroller is going to do nothing but wait until the delay is passed.
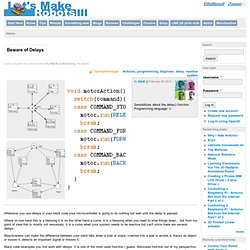
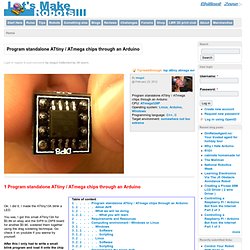
Where on one hand this is a blessing it is on the other hand a curse. It is a blessing when you need to slow things down... but from my point of view this is mostly not nessesary. It is a curse when your system needs to be reactive but can't since there are several delays. Reactiveness can make the difference between your robot falls down a stair or stops, crashes into a wall or avoids it, tracks an object or looses it, detects an important signal or misses it. Many code examples you find work with delays. Program standalone ATtiny / ATmega chips through an Arduino.
Ok, I did it, I made the ATtiny13A blink a LED.
You see, I got this small ATtiny13A for $0.99 on ebay and the SIP8 to DIP8 board for another $0.90, soldered them together using the drag soldering technique. Using a PicooZ IR Remote Control. Update: Added new video. What if your robot is stucked and can't free itself? Take back the control and steer your robot out of trouble. Desoldering tool. How to choose the motors for the robot. One of the problem building a robot is the choice of motors.
I'm speaking about a mobile robot with wheel. So, I'm not speaking about legs or others geometries. A simple robot with 2 wheel that goes around in the house. How to make wireless Wii sensor bar. Making PCB's the inkjet way. Hi all, Yes you read the title right, I'm going to describe here the method I used to create the above PCB using an INKJET printer.
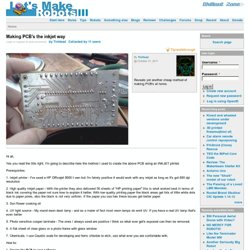
Prerequisites: 1. Inkjet printer - I've used a HP Officejet 8000 I own but I'm fairely positive it would work with any inkjet as long as it's got 600 dpi resolution 2. 3. 4. 5. 6. 7. How to use infrared receiver sensors for collision avoidance. Do you want to know how to use cheap infrared receiver sensors to detect objects?
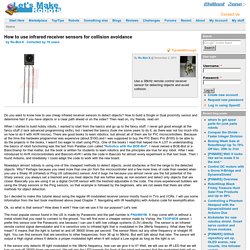
How to build a Single or Dual proximity sensor and determine fast if you have objects or a clear path ahead or on the sides? Then read on, my friends, read on! When I started to build hobby robots, I wanted to start from the basics and go up to the fancy stuff. SD Read and Write for Propeller. I recently read two great tutorials from gadget gangster on how to write to and read from SD card.
Now this is great if you want to write pre-set text. But doesn't work out so well if you want to send text that is writen as the chip is running. This code shows a simple "word processer" that can write to, append, read and delete a single file using the Parallax Serial Terminal. Please comment with any questions. Instructions: An easily tunable sensor mounting system. Let's say you have a sensor on your beloved (or hated) bot. You want to fix it so you can easily tune the distance between it and the floor (for example). You can use a bunch of screws and add more or less washer to it, but what if you want something accurate because with washer your accuracy will be limited by their thickness?
This is what i did: In my case, in my current test platform, i wanted to use a ps2 mouse and they can be quite stubborn with the distance from the floor. How to make your own solar panels. Well, I just thought I'd post what I've learned about solar panels in the past month. They are actually quite simple to make and will cost you alot less then buying one from a company. Part 1 - Assembling the cells: Parts List: · Soldering Equipment · Duct tape · Wire cutters · Solar cells · Tabbing wire · Bus wire. A perfect twist. Organising your code in the Arduino IDE. I have been revamping the code for Mr. Tidy and it has grown large enough (23Kb when compiled) to be a real headache to scroll through. I know that some IDE's solve this problem by collapsing code but the Arduino IDE doesn't have this feature. The Arduino IDE has "Tabs" instead which I have not seen people use very much.
In the past I have used these to seperate constants and IO pin definitions but you can also break your code into logical sections and store those sections in the tabs making it easy to jump from one section to another. In my new code for Mr. Note that my code segment tab names do not have an extension and do not need to be included at the beginning of the program.
Organising your code in this way makes it much easier to edit large programs. Good luck and enjoy! Newbie’s guide into programming - 00000001 - Programs and programming languages. Let’s start with a basic understanding of what program actually is. Plastruct. 28 pin Project Board (AXE020), Picaxe for dummies. Please note: The info on this page is about a board. However, things can be different depending on which chips you stick into the sockets of that board, and how these chips are programmed. Originally this page was written when the newest Picaxe 28 was 28X1. If you are using Picaxe 28X2 or later, you should be aware that depending on the programming that you do on these chips, the in's and out's can be set to differ from "standard setup", where we are dealing with in and out. In other words; This page's info on digital and analogue in and out is refering to the "Standard" setup of the Picaxe 28, 28A, 28X, and 28X1 versions.