
» DIY: Tank Dress with Pockets! academichic. At long last, I present a tutorial for the tank dress I made a few weeks ago before the end of the semester blindsided me.
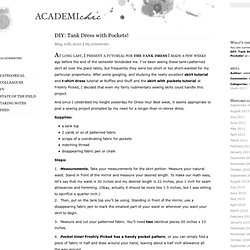
I’ve been seeing these tank+patterned skirt all over the place lately, but frequently they were too short or too short-waisted for my particular proportions. After some googling, and studying the really excellent skirt tutorial and t-shirt dress tutorial at Ruffles and Stuff and the skirt with pockets tutorial at Freshly Picked, I decided that even my fairly rudimentary sewing skills could handle this project. And since I celebrated my height yesterday for Dress Your Best week, it seems appropriate to post a sewing project prompted by my need for a longer-than-in-stores dress. Supplies: a tank top2 yards or so of patterned fabricscraps of a coordinating fabric for pocketsmatching threaddisappearing fabric pen or chalk Steps: 1. 3. 4. Pin and cut out a pair. 5. 6. 7. Diy Couture Tshirt Dress. How to Recycle An Old Credit Card into a Pretty Name Necklace.
Cool Copper Projects Warm metallic hues are easy to love but often pricey.

When you create the look... Easy Doily Bowl Craft a decorative bowl from a doily picked up from a flea market, antique... Camper Birdhouse Encourage birds to stay awhile with an adorable vintage birdhouse. Alana Taylor. Out of Order: DIY Tutorials. DIY Flower Halo. You’ll start by cutting 2 circles from the piece of felt at approximately 2″ in diameter.
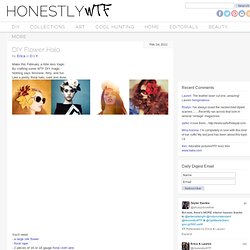
Form the wires of your halo by molding and bending each piece into a half circle. Lay the two half circles opposite of each other to create a single circle, laying it over the top of your head to check the fit. Wrap floral tape over 2 sections of overlapping wire at 11 o’clock and 3 o’clock. Trim any overlapping pieces with the wire cutters. (Click images to enlarge) Using the wire cutters, cut the stem off the flower making sure the back is flat. She's Crafty: DIY Multi-Chain & Ribbon Necklace. Due to the resounding success of her last She’s Crafty, my friend Pandora from Accessory Source is back with another lovely necklace DIY tutorial that would make a fantastic christmas present for a friend or relative!
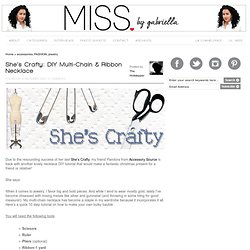
She says: When it comes to jewelry, I favor big and bold pieces. And while I tend to wear mostly gold, lately I’ve become obsessed with mixing metals like silver and gunmetal (and throwing in some bling for good measure!). DIY Tutorial: Tubular T-Shirt Scarves. DIY Tutorial: Tubular T-Shirt Scarves Winter is just around the corner, and you know what that means: scarf season!

Yes, one of the best parts of winter’s arrival is my favorite style basic: scarves. They’re easy to throw on and a definite staple for fall. Problem is, scarves cost money, so being the economically responsible person I am, I decided to whip up not one but TWO scarves from one shirt, and best of all, they’re FREE! So do you know what time it is? What You Need: 1. How to Make the Fringe Scarf Step 1: Take the shirt of your choosing and turn it so the side you want to be visible is on the inside. If you want to hide the decal or whatever, make sure the decal is on the outside and vice versa. Step 2: Measure out about 10 or so inches and make a mark in the center of the shirt. Step 3: Cut off the shirt sleeves. Step 4: Cut along the arched line you drew earlier and pull apart. DIY Market Bag. With Earth Day just around the corner, we’re turning to artist and environmentalist Chris Jordan for inspiration.
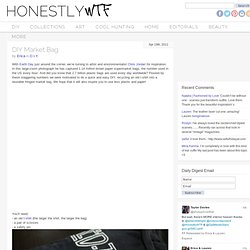
In this large-zoom photograph he has captured 1.14 million brown paper supermarket bags, the number used in the US every hour. And did you know that 2.7 billion plastic bags are used every day worldwide? Floored by these staggering numbers we were motivated to do a quick and easy DIY, recycling an old t-shirt into a reusable fringed market bag. We hope that it will also inspire you to use less plastic and paper! Lay the t-shirt on a flat surface. Snip 8 evenly spaced slits along the bottom hem of the t-shirt. Attach a safety pin to the end of one of the strings. You can trim the strings but we like leaving the fringe as is. Aren’t you excited to BYOB (bring your own bag)? Make one for a friend. (top image from here, rest of images by Honestly…WTF; thanks to Leethal & Lynn for the inspiration!)