
DIY Friendship Bracelet. For several months now, we’ve been receiving emails requesting a friendship bracelet DIY.
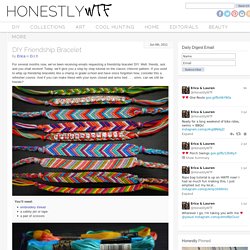
Well, friends, ask and you shall receive! Today, we’ll give you a step by step tutorial on the classic chevron pattern. If you used to whip up friendship bracelets like a champ in grade school and have since forgotten how, consider this a refresher course. And if you can make these with your eyes closed and arms tied . . . umm, can we still be friends? You’ll need:embroidery threada safety pin or tapea pair of scissors Start by cutting several strands of embroidery thread at about 24 inches each. Start on the left side with the outermost color (shown here in red) and make a forward knot by creating a 4-shape over the 2nd color, loop it under and back through the opening.
Pull up and to the right to tighten. Now pick up the outermost color on the right side (show here in red) and make a backward knot, creating a reverse 4-shape over the 2nd color, loop it under and back through the opening. Creative Window Seat Ideas. Redesign your window to create a cozy corner to curl up in the sun.
What would you wish for? For the second part here. Simple Ideas That Are Borderline Crafty - 31 Pics. Rock Patterned Denim On The Cheap With This DIY! I’m a little obsessed with patterned denim right now. I must confess though, buying a new pair of jeans right now isn’t exactly in my budget, and it doesn’t help that I have a ton of pairs in my drawers that I haven’t worn in years. So, in order to love what I have (and save a few bucks!) , I’m definitely going to attempt this DIY later this week!
Check it out after the jump! So here’s what you’ll need:jeans or cut offslight grey acrylic paint (white paint will look too clean and off-white looks dirty)a rulera wood skewer (for smaller dots, pencil eraser for larger dots) Steps:1. You can see more pictures and notes from this great DIY at the original source! 5 Ways to Turn Zippers into Awesome Arm Candy. UPDATE: By popular demand, Zipper Bracelet Kits ($15) and readymade Zipper Bracelets ($20) are now available in the Brit + Co. shop!
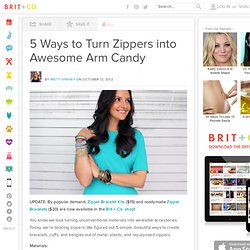
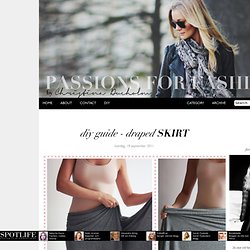
You know we love turning unconventional materials into wearable accessories. Today, we’re tackling zippers! We figured out 5 simple, beautiful ways to create bracelets, cuffs, and bangles out of metal, plastic, and repurposed zippers. Materials: - zippers - E-6000 quick hold contact adhesive - velcro or snap buttons - leather crimps + clasps - Tools: needle nose pliers, sharp scissors First thing to do is get your zippers! 1. These bangles are sweet, and have a definite friendship bracelet vibe. Use colored zippers for these, in whatever colors you like. Attach cord ends so that you can add a clasp and loop. 2. For this one, you’ll want a zipper with some contrast. We chose a black zipper with gold teeth. 3. DIY Guide - draped skirt. Mandag, 19 september 2011 Her får I den længe ventede DIY guide til at binde en draperet nederdel, som jeg første gang viste i et indlæg fra Kreta.
Jeg har brugt et gammelt tørklæde fra H&M, men har I ikke et tørklæde i den stil, kan man købe et langt stykke jersey stof i en stofbutik meget billigt. DIY Braided Bead Bracelet. It’s been awhile since our last bracelet DIY.

I don’t know about you, but our wrists have been begging for another colorful addition for months now. So after playing with some materials that were already on hand, we’ve created a tutorial for a braided bead bracelet, which is a not so distant cousin of the hex nut and wrap bracelet. Because honestly, you can never have too many . . . DIY Lip Balm. This fun recipe will give you a great organic lip balm!
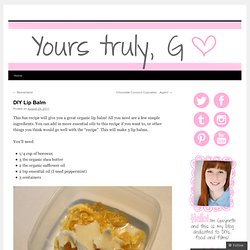
All you need are a few simple ingredients. You can add in more essential oils to this recipe if you want to, or other things you think would go well with the “recipe”. This will make 3 lip balms. You’ll need: 1/4 cup of beeswax3 tbs organic shea butter2 tbs organic safflower oil2 tsp essential oil (I used peppermint)3 containers Microwave the beeswax, shea butter and safflower oil until it has turned into a liquid. Once all melted, mix in your essential oils, and some food colouring if you want it.
Pour all of this into your containers and let cool. Create your own little label like I did, or just leave it blank. Bohemian Infinity Dress… « Needles, Thread and Love. I saw this dress as a project in vol. 4 of the Quick Stuff To Sew magazine.
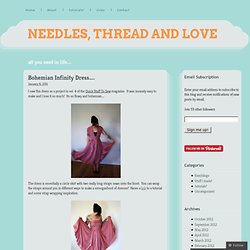
It was insanely easy to make and I love it so much! Its so flowy and bohemian… The dress is essentially a circle skirt with two really long straps sewn onto the front. How to Make a Ballet Tutu.