
Print and pattern - hello! Sashiko - Google Search. How to do sashiko stitching - How to Sashiko Stitch - A Threaded Needle - (Powered by CubeCart) How to do sashiko stitching: Materials for sashiko stitching are minimal: fabric to stitch your designs on, a sashiko needle, thread, scissors, a sashiko pattern, and some white fusible lightweight non woven interfacing. It is worth it to buy sashiko needles, they make stitching easier. You can stitch on any fabric but it is important to test it by stacking up some stitches on your needle and pulling them through. If you have to tug hard on the needle, change fabrics. Sashiko stitching should flow easily. It is a good practice to pre wash your fabrics before you begin. Transfer your design: Start by transferring the sashiko design to your fabric. Tip: Use a piece of interfacing larger than your sashiko project, and trace the cutting, sewing and any other pattern markings onto it as well.
Lift the interfacing and position it on the back of your fabric, again with the glue side down. Pattern Reading, Altering & Drafting. 6a00d8341c699253ef00e54ff622798834-800wi.jpg 800×1'257 pixels. Ultimate Paper Mache — Animal Sculptures and Advanced Paper Mache Projects.
Image transfer. Christmas Help / Movie star white teeth! My dentist actually told me about this. Use a little toothpaste, mix in one teaspoon baking soda plus one teaspoon of hydrogen peroxide, half a teaspoon water. Thoroughly mix then brush your teeth for two minutes. How To Make Vegetable Dye. Previous image Next image Choose the color.
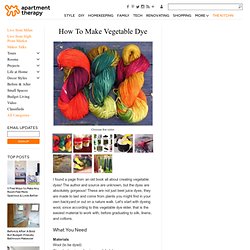
I found a page from an old book all about creating vegetable dyes! The author and source are unknown, but the dyes are absolutely gorgeous! These are not just beet juice dyes, they are made to last and come from plants you might find in your own backyard or out on a nature walk. What You Need MaterialsWool (to be dyed)Alum (potassium aluminum sulphate)Cream of TartarLarge saucepan or tall potContainer to store treated wool*Pick a color from the list below to find the herb, plant, or bark you will need.
EquipmentStovetopScaleWooden sticks, dowels, or knitting needlesRubber gloves Instructions *Please read any special instructions for your specific color before starting this process. 1. 2. 3.Prepare the Plant Once you choose a color, put the plant in cold water and bring it to a slow boil. Quick Tip: Make a Set of Cool Crochet Buttons. In this tutorial we’ll be making some cute and easy crochet buttons.

The pattern uses US terms and stitches include double crochet (dc); chain (ch); and a magic ring. Supplies Yarn in a main and a contrast colour (I used Drops Paris cotton yarn by Garnstudio).A crochet hook in a size suitable for the yarn you’re using (I used a 4mm hook here).A darning needle for sewing in the ends.A pair of scissors. Step 1: Make a Magic Ring Using the main colour yarn, make a magic ring and secure with a stitch. Step 2: Crochet the Button Chain 2 (counting as 1 dc), and work 11 double crochet in the ring, and pull it to close, creating a circle. Step 3: Needle Join Cut the yarn and pull the end through the loop on your hook. Close the circle by putting the needle through the top of your first double crochet (ie. not the starting two chains)… …and back again through the back loop of the last stitch. The red thread. How to make a fabric coil bowl or basket. Add a pop of neon to your desk or shelf with these woven coil bowls.

They’d also make a lovely handmade gift, perhaps a small bowl with a few rolls of washi tape inside? … it’s not long until Christmas! Click on the ‘read more’ link below for the full instructions. You’ll need: Long strips of fabric – anything will work: I used knits, both cotton and acrylic. Cord – the neon orange is ‘Brickie’s Line’ from the hardware store ($5 for 100 metres) – or you can use more fabric or yarn like I did on the pink bowls. A large yarn needle with a big eye. Scissors. If you are cutting up fabric (T shirts, sheets, fabric yardage, etc) the thicker you cut it the chunkier and quicker your bowl will be. The instructional photos are for the grey bowl with neon orange stitching, so I’ll refer to those colours from now on. Cut a length of orange cord as long as you can manage it without it getting tangled, and thread the needle with it. Overlap the ends of the orange cord and the grey yarn.