
How to Create a Business Card Mockup Using Smart Objects in Photoshop. Dodge And Burn Secrets: Adobe Photoshop CS6. Photoshop CS3 - Fare lo scontorno dei capelli. Brush Parameters: Airbrush build-up - Understanding Brushes, Vector Tools and Transforms - Photoshop CS6 103 - macProVideo.com : WebPlayer. Good or bad, we publish all reviews that are constructive.
Please detail why you like a tutorial program, or alternatively, why you do not. No Subjective Opinions. We will not publish reviews that are simple opinion with nothing to back them up. For example, if you write "This tutorial is awesome! " and nothing else, your review may not be posted. No Links to Other Websites. No Personal Comments About Trainers. Only customers can write a review. The Ultimate Beauty Retouching Photoshop Tutorial.
Levels vs Curves: A Photoshop Showdown. Easy Fix for White Balance in Photoshop. How to Blend Hair with Background In Photoshop CC. The Amazing Power of Frequency Separation Retouching in Photoshop. How to Master the Clone Stamp Tool in Photoshop. How do I recreate this color overlay layer effect in Photoshop? Original image Add a layer for your color and put it under your image.

Then use the blending mode "Luminosity" on that image. You can change the background color you want without changing the main picture. Select your image layer, and go in the menu "Image", then select "Adjustment" and then "Desaturate. " Add a new layer with a color on top of that image and set it to the blending mode "Color. " To add a more dramatic effect, you put the color image on top of these 2 layers and use the "Overlay" blending mode at 60% transparency.
Use the color mode "Duotone. " Fist set your image to grayscale mode, then Duotone mode in the menu "image/mode. " Then in the Duotone menu, you can choose 1-2-3-4 colors and mix them together. Design a Realistic Sandwich Bag. This tutorial derives from a suggestion a reader named Kippy placed in the Suggestion Box.
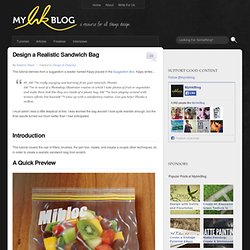
Kippy writes… Hi, I’m really enjoying and learning from your tutorials. Thanks. I’m in need of a Photoshop/Illustrator routine in which I take photos of fruit or vegetables and make them look like they are inside of a plastic bag. I’ve been playing around with texture effects, but haven’t come up with a satisfactory routine. I must admit I was a little skeptical at first. Introduction This tutorial covers the use of filters, brushes, the pen tool, masks, and maybe a couple other techniques; all in order to create a realistic sandwich bag from scratch.
A Quick Preview Step 1 The first step is to gather up the components for your design. Step 2 Once you have the components that your are going to use, open up the fruit image and extract if from its background. Step 3 We are going to make our light source come from the top left. Step 4 Step 5 Make a selection of the bag shape you just created.
Step 6. Tutorial Photoshop - Selezioni avanzate - I calcoli. Tutorial Photoshop - Escludere il nero in Photoshop - Intermedio. Accurate White Balance Adjustments in Photoshop - Photo Blog Stop. Sometimes the white balance in your images is “right on,” and other times it’s miles off—don’t worry, it happens to all of us, and it’s easy to fix in Photoshop!
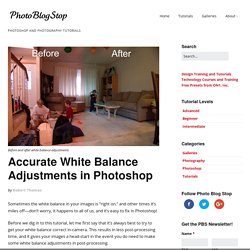
Before we dig in to this tutorial, let me first say that it’s always best to try to get your white balance correct in-camera. This results in less post-processing time, and it gives your images a head-start in the event you do need to make some white balance adjustments in post-processing. These days, virtually all digital cameras have white balance settings. If you’re shooting outside on a sunny day, you would set your camera’s white balance setting to “sun,” and if you’re shooting outdoors on a cloudy day, you would set your digital camera’s white balance setting to “cloudy,” etc. A lot of the higher-end digital camera also allow you to manually set custom white balance values. To fix the white balance in Photoshop we’ll be locating and setting the black point, white point and gray point in an image. Watch the video The steps. Photoshop Blend Modes Explained - Photo Blog Stop. Working with blend modes is almost always an experimental process.
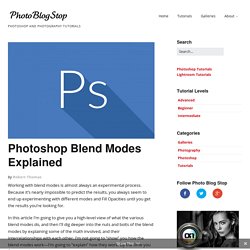
Because it’s nearly impossible to predict the results, you always seem to end up experimenting with different modes and Fill Opacities until you get the results you’re looking for. In this article I’m going to give you a high-level view of what the various blend modes do, and then I’ll dig deeper into the nuts and bolts of the blend modes by explaining some of the math involved, and their interrelationships with each other. I’m not going to “show” you how the blend modes work—I’m going to “explain” how they work. By the time you finish reading this article, you should have a better idea of how to use blend modes and where to begin your “experimentation,” which in turn should reduce the time it takes to achieve the results you’re looking for. How Blend Modes Work. Matching Color Between Images. How to Easily Correct Colors and Match Tones in Photoshop.