
No-fuss foam roses. Mother’s Day is hours away, but there’s still lots of time to make these beautiful foam roses in minutes.

They’re much more dainty than the no-fuss paper roses I made for Valentine’s, and perhaps far more versatile. In a few simple steps, you can make these sweet rose magnets, rose pushpins, and rose jewelry. You have probably made paper roses before by cutting and rolling spirals of paper. This applies the very same technique, however, I’ve added the petal details by employing a simple tool that many of us have stowed in our crafting bins — scalloped scissors. You will need: scallop-blade scissors, hot glue gun with glue sticks, and thin foam sheets. 1. 2.
Britt’s anthropologie-inspired tables. This incredible diy project makes my jaw drop every time i see it. the talented britt of cucumbersome created these seriously fantastic tables after seeing the curator table at anthropologie. inspired by angie’s diy faux-nelson jewelry chest on d*s, britt decided to create her own, more affordable (and dare i say, more beautiful?)

, version of the table for much, much less. using components from ikea and home depot, britt created these gorgeous tables for $96 each, a far cry from the $698 price tag on the anthropologie version. i just love britt’s initiative to create something with her own two hands that, in my opinion, came out looking just as good- if not better- than the inspiration piece.
CLICK HERE for the full project instructions from britt after the jump! I think there is a lot of potential here for other projects. You could stack two or three of the chests together and add little ornate feet. How to: 1. BDC Financing. One Pearl Button: Technique Tutorial: Stencil with Sharpie. Creative How-To Projects.
DIY Stores. Tools. Vintage File Drawers. DIY Marbled Glassware. When graphic designer and artist Joanna Bean Martin shared with us her technique for marbling the bottoms of glassware with nail polish, we couldn’t wait to try it ourselves.
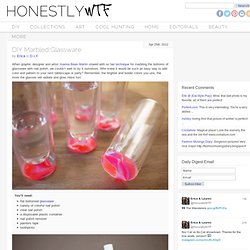
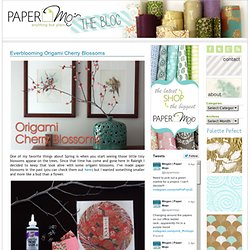
Who knew it would be such an easy way to add color and pattern to your next tablescape or party? Remember, the brighter and bolder colors you use, the more the glasses will radiate and glow. Have fun! You’ll need:flat bottomed glasswarevariety of colorful nail polishclear nail polisha disposable plastic containernail polish removerpainters tapetoothpicks Mask off the bottom of the glass with painters tape. Fill a disposable, plastic container with water. Layer the colors one on top of the other. Origami Cherry Blossoms. One of my favorite things about Spring is when you start seeing those little tiny blossoms appear on the trees.
Painted Dresser as Kitchen Island. Do-It-Yourself Decorating Projects and Ideas - BHG.com. Cool Copper Projects Warm metallic hues are easy to love but often pricey.

When you create the look... Easy Doily Bowl Craft a decorative bowl from a doily picked up from a flea market, antique... Camper Birdhouse Encourage birds to stay awhile with an adorable vintage birdhouse. Mini Manor Blog: Cutlery Tray for Jewelry! I LOVE Jewelry, real jewelry, costume jewelry, all of it . . . almost as much as I love shoes!
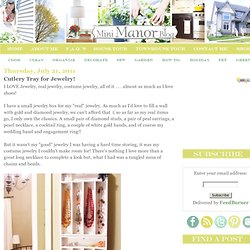
I have a small jewelry box for my "real" jewelry. As much as I'd love to fill a wall with gold and diamond jewelry, we can't afford that :( so as far as my real items go, I only own the classics. A small pair of diamond studs, a pair of peal earrings, a pearl necklace, a cocktail ring, a couple of white gold bands, and of coarse my wedding band and engagement ring!! Thrifty and Chic: furniture. So, this is one of those stories of getting something and having it sit in your basement for years.

Like 7 or so years. Yep. I wish that was uncommon around my house, but it really isn't. But, the bright side of this, is that I actually do get around to making things out of my little findings :) ..even though its more than half a decade later lol. High Functioning Coat Hooks. Back in Los Angeles, any old coat rack or a few hooks by the door would do.
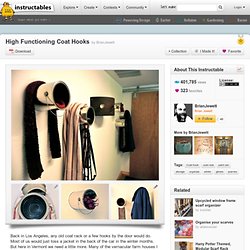
Most of us would just toss a jacket in the back of the car in the winter months. But here in Vermont we need a little more. Many of the vernacular farm houses I visit have at least a half dozen hooks per person lined up in their mud rooms. My wife and I each will have several different coats, jackets and vests in play all winter long. Add to that assorted scarves, hats and gloves, several of each for both of us, and your average coat rack doesn’t stand a chance. Materials, for each hanger you'll need: One cleaned or refinished paint can. 2 screws long enough to reach into wall studs.
Tools: Long handled screwdriver or screw gun with sufficient extensions to reach bottom of can. Step one: With the handle in a horizontal position, layout and make 2 small mounting holes at the top and bottom of the can within an inch or less of the edge. Step two: locate and mark stud position on wall for upper screw position. There Will Be Tables and Chairs… We’ve been desperately needing bedside tables since we moved into our new place.

I’ve been looking around for some to buy, keeping in mind that (a)the bedroom is super tiny and (B) we have a malm bed and dresser and wanted something that didn’t look too “Ikea”. So we came up with these. We took a quick trip to the Ikea in Richmond and Home Depot on Friday night and built them on Saturday. How to Paint Furniture Like a Real Pro. DIY: Laundry Room Drying Rack.
For a long time, I have really wanted one of those drying racks from Ballard Designs.
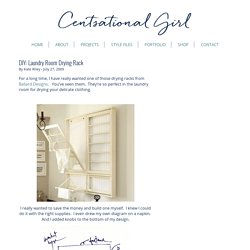
You’ve seen them. They’re so perfect in the laundry room for drying your delicate clothing. I really wanted to save the money and build one myself. A handmade mother’s day gift. I decided this year, for mother’s day, to do something a little different. My sister in law had a little something like this hanging in her bathroom, and I remember eyeing it about a year ago, thinking I totally wanted to make one: the perfect little garden shelf/jewelry holder/bathroom shelf for the space in need of a little umph. So, what better opportunity than mother’s day? A collection of salvaged upcycled into something useful. DIY Cherry Blossoms. Diy rope bowls. So it's been a while since i've posted anything remotely crafty lately...i suppose i must be getting lazy (technically lazy-er). anyway, i saw this cute bowl on craftgawker over the weekend so i decided to make my own-with my own tutorial 'cause i need the practice anyway right?
Anyway, it's a pretty simple process, it's actually really similar to my recycle magazine bowl but with rope instead. basically just glue, wrap, glue, wrap, etc, etc.