
TUTORIAL: Coffee Stirrer DIY Wall Art - makeanddogirl.com - StumbleUpon. Last week, I posted a preview of the simple, inexpensive wall art my mom and I created.
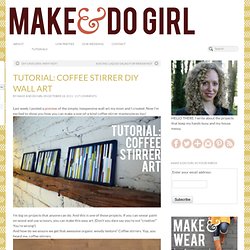
Now I’m excited to show you how you can make a one-of-a-kind coffee stirrer masterpieces too! I’m big on projects that anyone can do. And this is one of those projects. If you can smear paint on wood and use scissors, you can make this easy art. (Don’t you dare say you’re not “creative!” Here’s all you need to get started: 1.
Additional Supplies: 5. Okay, first things first. So, once you’ve got your palette, it’s time to paint your frames and your coffee stirrers! My mom and I did our painting as the sun was setting, which is always a questionable decision. I was going for the reclaimed driftwood sort of look. Once your coffee stirrers are painted, it’s time to trim them to fit into the frame(s) you’ve chosen. I found the quickest way to do this is to measure one stick to be the length you need it and then use it as the guide for trimming all the others. What’s left? Wedding Trends for Stylish + Creative Brides - StumbleUpon.
If you loved the beautiful DIY wedding this morning and Nata’s gorgeous paper flower bouquets, you are in luck as Nata is sharing how she crafted them with us!
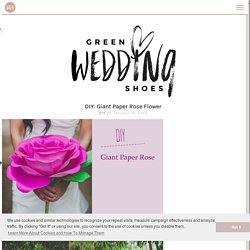
She was inspired by a template created by Morgan Levine on Martha Stewart (as was I in the flowers I created for this styled shoot). I just love that this basic idea has inspired different brides to create their own version of giant paper flowers – you might remember these equally awesome giant paper flowers from this wedding I shared last year. :) Thanks so much Nata for sharing how you created your giant pink paper rose + special thanks to Studio Castillero for the photos of the DIY + her wedding! Materials (to make one giant rose) Step 1: Cut the petals Cut 5-6 teardrop petals and 15-6 heart-shaped petals from the petal colored crepe paper.
IMPORTANT: Crepe paper is directional so it matters which way you’re cutting the paper. Repeat until all of your petals are cut Step 2: Cut the leaves + calyx Step 3: Make the rose stem. Mad in crafts: DIY Fire & Ice Lanterns - StumbleUpon. The old becomes new: A new variation on the outdoor lantern.
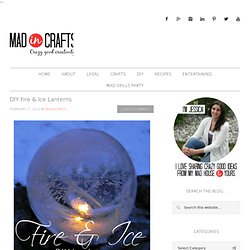
We have had an unusually warm winter in Michigan this year, and while the temps have been nice, I have had to hold off on this project idea until we got a cold snap. We finally got some snow and cold earlier this week, so I was able to try out this fun winter project. I had pinned a product called Globe Ice Lantern Kits a few months back recognizing that I could DIY them at home. Astonishing Paper Illustration by Yulia Brodskaya.
Yulia Brodskaya : About me. Yulia Brodskaya, born in 1983, is a highly regarded paper artist and illustrator.
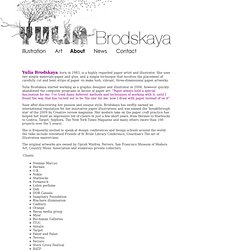
She uses two simple materials-paper and glue, and a simple technique that involves the placement of carefully cut and bent strips of paper -to make lush, vibrant, three-dimensional paper artworks. Yulia Brodskaya started working as a graphic designer and illustrator in 2006, however quickly abandoned the computer programs in favour of paper art: "Paper always held a special fascination for me. I've tried many deferent methods and techniques of working with it, until I found the way that has turned out to be 'the one' for me: now I draw with paper instead of on it". Soon after discovering her passion and unique style, Brodskaya has swiftly earned an international reputation for her innovative paper illustrations and was named the 'breakthrough star' of the 2009 by Creative review magazine.
How To Make A Stylish Photo Frame For Several Photos. Glass Etching. Have you ever done any glass etching?
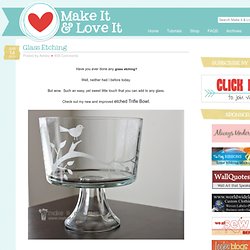
Well, neither had I before today. But wow. Such an easy, yet sweet little touch that you can add to any glass. Check out my new and improved etched Trifle Bowl. The perfect bowl for desserts of all kinds…..and even a great place for fresh fruit on the counter. Glass etching is also a great way to stamp your name on your pyrex dishes, to make sure they come back to you. And how about adding a little extra detail, just because…… (Edited to Add: The font used here is called Smiley Monster and I downloaded the font for free here.)
Sweet in every way. Are you wanting to make your own? (This technique permanently etches your glass. First, you’ll need a piece of vinyl with an adhesive back, like the vinyl you buy for vinyl wall decor. Then peel away the shapes, leaving the negative space all in one piece. The Silhouette code for the bird/branch is: bird_on_branch_C00044_23067 01/18/2010 Then peel the vinyl backing away. See how there are air bubbles? Good luck! Top 100 Tutorials of 2010. Fabric Bow.
Look to inspire. Paper Crafts.