
How Children Read Differently From Books vs. Screens. Dr.
Radesky, who was involved in the research projects with Dr. Munzer, talked about the importance of helping children master reading that goes beyond specific remembered details — words or characters or events — so a child is “able to integrate knowledge gained from the story with life experience.” And again, she said, that isn’t what is stressed in digital design. “Stuff that makes you think, makes you slow down and process things deeply, doesn’t sell, doesn’t get the most clicks,” she said. Parents can help with this when their children are young, Dr.
“When kids enter digital spaces, they have access to an infinite number of platforms and websites in addition to those e-books you’re supposed to be reading,” Dr. “All through the fall I was constantly helping families manage getting their child off YouTube,” Dr. Phil - a free crossword maker.
Grade V - Book Award Challenge (2020-2021) Colophon - Book Anatomy Words: Quire, Colophon, and More. When you want to rock out to your favorite tune, you reach for the volume knob or button, but when you want to find out how sound travels through the air to your ears, you might reach for a volume of an encyclopedia (at least, in pre-internet days).

So, what's the connection between those senses of the word volume? Volume comes from the Latin noun volumen (meaning "roll"), which, in turn, derives from the Latin verb volvere ("to roll"). The Roman volumen was essentially a book rolled up on a short staff. The reader held the roll in one hand and, once he or she had read a column, rolled it onto another cylinder with the other hand.
The French borrowed the word from Latin, changing it to volume, and in the 14th century, the English acquired the word from the French. Audio Books for Grades K-12.
Battle of the Books - March Madness. Blogs for Librarians. Book Awards. Book Displays & Bulletin Boards. Book Review Sites. Book Talks. Book Trailers. Cataloging. Citations. Civil War Battles. Collection Development. Creative Commons Photos. Curation Tools A-S. Dashboards and Playlists. Databases. Digital Citizenship / Fluency. Digital StoryTelling. Digital Tools. Diversity - Collection.
Drawing/Explaining/Sketching Tools. eBook Websites - Free.
Infographics and Posters. Kindergarten. LibGuides and More. Libraries - Articles. NYLIB. Overdrive. Photoshop. PLN. Presentation Tools. Programming Ideas. Read Alouds. READ Posters. Reader's Advisory. Reading Without Walls. Reluctant Readers. Research Skills. Review Journals. Screencasting. Shelving. Signs - Library. Teacher-Librarian Evaluation Rubrics. TimeLine Tools. Visual Content. Websites to Consult. Dining Room. Kitchen. Laundry Room. Living Room. Master Bedroom. Rugs. Cards. Men's Rowing. Transportation. Walker College. How to Choose the Right Dining Table for Your Home. ■ Veneer/Wood-Look: Wood veneer is often a more affordable alternative to solid wood.
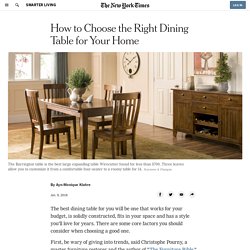
Here a very thin layer of solid wood (or material printed to look like wood) is glued to a plywood or other wood core. To identify good veneer, look for tables with clearly-labeled core interiors, like kiln-dried hardwood. One way to spot cheaper veneers is to look underneath the table at the store. “If just the outside is finished, but the underneath looks like a different material, the manufacturer is cutting costs,” Mr. Dyer suggested. “Make sure particleboard says it’s CARB compliant, which means it’s passed emissions tests,” said Thomas Russell, senior editor at industry newsletter Furniture Today. . ■ Stone and Stone-Look: Stone tabletops can include marble, quartz composite or cast stone (like cement) . ■ Glass: Glass tabletops can include clear, frosted or tinted versions. Safari Giraffe Duck Egg Sale Pillow. Rye City School District - Rye High School Class of 2020 on Vimeo.