
Construction Drawing. Ultimate Figure Drawing Course Known to Man by Riven Phoenix. Big Guide to Drawing the Body by `Cedarseed on deviantART. How to Draw Ears. For a video version of this tutorial visit www.proko.com/how-to-draw-ears-anatomy-and-structure In this tutorial I will go over the parts of the ear and suggest an easy way to remember all these complex shapes.

At the end, I will show a step by step of an ear drawing. Basic Forms The simplified volume of the ear is very much like a megaphone. This is easier to see from the back, where the concha is like the tubular part and the helix is the lip part of the megaphone. Just Remember “why?” At first glance the shapes in the ear seem random and confusing. Placement of the Ears The ears lie in the middle third of the face. In Perspective During an up-tilt or down-tilt the placement of the ears is very important since doing it incorrectly can break the illusion of a tilt. Anatomical Information Shading the Complex Forms of the Ear Concha The concha is the bowl-shaped part that attaches the back of the ear to the head. Helix The Helix is a semi-cylindrical form and should be shaded as such.
Antihelix. How to Draw the Nose. Update 09-26-2012 – Above is a video version of this tutorial.

For more video tutorials visit Proko.com and subscribe to the newsletter In this tutorial I will go over the structure of the nose and give detailed information about the bridge, ball, and nostrils of the nose. How to Draw the Head From Any Angle. The Basic Forms To draw the head from any angle you must first understand its basic structure.

Look past all the distracting details and visualize the underlying forms. Pencil Portrait Lessons. In the last lesson on eyes we talked about the various problems that artists run into when trying to draw eyes as realistic as possible.

In this lesson, we will begin the drawing process. There are two things that you need to do in order to in order to get started. Realistic Eyes. Have trouble drawing eyes?
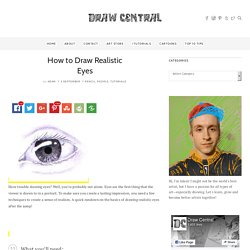
Well, you’re probably not alone. Eyes are the first thing that the viewer is drawn to in a portrait. To make sure you create a lasting impression, you need a few techniques to create a sense of realism. A quick rundown on the basics of drawing realistic eyes after the jump! What you’ll need:HB (#2) Pencil, 4B pencilEraserDrawing paperDrawing surface The first step in drawing eyes is to draw the full eyeball itself.
After you have your “not-a-perfect-circle” eyeball drawn, draw an oval shape horizontally across the eyeball in the shape of an eyelid opening. Once you have the opening for the eye nailed down, you can erase the lines outside. Now we’re ready for highlights! Almost done now! We’re entering the home stretch! Drawing the Human Eye » OnlyPencil Drawing Tutorials. We can all probably draw the human eye, we draw the oval shape with the iris and pupil.

I consider that to be a basic sketch of the eye. Before you draw a realistic eye you must first study what it really is. I will post a closeup picture of an eye so you can see what it looks up close. We all have them, but I’m sure that most of us haven’t really paid attention to what it really looks like up close. If you really want to draw a realistic eye, i suggest you study it well. Take a look at the pupil(the black area in the center), this area contracts in size when light hits it. Tools Used: 2h wood cased pencil2b 0.5 Mechanical PencilKneaded EraserColor BlenderSmooth Bristol Paper This is the final drawing of what we’ll be working on.
Step 1 Well we will start by drawing the outline, this can be a fast sketch, but enough detail to show the shape. Step 2 Start by filling in the pupil using the 6b progresso pencil. Step 3 Step 4 Step 5 Step 6 Similar Tutorial…You can also try Step 7 Step 8 Step 9 Step 10.