
Domotique. ESP8266-LUA/Thermometer-DHT11-Thingspeak at master · ok1cdj/ESP8266-LUA. Domotique. Arduino : dht11 + attiny85 + rf433 » Erwan's Blog. In a previous article, I have use an attiny85 + ds18b20 + rf433 to built a cheap temperature probe.
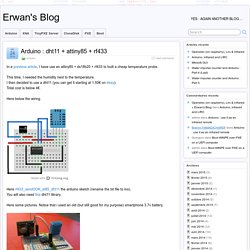
This time, I needed the humidity next to the temperature. I then decided to use a dht11 (you can get it starting at 1.50€ on ebay). Total cost is below 4€. Here below the wiring. Vera et RFXtrx, un couple parfait. Reverse Engineer Wireless Temperature / Humidity / Rain Sensors — Part 1. In this and the next two three blog posts (Part 2, Part 3, and Part 4), I will describe how I reverse engineered a few off-the-shelf wireless temperature, humidity, and rain sensors, and used an Arduino (Update: RPi is also supported now!)

To listen to and decode the sensor data. This has been a really fun journey and I will document the process as thoroughly as I can. Because there are lots of details, I don’t want to jam everything into a single post, so I have split the whole story into three posts. The Arduino and RPi programs are provided at the end of each post. Introduction The first question to ask is always: why am I doing this?
Here are the three sensors that I gathered and will use as examples in the following. Disclaimer: I am not associated with Acu-Rite in any ways, I just picked these sensors because they are common in retail stores. Preparation The tools involved are quite simple: I used an Arduino and a 433MHz receiver. Wireless Temperature Sensor Raw Waveform. Building a Wireless Sensor Network in Your Home. This tutorial will teach you how to create a network of cost effective, wireless sensor modules.
Many of the ready-made wireless modules can be too expensive for use in multiple sensor units. While Wi-Fi and Zigbee modules are popular and easy to use, their cost can make their use in an array of sensors impractical. There are, however, low cost RF modules without all of the expensive features that will work just fine these purposes. The Arduino platform can use low end radio modules to communicate easily and reliably. Once the hardware is assembled, you will leverage the Raspberry Pi platform to post the data to Xively's Internet of Things service where you can track the values over time and trigger on threshold conditions. This project will include three parts, two transmitter units and one receiver unit. There is a wide range of Arduino compatible boards that can be used for this project.
The transmitters themselves are relatively simple circuits. A note about RF use. [Tuto diy] Fabriquer sonde radio Oregon a 5€ pour les nuls - Forum Domoticz en français. /*Copyright (c) 2007, Jim Studt (original old version - many contributors since) The latest version of this library may be found at: OneWire has been maintained by Paul Stoffregen (paul@pjrc.com) sinceJanuary 2010.
![[Tuto diy] Fabriquer sonde radio Oregon a 5€ pour les nuls - Forum Domoticz en français](http://cdn.pearltrees.com/s/pic/th/fabriquer-domoticz-francais-103817423)
At the time, it was in need of many bug fixes, but hadbeen abandoned the original author (Jim Studt). None of the knowncontributors were interested in maintaining OneWire. Paul typicallyworks on OneWire every 6 to 12 months. Version 2.2: Teensy 3.0 compatibility, Paul Stoffregen, paul@pjrc.com Arduino Due compatibility, Fix DS18B20 example negative temperature Fix DS18B20 example's low res modes, Ken Butcher Improve reset timing, Mark Tillotson Add const qualifiers, Bertrik Sikken Add initial value input to crc16, Bertrik Sikken Add target_search() function, Scott Roberts Modified to work with larger numbers of devices - avoids loop.Tested in Arduino 11 alpha with 12 sensors.26 Sept 2008 -- Robin. DHT11-Humidity-TempSensor.
Digital output temperature and humidity sensor DHT11 - DHT22 NOTE: Available as both a plain component, or as an Electronic Brick.
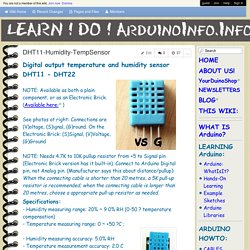
(Available here: )See photos at right: Connections are (V)oltage, (S)ignal, (G)round. On the Electronic Brick: (S)Signal, (V)Voltage,(G)Ground NOTE: Needs 4.7K to 10K pullup resistor from +5 to Signal pin (Electronic Brick version has it built-in). Connect to Arduino Digital pin, not Analog pin. (Manufacturer says this about distance/pullup): When the connecting cable is shorter than 20 metres, a 5K pull-up resistor is recommended; when the connecting cable is longer than 20 metres, choose a appropriate pull-up resistor as needed. Nouveau: RFXtrx433E - Interface USB 433,92Mhz (émetteur / récepteur) - RFXCOM - 14103. Nouvelle version du RFXtrx433 (12103), le RFXtrx433E (14103) ajoute la compatibilité avec les volets roulants Somfy RTS.

Cette interface vous permettra d'ajouter des capacités de d'émission / réception radio RF 433Mhz à votre installation domotique. Elle se connecte sur un port USB de votre ordinateur ou de certaines box domotiques compatibles, et à partir d'un logiciel compatible vous pourrez communiquer avec de nombreux modules émetteurs / récepteurs RF433Mhz (modules domotiques, sondes météo, thermostats sans-fil, etc.). Principaux protocole compatibles : Chacon DI-OOregon Scientific (sondes météo)X10 radio / XdomEtc. Domotique via un nas Synology.