
Rindfleischfischteich mit Bier. As promised, here's a stencil drawing of the Mexican-style IQ Lamp: .ps, .svg, .pdf. (1:1, DIN A4/ISO 216 paper size) 30 of these are needed to assemble one mexican style lamp, as depicted below.
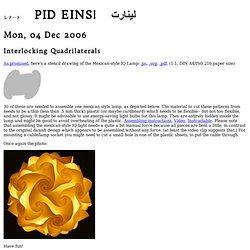
The material to cut these patterns from needs to be a thin (less than .5 mm thick) plastic (or maybe cardboard) which needs to be flexible - but not too flexible, and not glossy. It might be advisable to use energy-saving light bulbs for this lamp. They are entirely hidden inside the lamp and might be good to avoid overheating of the plastic. Assembling instructions, Video, Instructable. Once again the photo: Project 18 Week 21 – Folded Book Business Card Holder. The weather over the last few days has been just gorgeous, so I’ve been spending a lot of time in the park with my puppy Basel and his best friend Buster.
Paper Filigree Snowflake Gallery. I've switched over to using acid free paper and glue to make my paper filigree snowflake ornaments now. I figure there's no sense in putting this much work into something that might fall apart in a few years, and with practice, they're starting to get pretty enough that I'm planning to make quite a few of them. In my search for paper that will hold up over time, I was looking for archival quality paper, but there wasn't much available that wasn't too thick, or too yellow. I visited all sorts of art, craft, scrapbook, and office supply stores in my paper quest, but the pickings were pretty slim for archival paper in shades of silver and white, so I went with mostly acid free paper and will see how it holds up.
The pictures don't show it very clearly, but the snowflake above on the right has both white and off white, and it adds an interesting antique look, or at least I thought so until my kids mentioned the old joke about not eating the yellow snow.
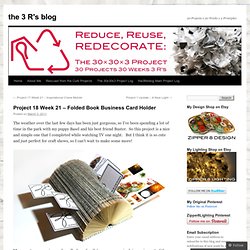
20 Cool Home Library Design Ideas. Do stuff! & Ten minute no-sew recycled t-shirt bag! Tutorial time!

I got a gig teaching a recycled t-shirt project at the library a few months ago, with a request for a recycled tee bag – the only bags I’d made from tees in the past had required sturdy sewing, and I didn’t want hand-sewing to be the only thing holding the bottom closed in a class version of the bags, so I started brainstorming about some kind of hand-sewing-friendly or no-sew bag idea…. and here’s what I came up with! The simplest version of these bags is great for smaller tees, or the more light-weight kind of girl-tees – just turn the bottom of the shirt into a drawstring and tie it closed! As you can see, even with a not huge tee, this will still leave a significant hole in the bottom of your bag, but for purposes like grocery shopping, this size hole shouldn’t really matter… But to make smaller holes, just make more than one of them! Crafting MacGyver: Circular Logic.
Simple Pop-Ups You Can Make! Japanese Paper. We are thrilled to be sharing this Guest Post from Karen Kelsky of Paper Demon Jewelry with you!
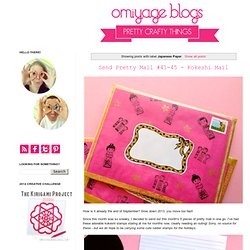
Karen creates stunning modern accessories from traditional Japanese materials. Visit our post on Paper Demon Jewelry or head right to Karen's etsy shop to check out all the lovely, Japanese-inspired pieces she creates. Today, Karen has generously offered to teach us how to make a simple but striking chiyogami gem pendant in matching tin. A great gift project to try your hand at as the holiday season approaches! Chiyogami Gem Pendant in Matching Gift Tin Tutorial Supplies:Chiyogami paper from Omiyage.ca7/8" glass gems7/8" square craft punch (optional - can also hand-cut paper)Aanraku bails in gold or silversmall glass / acrylic topped jewelry tinDiamond GlazeMod PodgeE6000 GlueScissorsToothpick Step One: Punch or cut out chiyogami paper in a 7/8" square, centering the pattern that you want on your pendant.
Step Two: Check the size of the square and trim off any overhanging edges. Look to inspire. Tissue Paper Flower Tutorial. Paper Flowers ? Anyone Can Do That. Japanese Kusudama, this tutorial is featured on Craftuts Anyone can do that, I assure you.

The proof: I can, just take a quick look at my result below. And, believe me, I am neither meticulous nor particularly patient. Billie Monster / Blog / A nifty framed jewelry display. I needed a place to store and showcase the jewelry I've created before I put it up for sale on my Etsy shop, so I thought it would be a pretty nifty idea to repurpose an old picture frame I had lying around.
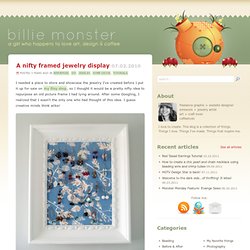
After some Googling, I realized that I wasn't the only one who had thought of this idea. I guess creative minds think alike! What you need: picture frame stretched canvas/canvas mounted on a wooden frame (you can make or buy one) sturdy fabric (mine was from Ikea) quilt batting staple gun and staples paint brush paint sandpaper u-pins, or other type of pin plastic sheet to protect your work surface First thing you want to do is remove the glass from your picture frame - you won't need it.
Now measure the length and width of the stretched canvas that you will be using as the insert for your picture frame. Now you are ready to secure the fabric to the canvas frame. At this point you are ready to put your fabric-covered canvas into the frame. Boom, done.