
How to Create a Cute Robot Game Sprite using SSR in Adobe Illustrator. In this tutorial you will learn how to use a combination of the SSR (Scale, Shear, Rotate) method and Adobe Illustrator guides to make an isometric robot.
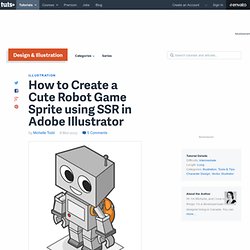
Isometric images are perfect for diagrams and game sprites. So let's see how to make this cute isometric robot... Step 1 Open up a New Illustrator document. The size and resolution of the document aren't too important, so choose something you're comfortable with.
How to Create a Grunge Paper Texture Graphic Style in Illustrator. I love adding texture to my illustrations, but creating a texture from nothing is always hard, so learning how to manipulate the different tools and default resources in Adobe Illustrator you already have, can work in your favor.
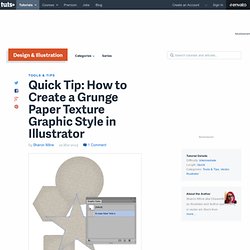
Today I'm going to show you how to create a grunge paper texture Graphic Style, starting with a humble default Art Brush, then using the Pattern Options of CS6 and then some fun with the Appearance panel. So let's jump in! Step 1 Let's start by taking advantage of one of the Art Brushes you get by default in Adobe Illustrator. In the Brushes panel go into the drill down menu and select Open Brush Library > Artistic > ChalkCharcoalPencil. Step 2 While the line is selected, go to Object > Pattern > Make. So select the group and Object > Ungroup until you're left with the below. Step 3 Let's give the pattern a name, here I'm using the inspiring name "Texture Pattern" and then set the Tile Type to Hex by Row.
How to Create a Blueprint Illustration. Have you always wanted to be an architect, but really just because you want to show people cool blueprints?
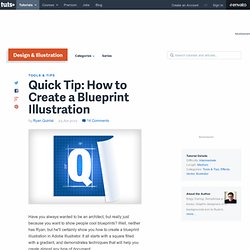
Well‚ neither has Ryan, but he'll certainly show you how to create a blueprint illustration in Adobe Illustrator. It all starts with a square filled with a gradient, and demonstrates techniques that will help you create almost any type of document. Note: If you're following along with the video, the details we use for our document are as follows. Document: Letter - Horizontal - RGBGrid: 20x20, 20% OpacitySquare Gradient: (R to L) 0,78,144 56,126,235 0,167,255 Curl Gradient: white 217,227,240 white.
Blog - Web Design Experts. How to Get Pixel-Perfect Designs in Adobe Illustrator. Pixels are not what most designers are thinking about when they launch Adobe Illustrator, but there are some pretty awesome things Illustrator can do with them. By default Illustrator is set up to be a resolution independent vector drawing and print layout tool -- in short, not for pixels -- but in this tutorial we will go over a few techniques which can add pixel-perfect design to it's list of uses. As regular MediaLoot visitors will know I have previously posted a few articles discussing the advantages of using Fireworks instead of Photoshop for certain design tasks, this tutorial will hopefully do something similar for Illustrator by demonstrating it’s widely unknown ability to work well with pixels.
Background. Logo Vector Download For Free - Logo EPS, AI, CDR. Free Vector Logo logos archive, download Free Vector Logo vector. Logo EPS Recommend: Social Media Icon Vector RSS Feed Logo EPS » All Free Vector Logo All Free Vector Logo - LogoEPS.com.

Create a 3D Bullet in Adobe Illustrator CS6. How to Create Game Elements with Graphic Styles – Tuts+ Premium. In today's tutorial I'm going to show you how to prepare and create a variety of Graphic Styles in Adobe Illustrator CS6 to then use within a game.
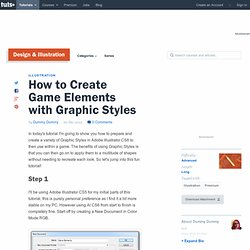
The benefits of using Graphic Styles is that you can then go on to apply them to a multitude of shapes without needing to recreate each look. So let's jump into this fun tutorial! Step 1 I'll be using Adobe Illustrator CS5 for my initial parts of this tutorial, this is purely personal preference as I find it a bit more stable on my PC. However using AI CS6 from start to finish is completely fine. Step 2 I'm going to try something new for me and that is a different way of preparing a color palette. Mix it up and try picking a color from the default Swatches panel but then going into the Color Guide panel and selecting a color from there.
Step 3 Before I go any further with preparing my palettes, I need to know what sets of colors I will need for the variety of elements I'm going to be creating. How to Create a Hollow Die in Adobe Illustrator. In this tutorial we will be learning how to create a stylized hollow 3D die.
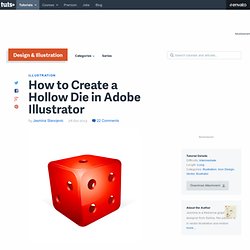
Instead of having usual dots on its surface we will create holes. Well not actual holes, but we will certainly make them look like holes. In the whole creating process there is something we shouldn't forget - perspective. Perspective is one of the most important things we have to be aware of when we are creating a 3D object. If we leave out the perspective we will end up with distorted object. Step 1 We will start by creating symbols for each individual side of the die. How to Create Fireworks Rockets in Adobe Illustrator. Today we will be creating a neat icon of Fireworks Rockets. 3D Effect is a convenient tool for creating this kind of illustration, but we have to be aware of the fact that 3D effects can mess up our illustration.
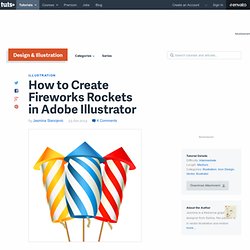
It can create many unnecessary anchor points and distort the shape of the illustration. In order to avoid that we will use 3D effect only to create a reference objects. The Pen Tool will help us to trace the object with just few anchor points that will allow to us manipulate the shapes easily. So, let's move from words to deeds. Step 1 For the start we will create stripes pattern for the rockets. Step 2 Hold the Alt / Option key on the keyboard and click on the red rectangle. Our Top 20 Vector Tutorials and Articles of 2012! How to Create a Self Portrait in a Geometric Style.
In this tutorial we’re going to talk about how to create an illustrated self-portrait in a geometric style.
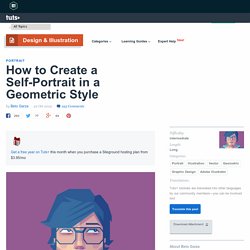
We’ll be using a photograph of ourselves as the base of the illustration, drawing a sketch from that, and then creating the final piece. Let’s get started! Since posting this tutorial, readers have been inspired to create their own self portraits in this style. Check out what they’ve achieved over on a special edition of Tuts+ Workshop: Created by You. First, we take or select a photo. Now, create a New Document (cmd+N or ctrl+N) in Adobe Illustrator with an artboard size of 600 x 480px. We are going to organize the layers as follows: The top layer is named “Draw”. Lock the "Background" and "Photo" layers. Now you can delete the "Photo" layer. Change the Opacity of the sketch to 30% and lock the "Sketch" layer. 50 Excellent 3D Adobe Illustrator Tutorials. Advertisement Adobe Illustrator is one of the best applications for making graphic artwork like logos, print designs and Web pages.
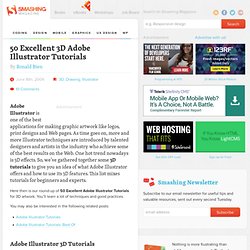
As time goes on, more and more Illustrator techniques are introduced by talented designers and artists in the industry who achieve some of the best results on the Web. One hot trend nowadays is 3D effects.