
Multi-Strand Chain Watch. When it comes to DIY, most of you know that I tend to focus on jewelry and accessories.

Between that & the fact that I've been making jewelry for many years, it's no surprise that I have a crazy stash of random chains. I thought this project would be a good way to use up the leftover chain that isn't long enough to be a necklace, or even a bracelet. Might as well put every little bit to good use! It's really simple and easy to make, even for beginner DIY'ers and jewelry makers. Check out how I made it below. Supplies: - Watch with a strap that can be cut off (Try stores such as Target or Claire's for simple, affordable watches) - Large jump rings (at least 4) - Jump rings and jewelry clasp - Jewelry pliers - Scissors & ruler (not shown) - Assorted strands of chain...colors & types are up to you!
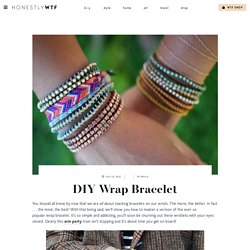
Each should be at least the length of your wrist. 1) Measure the entire metal component of the watch. 2) Measure your wrist if you haven't already. 5) Carefully close the jump ring. xo! Wrap Bracelet. You should all know by now that we are all about stacking bracelets on our wrists.

The more, the better. In fact . . . the most, the best! With that being said, we’ll show you how to master a version of the ever so popular wrap bracelet. It’s so simple and addicting, you’ll soon be churning out these wristlets with your eyes closed. Clearly this arm party train isn’t stopping and it’s about time you get on board! You’ll need (for a double wrapped bracelet) :* Lengths will vary depending on the size of your wrist (see comments for suggestions).
Fold the length of leather cording in half to form a loop. Place the ball chain along the leather cording with the end of the chain meeting the end of the wrap. Continue wrapping while checking it for fit around the wrist. When you have reached the end of the ball chain wrap the linen cording around the leather strands 2-3 more times. Thread the hex nut through the strands and tie a second knot. Trim with scissors and your wrap bracelet is finished!! T-Shirt Bracelet. How To: Give your old t-shirts a second life.

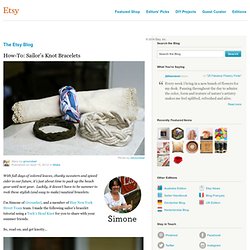
Sorry dust rag pile! Photos: kirsten for we heart this I love using simple materials to make something fun and innovative. The supplies for this bracelet DIY are really basic, so there’s a REALLY good chance you own all of them already. I mean, who doesn’t have a stack of soft old T’s you can’t wear outside of the house, but love to much to toss in the rag pile? As with most of my DIY’s for wht, this is very customizable. Supplies: • T-shirt scraps • 2 keychain rings • Scissors • Needles and thread • Glue gun • Ruler 1. Sailor's Knot Bracelets. With fall days of colored leaves, chunky sweaters and spiced cider in our future, it’s just about time to pack up the beach gear until next year.

Luckily, it doesn’t have to be summer to rock these stylish (and easy to make) nautical bracelets. I’m Simone of Groundsel, and a member of Etsy New York Street Team team. I made the following sailor’s bracelet tutorial using a Turk’s Head Knot for you to share with your summer friends. So, read on, and get knotty… Supplies you’ll need: 3.5 yards of twine14 ounce can for a smaller bracelet or a 20 ounce can for a larger bracelet. Directions: Step 1: Wrap one end of the twine around the can to shape an X. Step 2: Wrap the long end of the twine around the can again and bring it up to the middle of the X. Step 3: Next, move the upper left leg of the X over the right leg of the X to create an oval shape. Hex-nut Bracelet.
Top two images from Honestly… WTF (total cost about $5)/ Bottom image from Oak– retail $372.00 Love this clever project from Erica and Lauren of Honestly… WTF… so much so I might even attempt it– I love these bracelets!

The best part is, there are tons of options in terms of hex nuts (they have bronze, steel, etc.) and twine color, size, etc. and the project is super straight-forward. Have fun! Via MCSpice.