
DIY Criss-cross headband. My addiction to insanely simple DIYs continues.

I threw this together today and thought I'd share:) 1. Take a long strip of fabric (preferably some type of stretchy fabric) 2. Position the middle of the fabric strip at the base of your neck 3. Cross once! Clothing ideas. Tripping over joy: DIY elastic empire waisted dress. T-Shirt Remodel: A Tutorial. There have been SO many t-shirt remodels on Pinterest, that I thought I’d give one a try my own way.

I found the most gorgeousss colored shirt at A.C. Moore today (for less than $4!) And I knew that this would be The Shirt. I got an extra large so I could make a dress (I’m short, so it works for me, if you’re tall, you would make a long shirt, or add a layer to the edge of the shirt to make a dress). If you have some knowledge of sewing, this is pretty easy, I finished it in less than 2 hours! Here is my remodel! So, I started by putting my shirt on inside out, and marked with some chalk where my shoulders actually start (they sure don’t start halfway down my arm!
Then, I marked from the top to the arm pit, and cut! I marked, pinned, and sewed (but forgot to get a picture of that!) After I sewed the sleeve smaller, I pinned it back to the original hole. Easy-to-Sew Bags for Every Occasion. How To Twist Scarf Into Head Band PLUS Head Band DIY (Level:Easy) DIY Detachable Collar (Accessory) Level: Easy. Rosette Neck Wrap. STEP 1 Place the scarf around your the back of your neck with the ends hanging in front.

STEP 2 With the ends together and positioned to one side of the neck, start twisting. STEP 3 When the twist becomes taut, wrap it in a circular motion at your neck using your fingers to guide the scarf into a bun. STEP 4 When you come to the ends, tuck them into the bigger loop at your neck so they stick out to resemble petals. Scarf Knot Master List. DIY ideas Fashion. My InstaLife Recap : Week 4/8-4/20 in Photos We’re driving home to LA on Sunday to meet my husband’s new baby brother {my new brother in law} who was born yesterday at… Feather Wall Art DIY African Juju Hat Tutorial A few weeks ago, after what seemed like a never-ending decor battle with my console table design layout {I know, so dramatic}, I decided… DIY Idea: Prada Spring 2013 RTW Bracelets… Yet another DIY idea I’ve had lingering on my desktop since September; these gorgeous bracelets from the Prada Spring 2013 Ready-to-Wear collection.

Pleated tote (beach bag) tutorial. Before we went away, I decided that a new bag for the beach was a must – something big and roomy to hold books, magazines, sunscreen, hats, and all that other good stuff.

So I made this big pleated tote, and it worked perfectly. This is a picture of it in action: And here’s a little tutorial in case you want to make one for yourself – doesn’t have to be for the beach either, it could come in handy for schlepping all kinds of things around town. Here’s what you need: two pieces of your main fabric cut in shape A four pieces of the top shape (B) in a contrasting fabric two pieces of a lining fabric in shape C one piece of the long rectangle for the strap in the contrasting fabric two pieces of the top shapes (B) and one of the strap in a medium weight interfacing 1) Along the longest (22″) edge of the main fabric pieces, mark along the top at the following intervals: 3″ – 4″ – 6″ – 7″ – 9″ – 10″ – 12″ – 13″ – 15″ – 16″ – 18″ – 19″ 13) And voila, this is what it should look like.
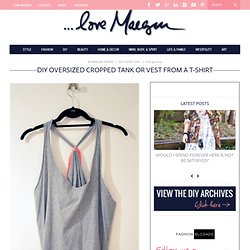
Oversized Cropped Tank or Vest DIY Fashion. What you’ll need. . . * NOTE: as you wear it the edges will curl a little …which actually makes it look better for a cropped look, pull it back more or cut the center shorter * NOTE #2: instead of ribbon you can cut strips out of the left over t-shirt, shoe laces, lace, anything!
Downton Abbey style hat in 20 minutes! I was invited to a Downton Abbey party last night and of course, I waited until the last minute to fancy up my hat!

I wanted to add a flower but didn't have one. I've seen tutorials on handmade layered flowers before and luckily, I had all the supplies needed at hand. DIY: Bow Cut-Out Leggings. DIY Multi-Strand Scarf. I am a huge fan on no-sew projects from recycled clothing.
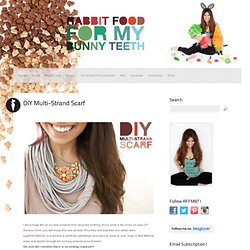
If you were a fan of my no-sew DIY Workout Shirt, you will enjoy this one as well. Plus they will look très chic when worn together! Behold, a scarf that is perfectly lightweight and easy-to-wear to your Yoga or Bar Method class and stylish enough for running errands around town! Oh, and did I mention there is no sewing required?! How to sew cases, bags, and buckets.