
Colored Pencil Demo: Red Pepper—Part 1 - Roz Wound Up. A couple of weeks ago I gave a talk on colored pencils to the University of Minnesota Women’s Club.
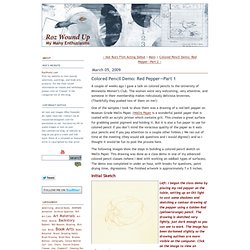
The women were very welcoming, very attentive, and someone in their membership makes ridiculously delicious brownies. (Thankfully they pushed two of them on me!) One of the samples I took to show them was a drawing of a red bell pepper on Museum Grade Wallis Paper. (Wallis Paper is a wonderful pastel paper that is coated with an acrylic primer which contains grit. This creates a great surface for grabbing pastel pigment and holding it. The following images show the steps in building a colored pencil sketch on Wallis Paper. Initial Sketch Left: I began the class demo by placing my red pepper on the table, setting up an Ott light to cast some shadows and sketching a contour drawing of the pepper using a Golden Rod (yellow/orange) pencil. All pencils used in this demonstration were Prismacolor brand. As you draw, take care not to get pigment drifting across your surface.
:COLOURED PENCIL TUTORIAL: by Angelstorm-82 on deviantART. Dion Dior Art & Illustration: Free Tutorials. Randocroquis - Technique du CC. Avant tout, il vous faut au minimum une dizaine de crayons.
Pour vos premiers essais, choisissez des crayons classiques et bon marché. Evitez tout de même les crayons en plastique dont la mine est inutilisable. Par la suite, si cette technique vous plaît, vous pourrez acquérir des crayons de meilleure qualité mais aussi plus onéreux. Commencez par les tailler.
Si en les taillant, proche de la pointe parfaite, votre mine se casse, votre crayon s'est sans doute sournoisement brisé de l'intérieur dans sa chute. Pour le papier, vous pouvez travailler aussi bien sur du papier totalement lisse que sur support épais et granuleux. Lorsque nous observons le feuillage d'un arbre, nous sommes tentés de dire que celui-ci est vert.
Tout cela pour vous dire quelque soit le motif, vous utiliserez toujours de nombreuses couleurs que vous déposerez par petites touches. En théorie, aucune trace de crayonnage ne doit apparaître. Underpainting. Underpainting by Jane Millar There are several good reasons to use underpainting in your colored pencil work.
You can save time, as an underpainting requires less subsequent layering and burnishing. Underpainting is a good way to quickly color white paper and still maintain enough tooth for subsequent layering. And, it will be easier for you to erase later mistakes over an underpainting. Both Nan Klein and Donna Caputo have demonstrated the use of a dry underpainting. Animal Drawing Slideshows. MIGHTY ART DEMOS and TUTORIALS. Page. Sketch a cat in 30 s. Direction of your stroke. Bet Borgeson Colored Pencil Demo. Step 7/FINISH.
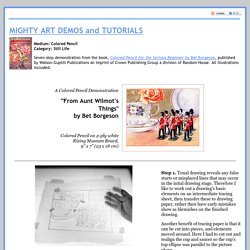
After appraising the preceding stage of this drawing, two main tasks emerged for finishing it. The first was that white granular flecks all over the piece needed refining to increase color intensity. The second was that many of the darks needed additional darkening to increase the illusion of three-dimensional modeling of the various forms. Scanning from top left to right: The darks of the flower and the right side of the cup were darkened using sharp pencils. I also lifted one of the cup's painted flowers and restated it in blue for added interest. On the tabletop, I lifted, added, and adjusted color, and finished the cast shadows of the soldiers. Colored Pencils, learn to draw. Step 1.
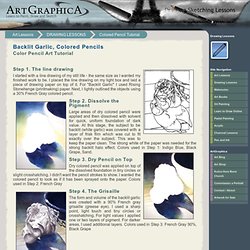
The line drawing I started with a line drawing of my still life - the same size as I wanted my finished work to be. I placed the line drawing on my light box and laid a piece of drawing paper on top of it. For "Backlit Garlic" I used Rising Stonehenge (printmaking) paper. Next, I lightly outlined the objects using a 30% French Gray colored pencil. Step 2. Large areas of dry colored pencil were applied and then dissolved with solvent for quick, uniform foundation of dark value.
Step 3. Dry colored pencil was applied on top of the dissolved foundation in tiny circles or slight crosshatching. Step 4. The form and volume of the backlit garlic was created with a 90% French gray grisaille (greese eye). Backlit Garlic15" x 11" (38 cm x 28 cm) Visit Barbara Benedetti Newton's Website Tutorial is copyright of Barbara Benedetti Newton, CPSA.