
Itsphotoshop.com. Hello guys again!
Itsphotoshop.com. Tutorial made by sallydonovan.
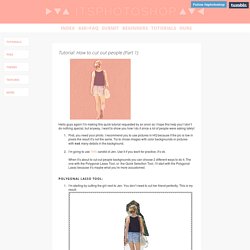
This is a Photoshop tutorial for cutting people out of a background when they have messy hair, so you can keep all of the stray locks/strands and avoid a blocky, unrealistic look without having to manually trace around them yourself. This tutorial works for both single- and multi-colored backgrounds. As always, any comments/criticisms on the tutorial are welcome. And please, if you found this helpful, likes and reblogs are much appreciated! Itsphotoshop.com. I was asked to create a manip tutorial by her so here it is!!
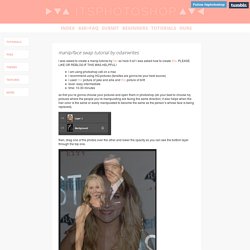
I was asked how to create this. PLEASE LIKE OR REBLOG IF THIS WAS HELPFUL! I am using photoshop cs6 on a maci recommend using HQ pictures (fansites are gonna be your best source)i used this picture of jake and allie and this picture of brittlevel: easy intermediatetime: 10-30 minutes so first you’re gonna choose your pictures and open them in photoshop (do your best to choose hq pictures where the people you’re manipulating are facing the same direction; it also helps when the hair color is the same or easily manipulated to become the same as the person’s whose face is being replaced). then, drag one of the photos over the other and lower the opacity so you can see the bottom layer through the top one. then transform the top layer so that it is the same size and orientation as the bottom layer. i like to line up the eyes, nose, mouth, and chin to the best of my ability. create a layer mask on the first layer.
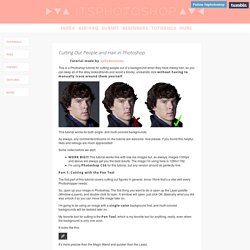
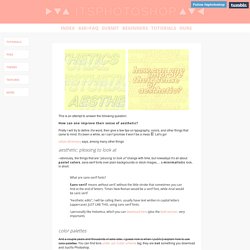
My darlin' My darlin' May i help you? Itsphotoshop.com. Itsphotoshop.com. In this tutorial I will be teaching you how to make a gradient on a shirt like this: Before we begin, the font I used on the photo is Colors of Autumn.
Click on the name for a download.As always, begin by opening your photo. Itsphotoshop.com. Anonymous Q&A. Amazing typography tut. Someone asked me how to make a typography poster like this one, and i will try to make something you can understand.
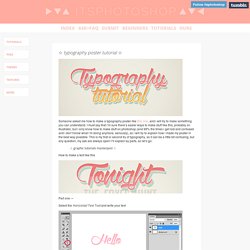
I must say that i’m sure there’s easier ways to make stuff like this, probably on Illustrator, but i only know how to make stuff on photoshop (and 99% the times i get lost and confused and i don’t know what i’m doing anymore, seriously), so i will try to explain how i made my poster in the best way possible. This is my first or second try of typography, so it can be a little bit confusing, but any question, my ask are always open! I’ll explain by parts, so let’s go: ☆ graphic tutorials masterpost ☆ How to make a text like this Part one → Select the Horizontal Text Tool and write your text Click with the right button of the mouse on the text layer, then duplicate the layer two times With the Move Tool separate the layers, like this ^ Click on the little bar with the black/white gradient and this other box will open Click on these little squares and drag them to the center. Done! Itsphotoshop.com. Aesthetic help. This is an attempt to answer the following question: How can one improve their sense of aesthetic?
Firstly I will try to define the word, then give a few tips on typography, colors, and other things that came to mind. Putting constellations over face. Sure & Thank you!
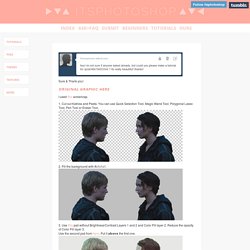
I used this screencap. 1. Cut out Katniss and Peeta. You can use Quick Selection Tool, Magic Wand Tool, Polygonal Lasso Tool, Pen Tool or Eraser Tool. 2. 3. 4. 5. Do the same with Peeta. Itsphotoshop.com. An anon asked me to make a tutorial for this graphic set.

This tutorial involves some basic Photoshop skills, like using adjustment layers, layer masks and cutting images out of their backgrounds, but I’ll try to explain the steps as best as I can. I’ll be making a tutorial for this graphic: To start, you want to choose a shot that has a decent amount of black/darker colours for the floral texture to show up on. I like using profile shots for this reason (where there is lots of hair visible), but this would also work if your subject had dark hair, was wearing darker clothing or the shot has lots of shadows as well. Itsphotoshop.com. Tutorial asked by controlyourface and anonsI use Photoshop CS5 & CS6Like/reblog the post if it was useful!
This tutorial includes millions of several examples after the cut. I’m explaining how to add text to gifs: not subtitles but other styles such as in the previews. Let’s go! First of all we make our gif, sharpen and add coloring. This kind of text goes well on 245px and 500px width gifs. There’s a lot of things we can play with when it comes to typography, as I explained in this tutorial: size, font style, font weight, font decoration, alignment, rotation, color, duplication, opacity, blending modes and layer styles. Style 1where text is big and accentuated This is personally the one I like the most. Pick the Type Tool and open a box as wide as the gif. . - Airplane / Archive / Bebas Neue / Bemio / Coolvetica / Cubano / Ranger. Itsphotoshop.com. Requested by Anonymous.I use Photoshop CS5.Please like the post if you think the tutorial has been useful.
In this tutorial, I’ll tell you what you should or shouldn’t do to make your photos look quality. Hope this helps :) When you’re going to change the size of a picture you have to go to Image > Image size or Image > Canvas size. Also, when you go to Image size, ps doesn’t let you change the height and the width at the same time, you have to change one of them, and the other one will change automatically. After you change one, you have to go to Image > Canvas size and change the other one, so the image will be cut and won’t get deformed.Also remember: never use the Free transform tool without clicking SHIFT while you apply it and always drag the points in the corners (not the ones in the sides of the box) or your images will look deformed, like this.
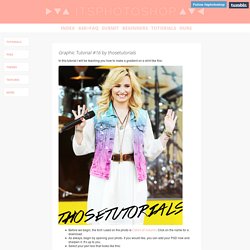
TEMPLATE 012 BY COLORING-PSD (NEW SIZE!). Our... Itsphotoshop.com. Zaynmalikds: a lot of people asked me how i made this, so this is a tutorial explaining how. it’s quite simple, but i’m pretty sure i’m quite bad at explaining things so if you don’t get it, ask me anything i’ll help clarify it for you. things that you’ll be needing: emojis - font - photoshop for the sake of this tutorial: [the colors] background: #e0e7f1. front text: #351b66. back text: #ffffff[the person] zayn malik let’s get to work, shall we? Step one: a) open a canvas, for this tutorial i’m using 500 x 200. b) colour the background.
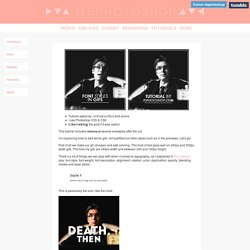
Step two: open the emojis relating to your person. so i’m going to be using the game control, the cigarette, the smirking smiley, the paint palette, and the pile of books. Photoshop resources. May i help you? May i help you? May i help you? May i help you? May i help you? May i help you? Down in the forest; Do what you can, when you can, while you can. Bow, wow, wow! Itsphotoshop.com. This tutorial is actually really easy. If you’re a beginner on photoshop, I’ll link you to other tutorials. Okay, let’s go! (English isn’t my first language so bare with me pleeease) Step 1: Download this picture and open it in photoshop. File > Open Step 2: Now choose the pictures you wanna use.
Step 3: Crop your picture using the Crop Tool. Set the width and the height to 100px like this. Photoshop Repeating Patterns Tutorial. In this tutorial, we'll learn the basics of making and using simple repeating patterns in Photoshop. We're just going to cover the essential steps here to get things started, but once you understand how repeating patterns work and how easy they are to create, you'll quickly discover on your own that there's virtually no limit to their creative potential in your designs, whether you're building a simple background for a scrapbook or web page or using them as part of a more complex effect. This tutorial will cover the three main parts to working with repeating patterns.
First, we'll design a single tile which will eventually become our repeating pattern. Next, we'll learn how to save the tile as an actual pattern in Photoshop. Finally, with our new pattern created, we'll learn how to select the pattern and make it repeat across an entire layer! I'll be using Photoshop CS5 here, but the steps apply to any recent version of Photoshop. Step 1: Create A New Document. Undisclosed desires. Itsphotoshop.com. May i help you? Louis tomlinson gallery. December 13th - Louis at Libertine Nightclub in London - OneDirectionPhotos.net. Watercolor edit tut. Simple photo edit tut. Makeup edit tut. Social media psds. Social media psds masterpost. Requested by Anonymous. I use Photoshop CS5. ... Requested by Anonymous. I use Photoshop CS5. ... A gif tutorial. Layer Mask tutorial by Shinybinary on DeviantArt. A Simple Layer Mask. Guide to textures. Where Photoshop & Lovers meet. Welovetemplates.
Font Source Gallery. Pastel colouring tut. Lyrics edit tut. Text effects tut. Layer masks tut. THIS GRACE BESTOWED UPON ME - Typography Tutorial. Where Photoshop & Lovers meet.