
How To Make Digital Photos Look Like Lomo Photography. A Post By: Darren Rowse The following tip on getting digital images to look like Lomo Images was submitted by DPS reader – Frank Lazaro.

You can see his photography at his Flickr page and see some of his Lomo shots here NB: most of the shots in this post can be enlarged by clicking them. update: once you’ve read this tutorial and had an experiment with the technique head to our Forum to share some of your results. From the first time I saw a photo that looked like this, I wanted to shoot one of my own. But, for the longest time I couldn’t figure it out how people took photos look like this.
Then one day searching the web, I realized I needed a Lomo LC-A camera. Low and behold I went out and bought 2 of these babies. I searched and searched and after trying several different Photoshop methods, I finally came up with my own using a mix of different techniques. Get Free Weekly Digital Camera Tips via Email. Giving your Photograph an Antique Look. This simple tutorial is an alternative method (from many others available on the Internet) for making a photograph look aged.

Suitable for Photoshop beginners. Let us start off with a normal full-color photograph. I am using the "Young Teenage Girl" from ShutterStock. Select the photo layer, go to Filter > Noise > Dust and Scratches. Set the Radius to 2 and Threshold 0. Duplicate the photo layer. Make a Layer Mask on the duplicated layer. Download "Vintage Background" from ShutterStock. Set the Blend Mode of vintage background to Soft Light.
Download "Grunge Background" from ShutterStock. Set the Blend Mode of grunge background to Multiply. Add Dramatic Color to Photographs: Photoshop Tutorial! Add A Realistic Rainbow To A Photo In Photoshop. Written by Steve Patterson.

In this Photoshop Effects tutorial, we’ll learn how to easily add a rainbow, and even a double rainbow, to a photo! As we’ll see, Photoshop ships with a ready-made rainbow gradient for us to use. We’ll learn where to find it and how to load it in. We’ll also learn how to flip the order of the colors in a gradient, which we’ll need to do to create a more realistic double rainbow effect. Of course, as with most photo effects, it helps if you start with the right type of image. Here’s the photo I’ll be starting with: The original image. Here’s what the image will look like after adding a double rainbow: The final rainbow effect. Let’s get started! Step 1: Add A New Blank Layer With the image newly opened in Photoshop, if we look in the Layers panel, we see that we currently have one layer, the Background layer, which contains our image:
Photoshop Tutorials - Age Progression. Disclaimer: None of the given Photoshop Tutorials are written by me.
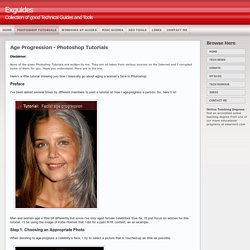
They are all taken from various sources on the Internet and I compiled some of them for you. Hope you understand. More are in the line. Here’s a little tutorial showing you how I basically go about aging a woman’s face in Photoshop. Preface I've been asked several times by different members to post a tutorial on how I age-progress a person. Men and women age a little bit differently but since I've only aged female celebrities thus far, I'll just focus on women for this tutorial. Step 1: Choosing an Appropriate Photo When deciding to age-progress a celebrity’s face, I try to select a picture that is touched-up as little as possible. I find that candid shots, or any shots that have not been taken in a studio, work best because the resulting harsh lighting reveals more of the skin’s details i.e. slight bags under the eyes and faint wrinkles.
Step 2: Collecting Reference Material Reference material is key in my method of aging. Creating Energy Spheres in Photoshop. For this tutorial you’ll want to find a photo of someone doing something that looks a bit larger than life.

I used this photo that I found at the stock photo website Stock Exchange. For this tutorial you’ll need a photo that you want to manipulate and some special brush sets which I downloaded from here. This will be the final result. Download the brush set and install it.